This article shows a lightweight account system for iOS apps that stay inside Apple's platform stack.
Instead of wiring up a third-party backend just to keep basic user profile data, the article pairs
Sign in with Apple with a private CloudKit record. The result is a simple flow:
register with Apple, store the first-time profile details in iCloud, and later recover that same data with the stable Apple user ID.
The article emphasizes two outcomes. First, users can sign back into the app on any device that is using the same Apple ID. Second, the app can retrieve previously saved values such as name, email, and any custom fields you choose to add later.
ASAuthorizationAppleIDCredential gives you the user's name and email only on the first authorization. On later sign-ins,
you should expect to receive the stable user identifier and look up the saved profile yourself.
The setup starts in Xcode: turn on iCloud with CloudKit, create or select a container, and enable Sign in with Apple.
The first half of the post is pure project configuration. Inside the target's Capabilities tab, enable iCloud,
make sure CloudKit is checked, then either reuse an existing container or create a new one for this app.
After that, turn on the Sign in with Apple capability too.

The post also walks through creating a new iCloud container when needed. The durable point is simpler: whatever container ID you choose here must match the one you use later in code when opening the private database.
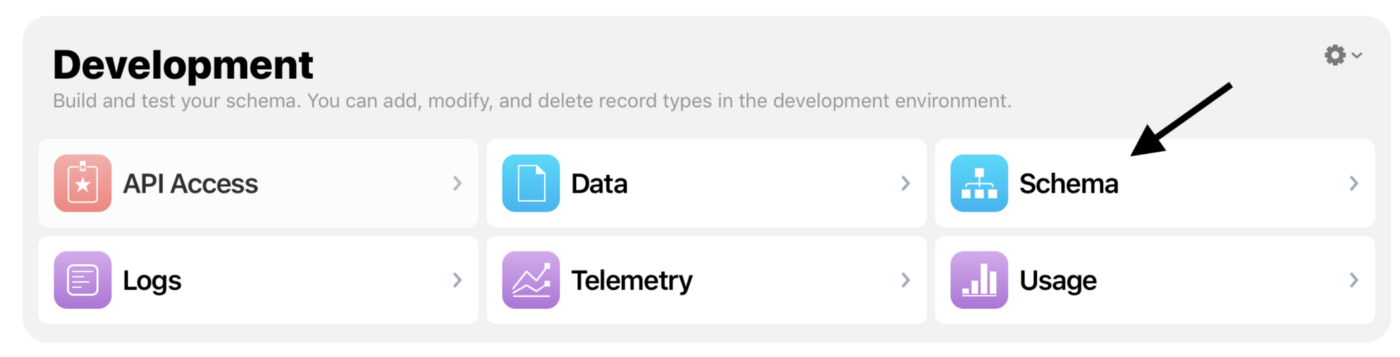
Before the code can save anything, the CloudKit dashboard needs a record type that matches the user data you want to keep.
The article creates a user record in the CloudKit dashboard and adds string fields for emailAddress and name.
That is enough for the first pass, and later sections extend the record with extra fields such as a list of liked animals.
userInfo and UserInfo in different places. In your project, keep the CloudKit record type name consistent between the dashboard and the code.
The UI layer is a normal UIKit setup: host an ASAuthorizationAppleIDButton, request the name and email scopes, and listen through the authorization controller delegate.
The article builds the button inside a placeholder view, then launches the authorization flow from a touch handler:
import AuthenticationServices
import CloudKit

@IBOutlet weak var signInBtnView: UIView!
var authorizationButton: ASAuthorizationAppleIDButton!

override func viewDidLoad() {
    super.viewDidLoad()
    authorizationButton = ASAuthorizationAppleIDButton(type: .default, style: .whiteOutline)
    authorizationButton.frame = CGRect(origin: .zero, size: signInBtnView.frame.size)
    authorizationButton.addTarget(self, action: #selector(handleAppleIdRequest), for: .touchUpInside)
    signInBtnView.addSubview(authorizationButton)
}

@objc func handleAppleIdRequest() {
    let appleIDProvider = ASAuthorizationAppleIDProvider()
    let request = appleIDProvider.createRequest()
    request.requestedScopes = [.fullName, .email]
    let authorizationController = ASAuthorizationController(authorizationRequests: [request])
    authorizationController.delegate = self
    authorizationController.performRequests()
}
That is enough to start the system sheet. The rest of the work happens inside the delegate methods, where the app decides whether it is seeing a new registration or a repeat login.
The key branch in the article is simple: if Apple returns a name and email, treat this as first-time registration; otherwise, fetch the existing user record.
This article makes the important behavioral point explicit: the Apple credential's user ID is stable,
but the user's fullName and email are only provided on the initial authorization. That means the ID becomes your lookup key.
func authorizationController(controller: ASAuthorizationController,
                             didCompleteWithAuthorization authorization: ASAuthorization) {
    if let appleIDCredential = authorization.credential as? ASAuthorizationAppleIDCredential {
        let userID = appleIDCredential.user

        if let name = appleIDCredential.fullName?.givenName,
           let emailAddr = appleIDCredential.email {
            // new user: save to CloudKit
        } else {
            // returning user: fetch from CloudKit
        }
    }
}
That split is the heart of the design. Once you accept that Sign in with Apple will not hand back the user's profile details forever, the CloudKit record becomes the persistent source of truth for later sessions.
The article stores profiles in the user's private CloudKit database and uses the Apple user ID as the CloudKit record ID.
The record-ID choice is what makes later lookups easy. When the first sign-in returns a new name and email,
the app creates a record whose recordName is the Apple userID. On future logins,
that same ID can be used to fetch the saved record directly.
let privateDatabase =
    CKContainer(identifier: "iCloud.com.[your-container-name]").privateCloudDatabase

let record = CKRecord(
    recordType: "UserInfo",
    recordID: CKRecord.ID(recordName: userID)
)
record["name"] = name
record["emailAddress"] = emailAddr

privateDatabase.save(record) { _, _ in
    UserDefaults.standard.set(record.recordID.recordName, forKey: "userProfileID")
}
Returning users then take the fetch path:
privateDatabase.fetch(withRecordID: CKRecord.ID(recordName: userID)) { record, error in
    if let fetchedInfo = record {
        let name = fetchedInfo["name"] as? String
        let userEmailAddr = fetchedInfo["emailAddress"] as? String
        UserDefaults.standard.set(userID, forKey: "userProfileID")
    }
}
The article uses the private database specifically so that each user only sees their own data. For this profile-storage use case, that is the right default.
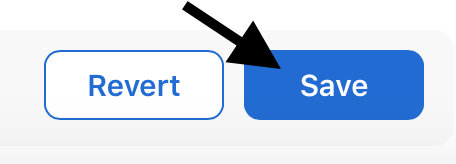
Once the basic profile record exists, the same record can hold more application-specific fields, but the schema still needs to be deployed to production.
The post extends the example with a likedAnimals field, showing both how to read an array field from the stored record
and how to fetch the record, modify the value, and save it back.
func getUserLikedAnimals() {
    let privateDatabase =
        CKContainer(identifier: "iCloud.com.[your-container-name]").privateCloudDatabase
    if let userCloudID = UserDefaults.standard.string(forKey: "userProfileID") {
        let recordID = CKRecord.ID(recordName: userCloudID)
        privateDatabase.fetch(withRecordID: recordID) { fetchedRecord, error in
            let likedAnimals = fetchedRecord?.value(forKey: "likedAnimals") as? [String]
        }
    }
}
The last operational step is easy to forget: changes made in the development environment need to be deployed in CloudKit before the production app can rely on them.

The article's main value is that it turns Sign in with Apple from a login button into a full native profile flow.
The pattern is straightforward: request Apple identity, use the stable Apple user ID as the CloudKit record ID, save the first-time profile details to the private database, and treat CloudKit as the place to refill those details on later logins. For an app that lives entirely inside the Apple ecosystem, that is a clean and practical baseline.
This article also links to a full sample implementation on GitHub: CloudKitAppleSignInExample/loginViewController.swift.