MusicKit removed a lot of the low-level Apple Music API friction and replaced it with async Swift types that are much easier to integrate into an app.
Before this framework, searching Apple Music and turning the results into something playable meant working much closer to the raw web API. This article shows how the newer iOS MusicKit APIs make common app flows simpler: catalog search, album lookups, artwork access, and playback.
Apple positions these APIs for scenarios like background music, discovery, workout apps, and social experiences. The article also notes the obvious caveat: playback rights and licensing still matter even if the framework itself is easier to use.
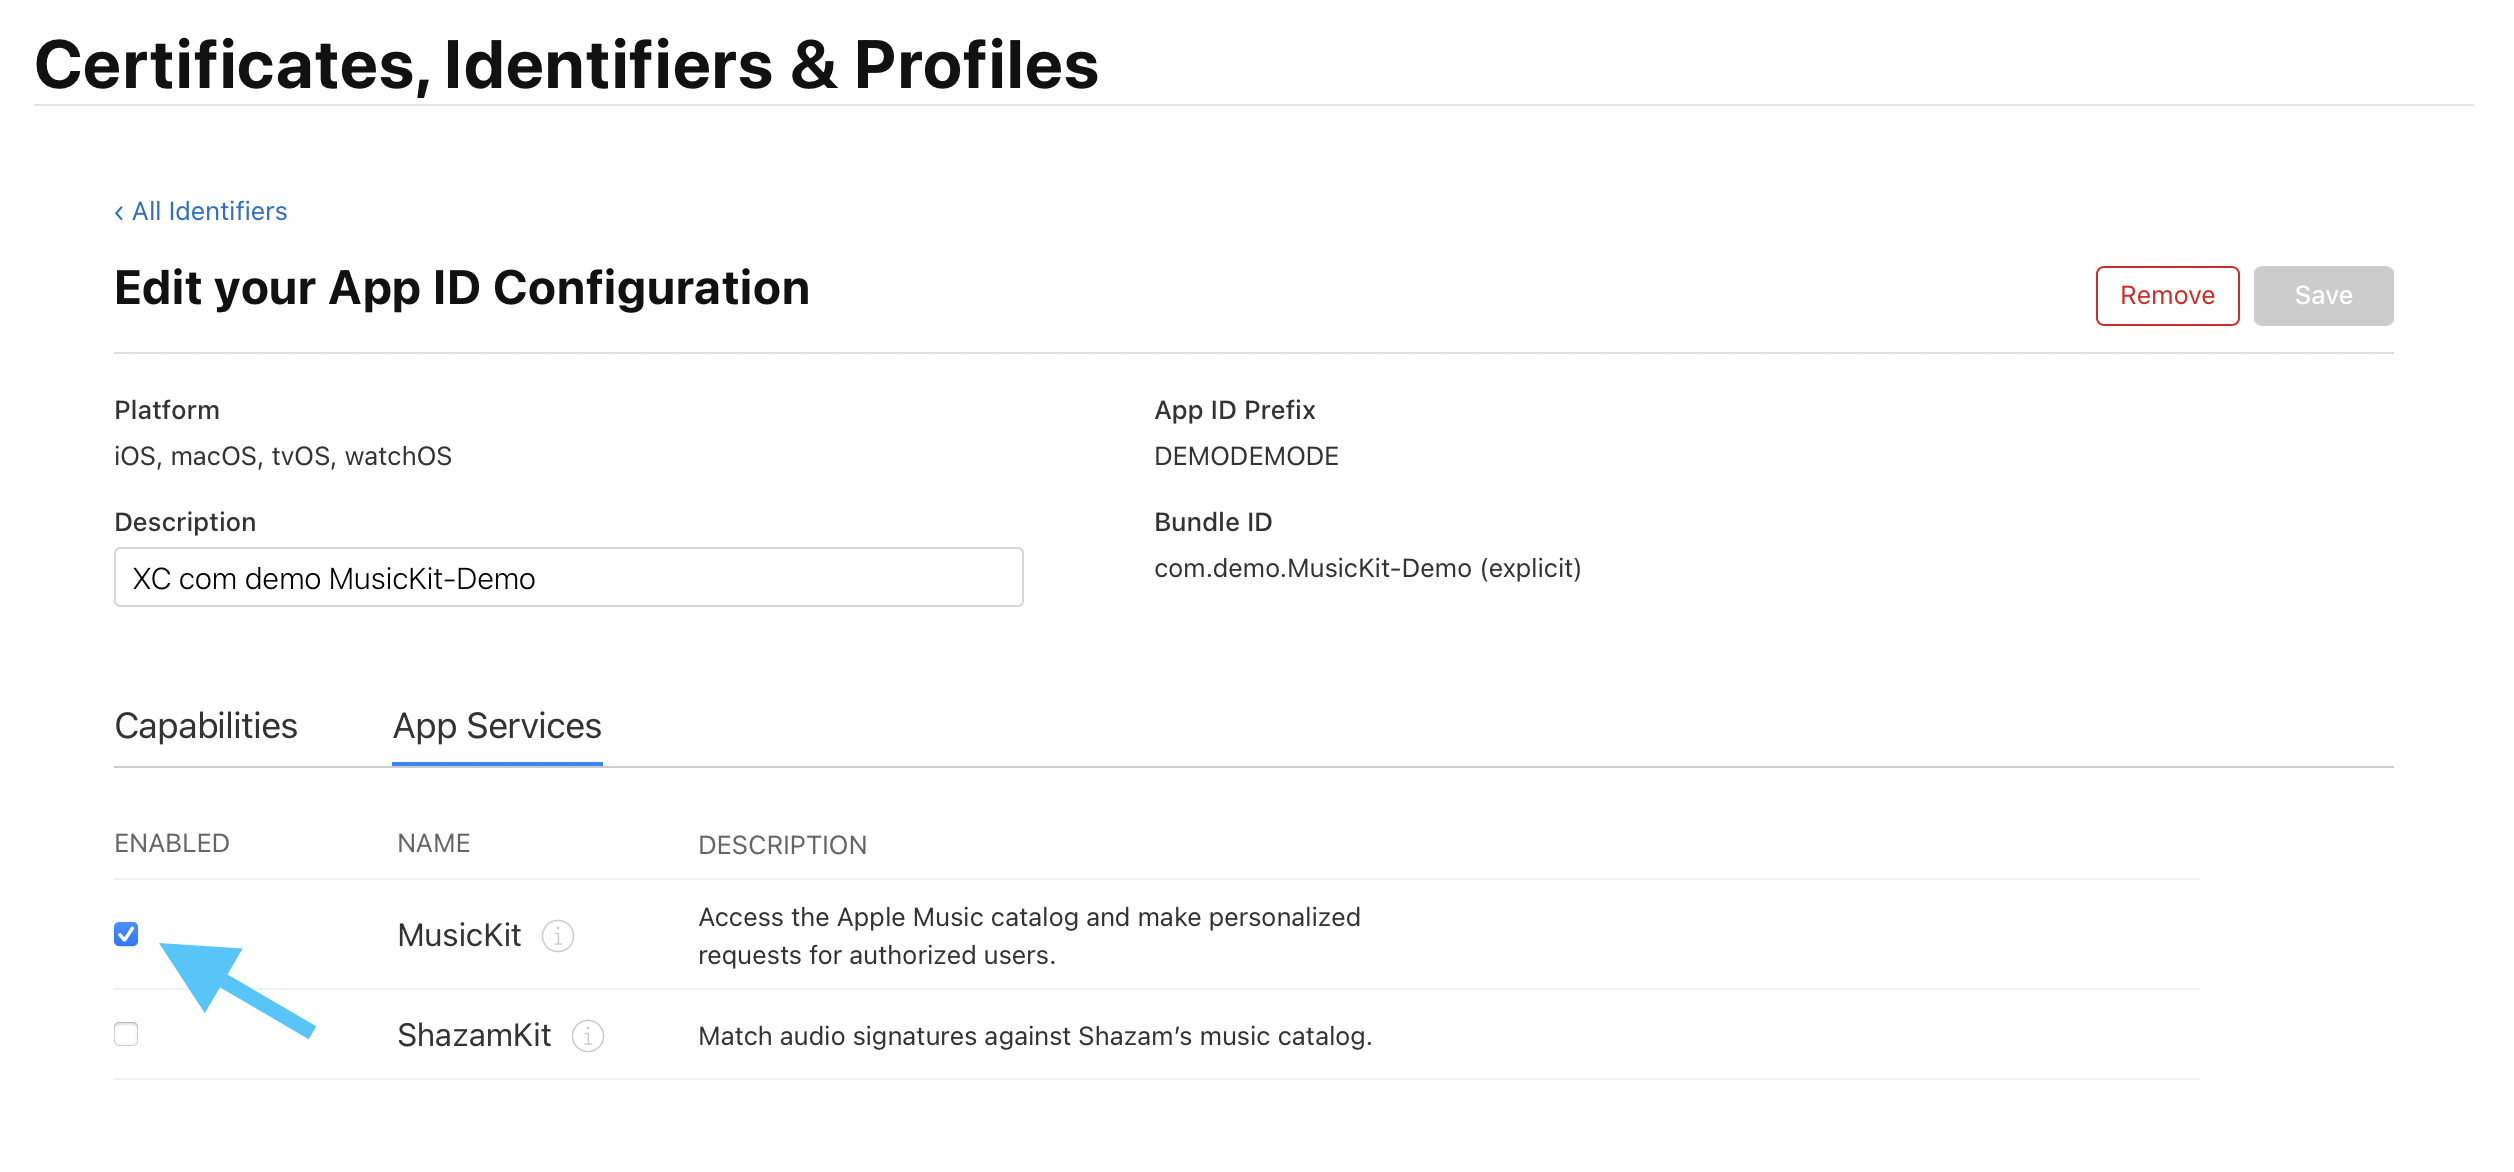
The first requirement is not code. Your app identifier needs the MusicKit service enabled in Apple's developer portal.
The original walkthrough starts in the Apple Developer identifiers list. Open the target app,
switch to the App Services tab, and turn on MusicKit.
One useful detail from the post: if the app does not appear in the portal yet, adding any capability
in Xcode's Signing & Capabilities screen is often enough to make Xcode generate the
signing profile for you. You do not need to hand-roll a separate Apple Music token for this flow.
Access to a user's music library and playback privileges is a combination of permission state and subscription state.
The article begins by adding NSAppleMusicUsageDescription to Info.plist,
then requesting authorization directly from SwiftUI:
Button("Request authorization") {
    Task {
        await MusicAuthorization.request()
    }
}
You can read the current permission state at any time through MusicAuthorization.currentStatus:
Button("Reload authorization status") {
    self.currentAuthStatus = MusicAuthorization.currentStatus
}
After that, the more interesting part is the subscription stream. This article stores a
MusicSubscription? in view state and listens for updates with an async loop:
@State private var musicSubscription: MusicSubscription?

.task {
    for await subscription in MusicSubscription.subscriptionUpdates {
        self.musicSubscription = subscription
    }
}
From there, the article highlights three practical checks. canBecomeSubscriber tells you
whether the person can still sign up, canPlayCatalogContent tells you whether Apple Music
catalog playback should work, and SwiftUI can present a subscription upsell through the
musicSubscriptionOffer(isPresented:) modifier when appropriate.
Catalog search is the part that becomes noticeably cleaner in MusicKit: build a typed request, await the response, then read strongly typed collections back out.
The core search object takes the search term plus the item types you want back:
let request = MusicCatalogSearchRequest(
    term: searchTerm,
    types: [Song.self]
)

let response = try await request.response()
self.searchResultSongs = response.songs
That typed response is the big ergonomic win. Instead of manually decoding generic payloads for a basic song search, the app can work directly with MusicKit song models and present them immediately in SwiftUI.
Once you know the item ID you want, MusicKit can fetch a specific album and then expand it with more relationships such as tracks and artists.
This article demonstrates a targeted resource request by album ID:
let request = MusicCatalogResourceRequest<Album>(
    matching: \.id,
    equalTo: "1594311281"
)

let response = try await request.response()
let items: MusicItemCollection<Album> = response.items
That initial album object may not contain every relationship you want to render. The post then loads more
data from the same object with with(...), using it to populate track lists and related metadata
only when the detail screen needs them.
let detailedAlbum = try await album.with([.artists, .tracks])
Artwork access is simple too. Music items expose an artwork value directly, and SwiftUI can
render it through ArtworkImage:
if let artwork = songItem.artwork {
    ArtworkImage(artwork, height: 100)
}The article shows two playback paths: the system player if you want music to keep going outside the app, and the application player if you want more in-app control.
For system-level playback, queue the target item and call play() on
SystemMusicPlayer.shared:
Button("Play using iOS system player") {
    Task {
        SystemMusicPlayer.shared.queue = .init(for: [album])
        do {
            try await SystemMusicPlayer.shared.play()
        } catch {
            print(error.localizedDescription)
        }
    }
}
The app-level player follows the same queue-and-play pattern, but keeps playback under your app's own UI:
Button("Play using in-app player") {
    Task {
        ApplicationMusicPlayer.shared.queue = .init(for: [album])
        do {
            try await ApplicationMusicPlayer.shared.play()
        } catch {
            print(error.localizedDescription)
        }
    }
}
The source notes that the queued object does not have to be an album specifically. Any suitable
MusicItem-conforming object can be used as the playback source.
MusicKit does not cover every Apple Music endpoint, so the fallback is MusicDataRequest for direct requests that you decode yourself.
The article uses recent playback history as the example. If the high-level framework does not expose the endpoint you need yet, you can still issue a signed request through MusicKit and then parse the response manually:
let url = URL(string: "https://api.music.apple.com/v1/me/recent/played")!
let request = MusicDataRequest(urlRequest: URLRequest(url: url))
let response = try await request.response()
That keeps you in one authentication model even when you need to drop below the typed Swift wrappers.
This walkthrough is a good snapshot of what made the newer MusicKit APIs appealing: less web-API ceremony, more native models, and async code that reads like normal Swift.
The article is most useful as a practical sequence: turn on the entitlement, request permission, inspect subscription state, search the catalog, fetch richer objects, then choose the player model that fits your app.
If you need Apple Music inside an iOS app without spending most of the time on raw request plumbing, this remains a solid introduction to the framework's core path.