This experiment is not about making ChatGPT. It is about understanding what a tiny, domain-limited text model looks like when you train it yourself.
This article makes two constraints explicit. First, this is not fine-tuning an existing large model. The goal is to train a conversational text model from scratch on your own input text. Second, you should not expect anything close to ChatGPT, especially when the corpus is only 88 self-authored posts and the training run is roughly an hour on a Mac mini.
That framing is important because it keeps the article practical. It is really a walkthrough of the pipeline: pick a base project, prepare a corpus, replace the tokenizer so Japanese text is handled more sensibly, save binary token files, run training, then patch the sampling script so you can keep asking questions interactively.
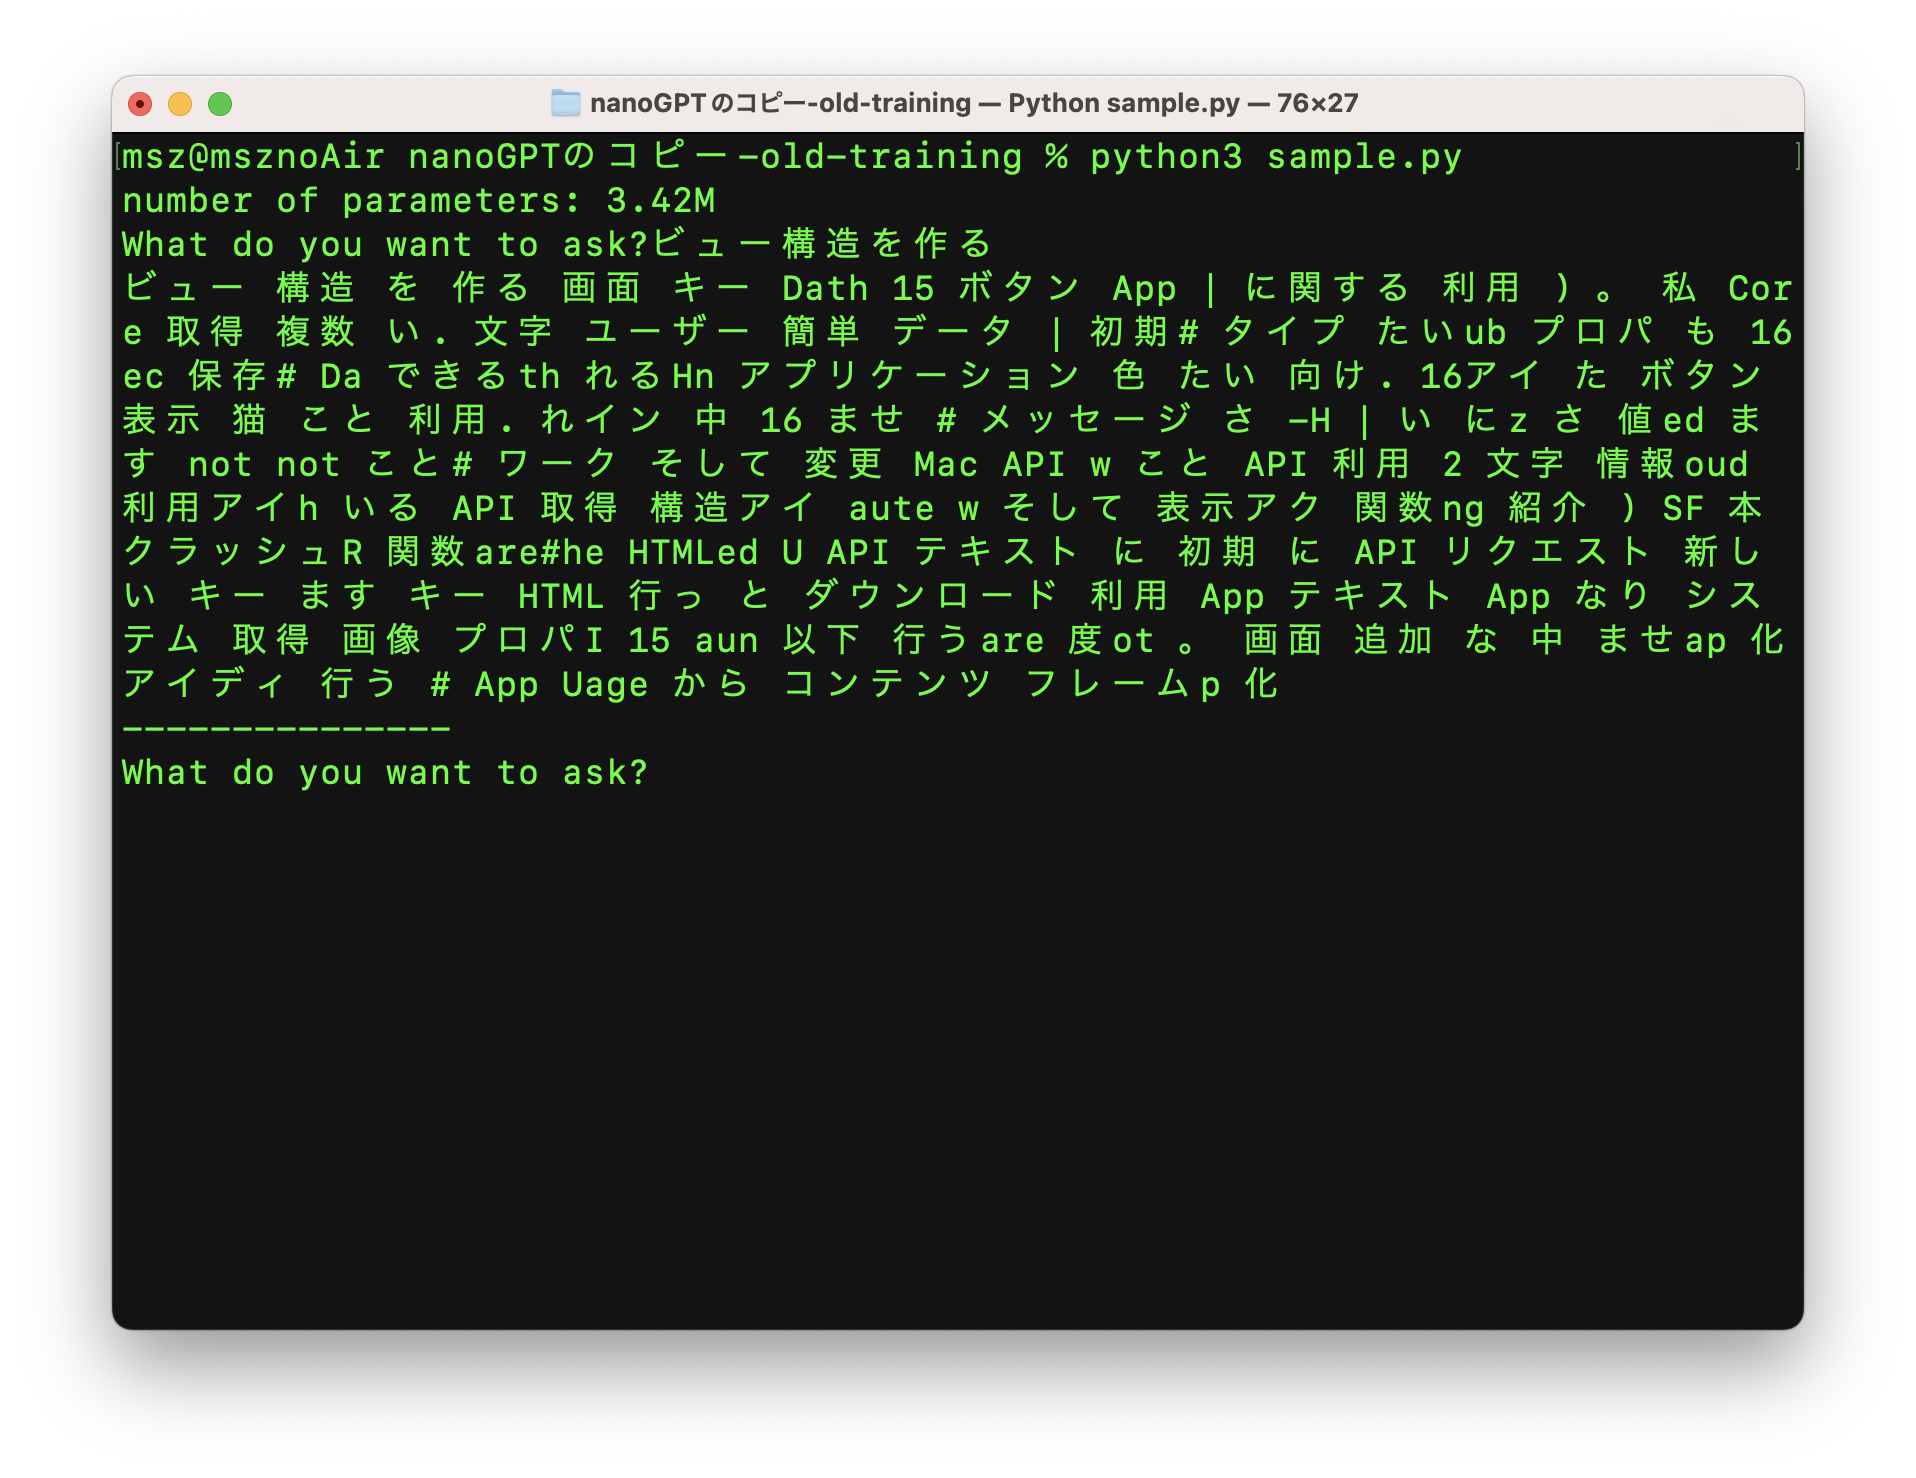
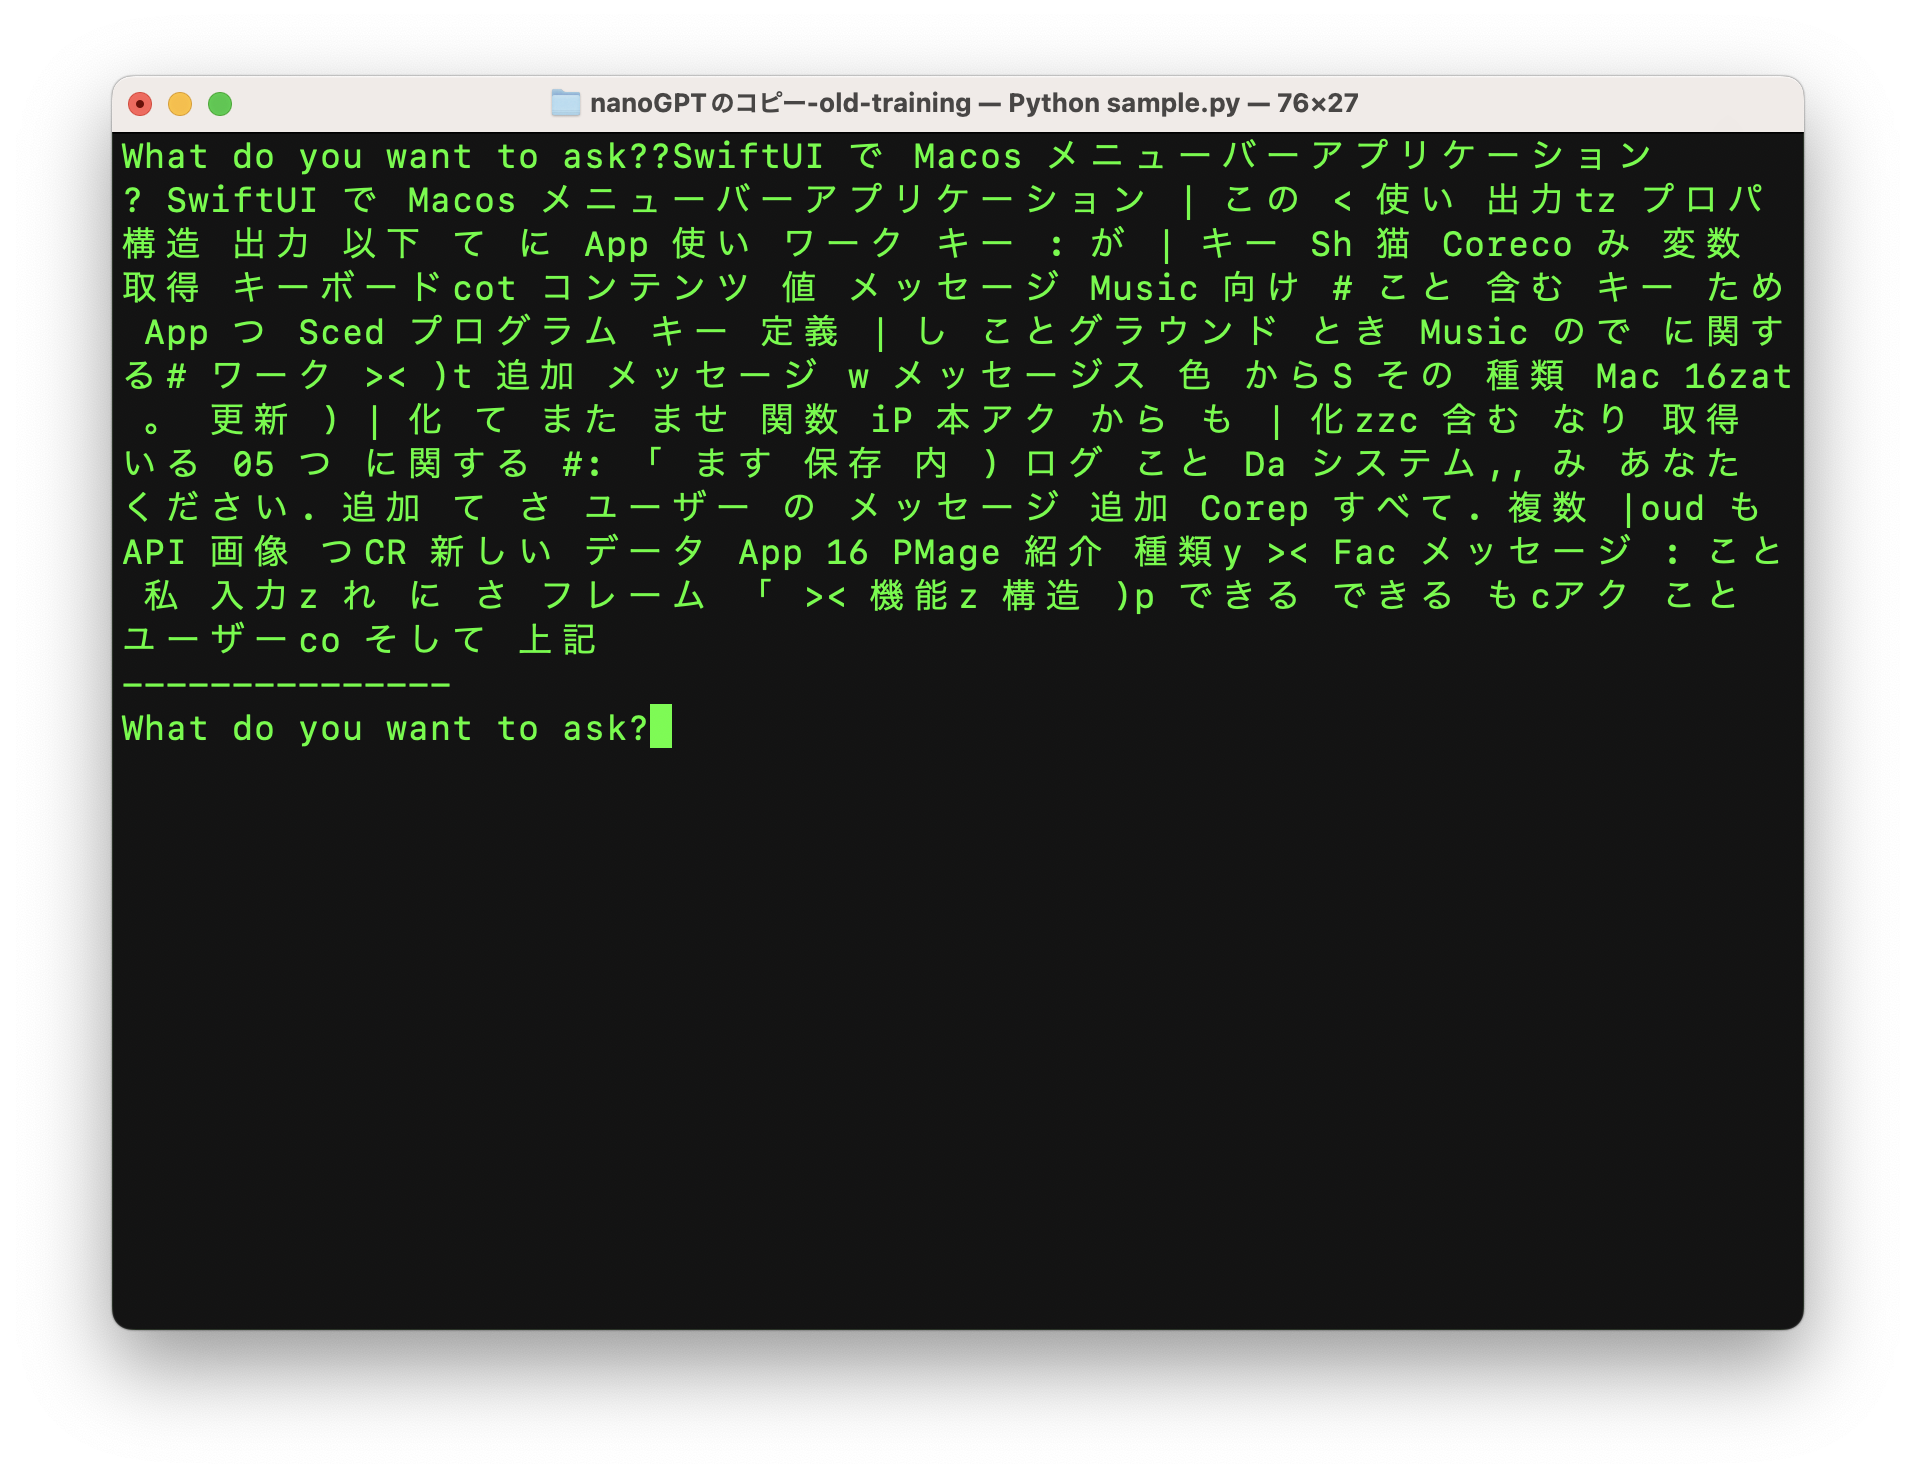
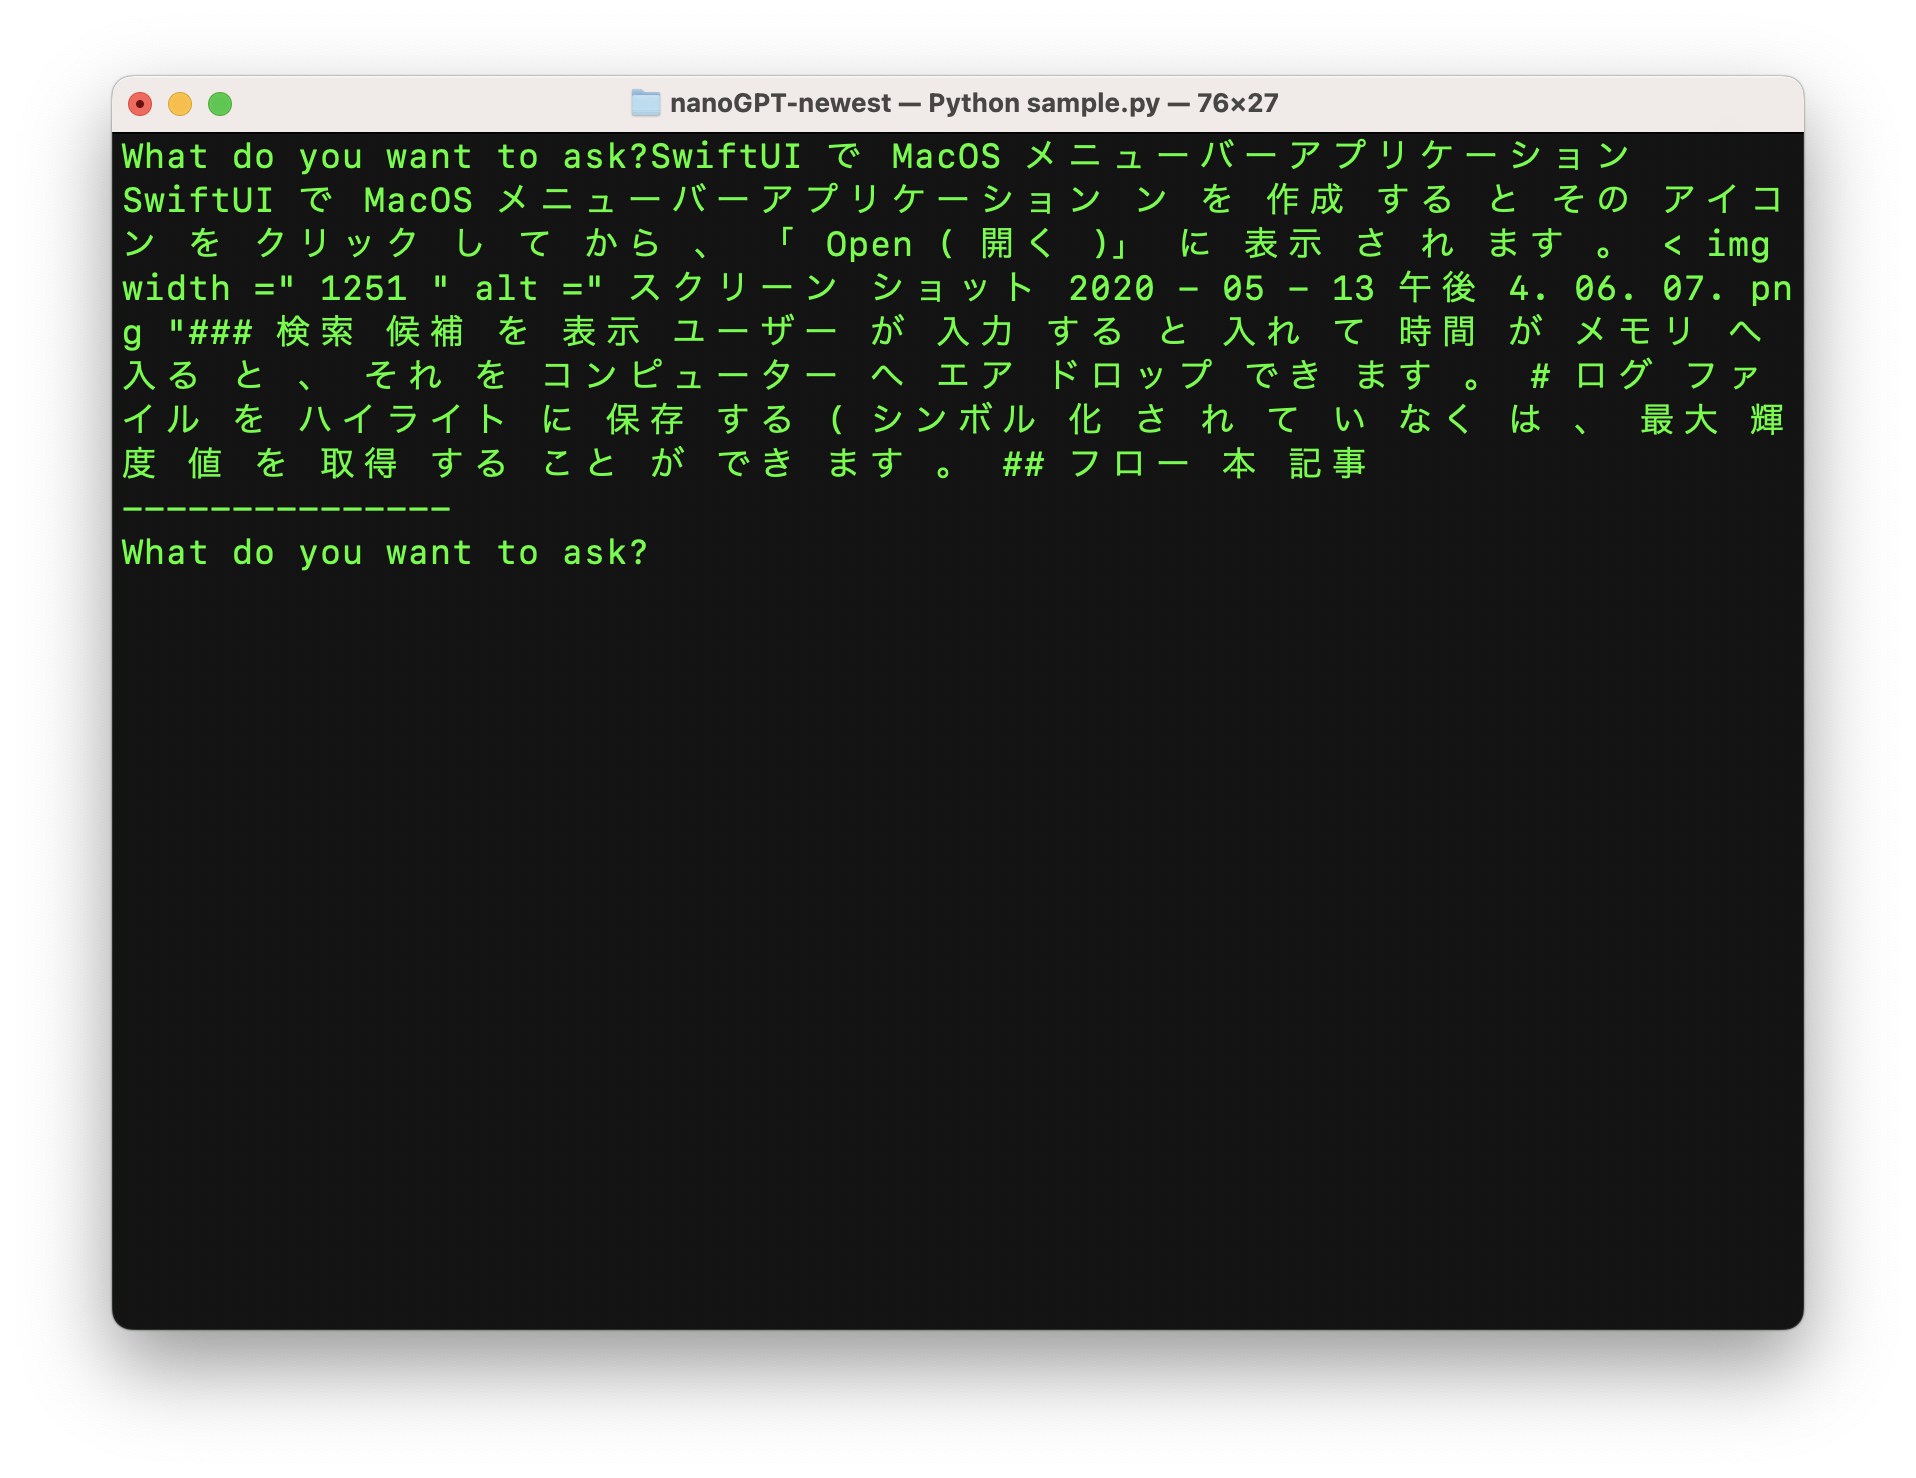
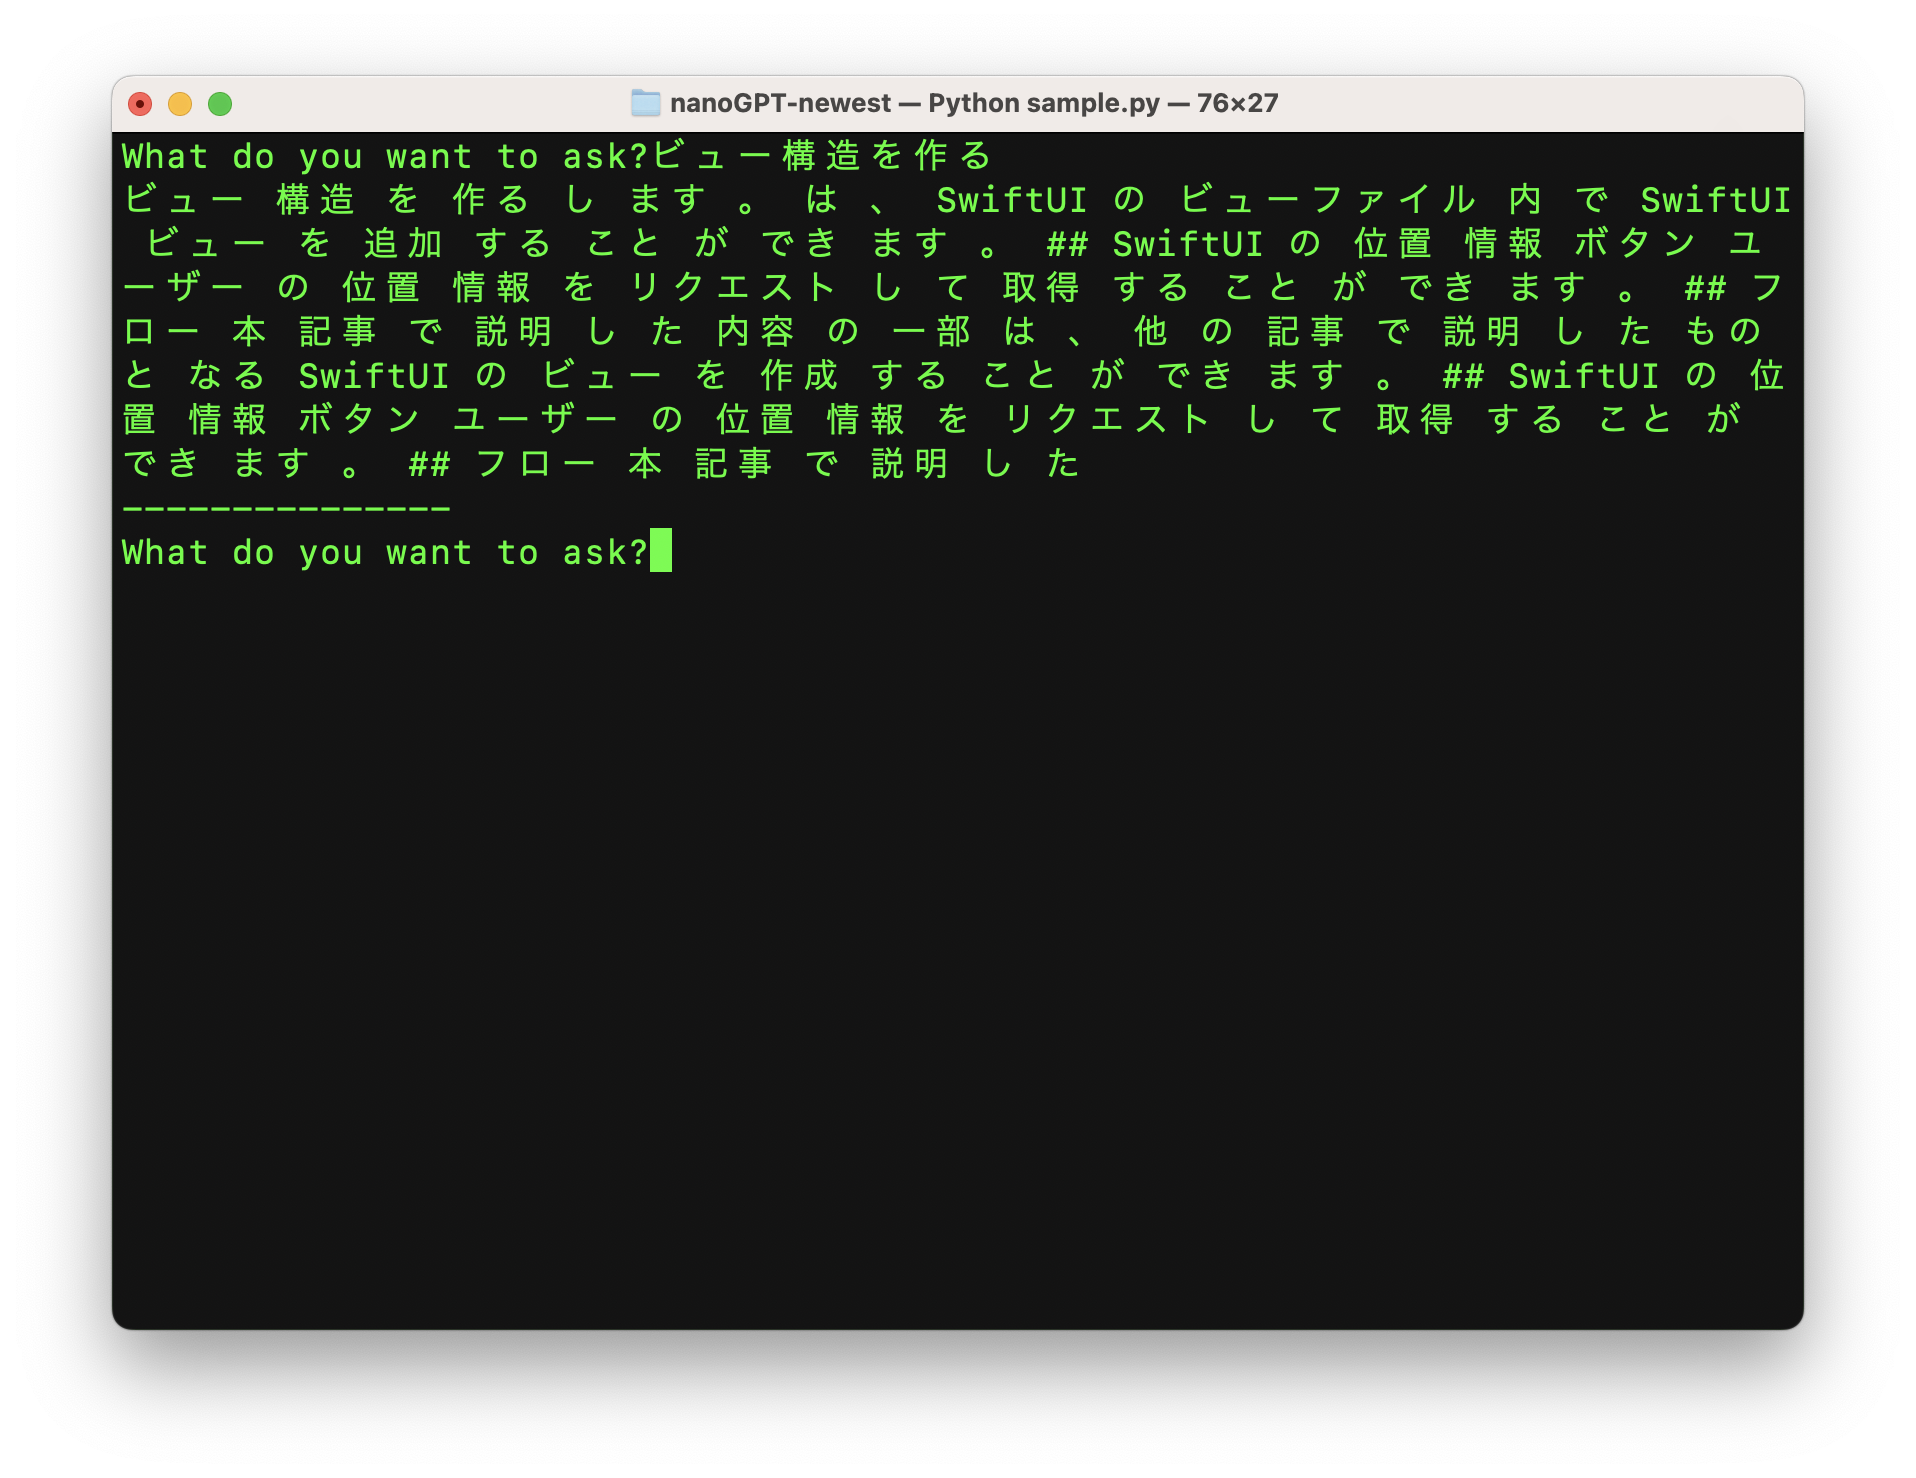
The most useful part of the article is seeing how the outputs change as training progresses.
With only 200 iterations, the model is still mostly producing broken text. By 2,000 iterations it starts to look more coherent, and by around 8,000 to 10,000 iterations it can answer in a way that at least resembles the tone and vocabulary of this articles. The model only "knows" words and patterns taken from those 88 articles, which is why the output improves but remains narrow.
The training base is nanoGPT, plus a small stack of Japanese text-processing packages.
The article starts from Andrej Karpathy's nanoGPT repository. The stock project includes example data like Shakespeare,
but the point here is to swap in a Japanese corpus and a Japanese tokenizer, then keep the rest of the training flow lightweight.
git clone https://github.com/karpathy/nanoGPT

python3 -m ensurepip

pip3 install transformers datasets tiktoken tqdm wandb numpy fugashi ipadic

pip3 install \
  --pre torch torchvision torchaudio \
  --extra-index-url https://download.pytorch.org/whl/nightly/cpu

brew install mecab mecab-ipadic
The original commands were shown on macOS, but the general idea transfers: get PyTorch working, install tokenizer dependencies, and make sure Japanese text segmentation is available before preprocessing the dataset.
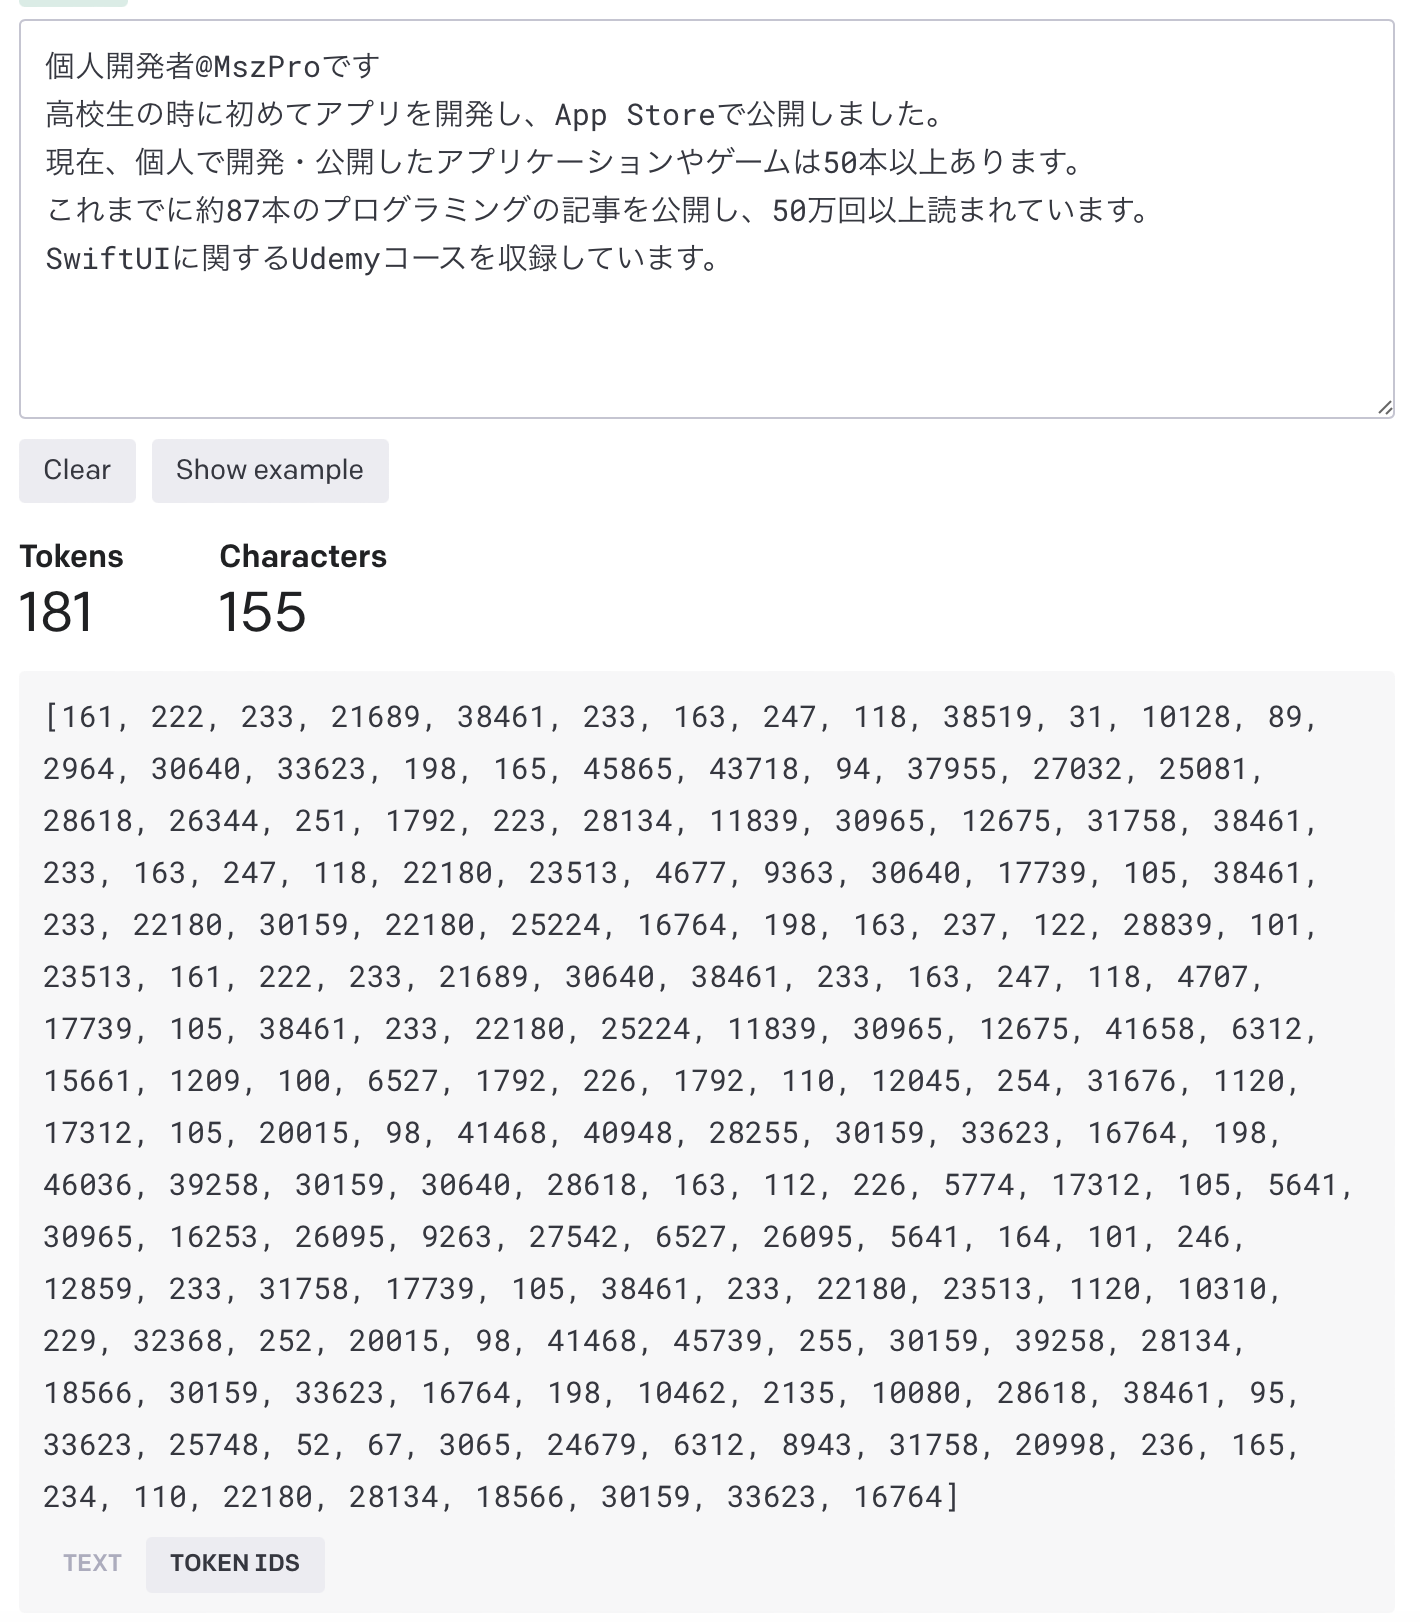
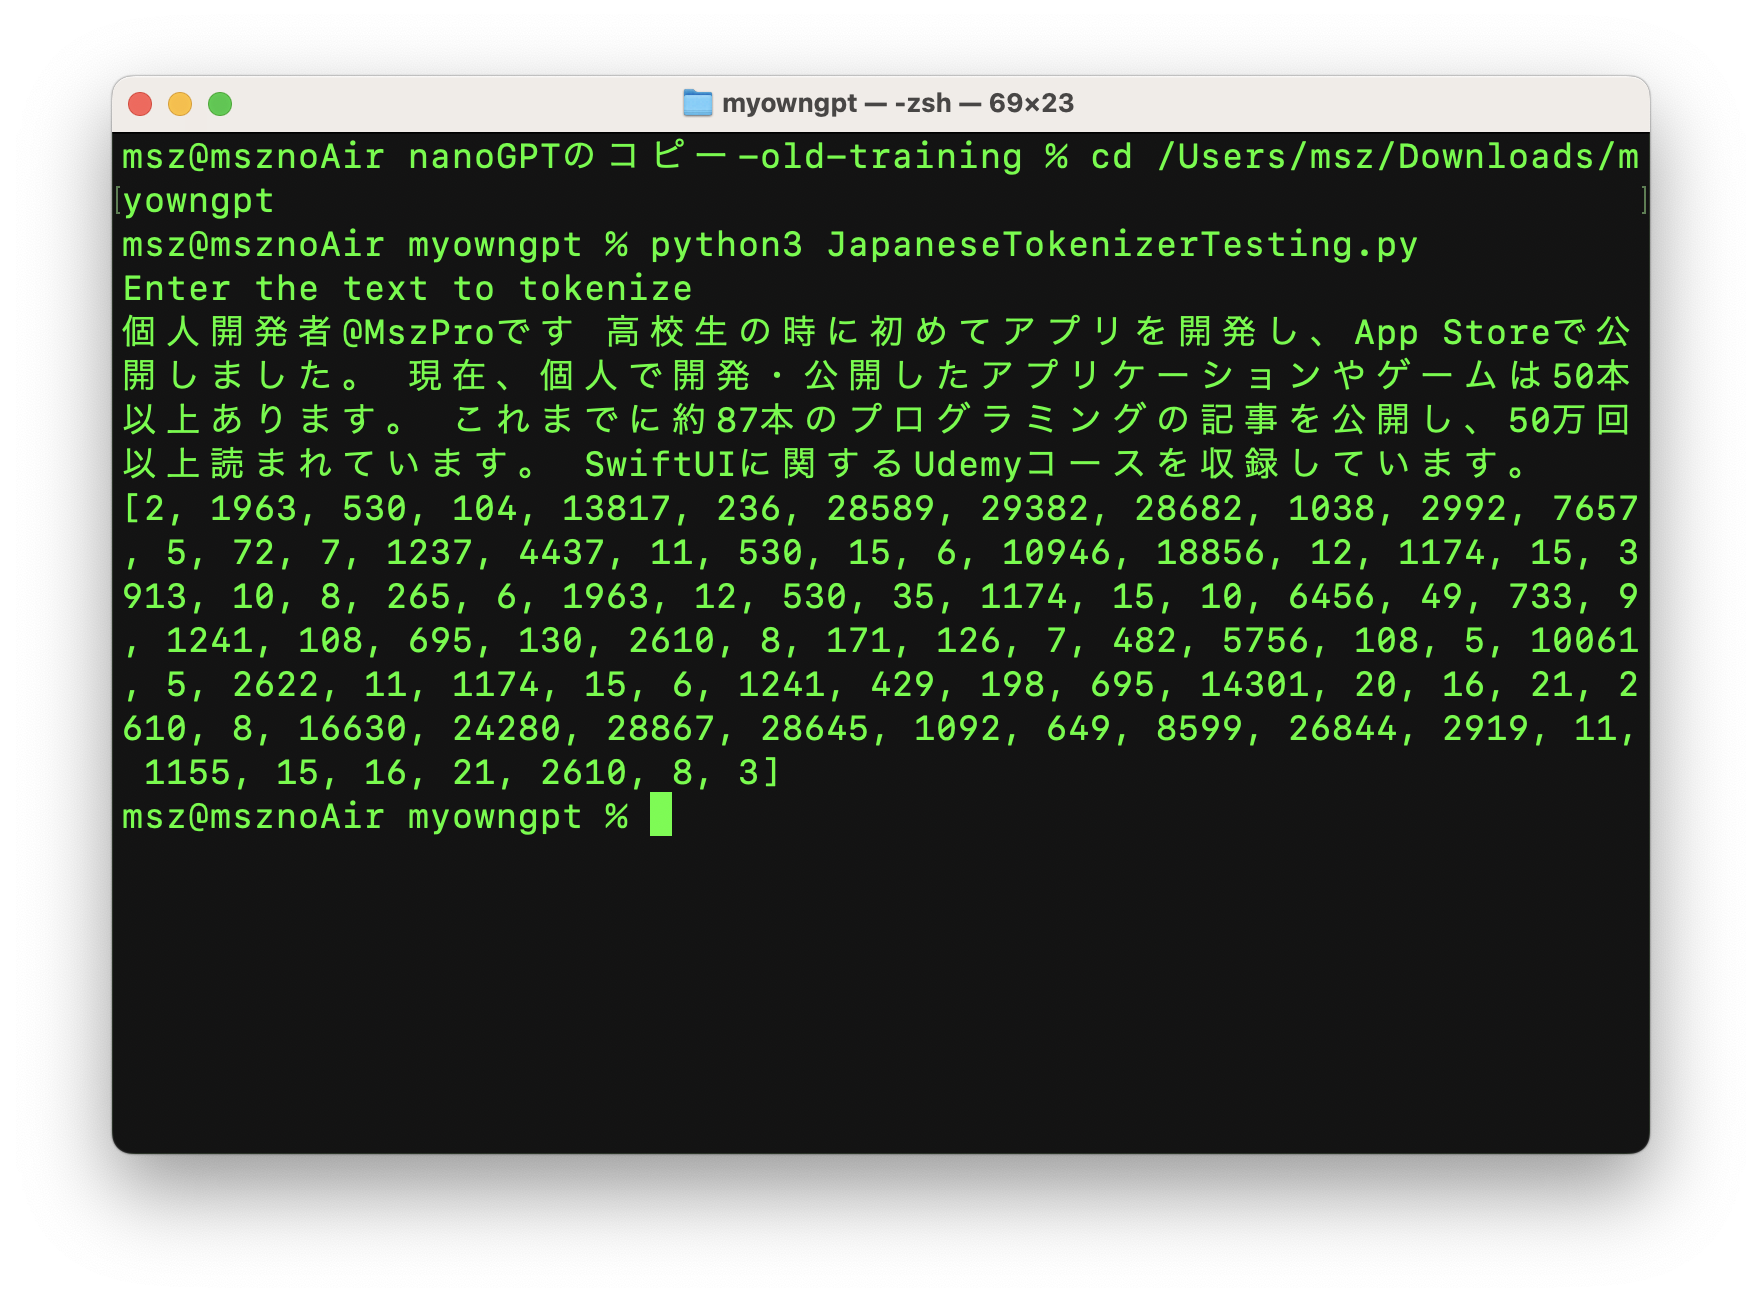
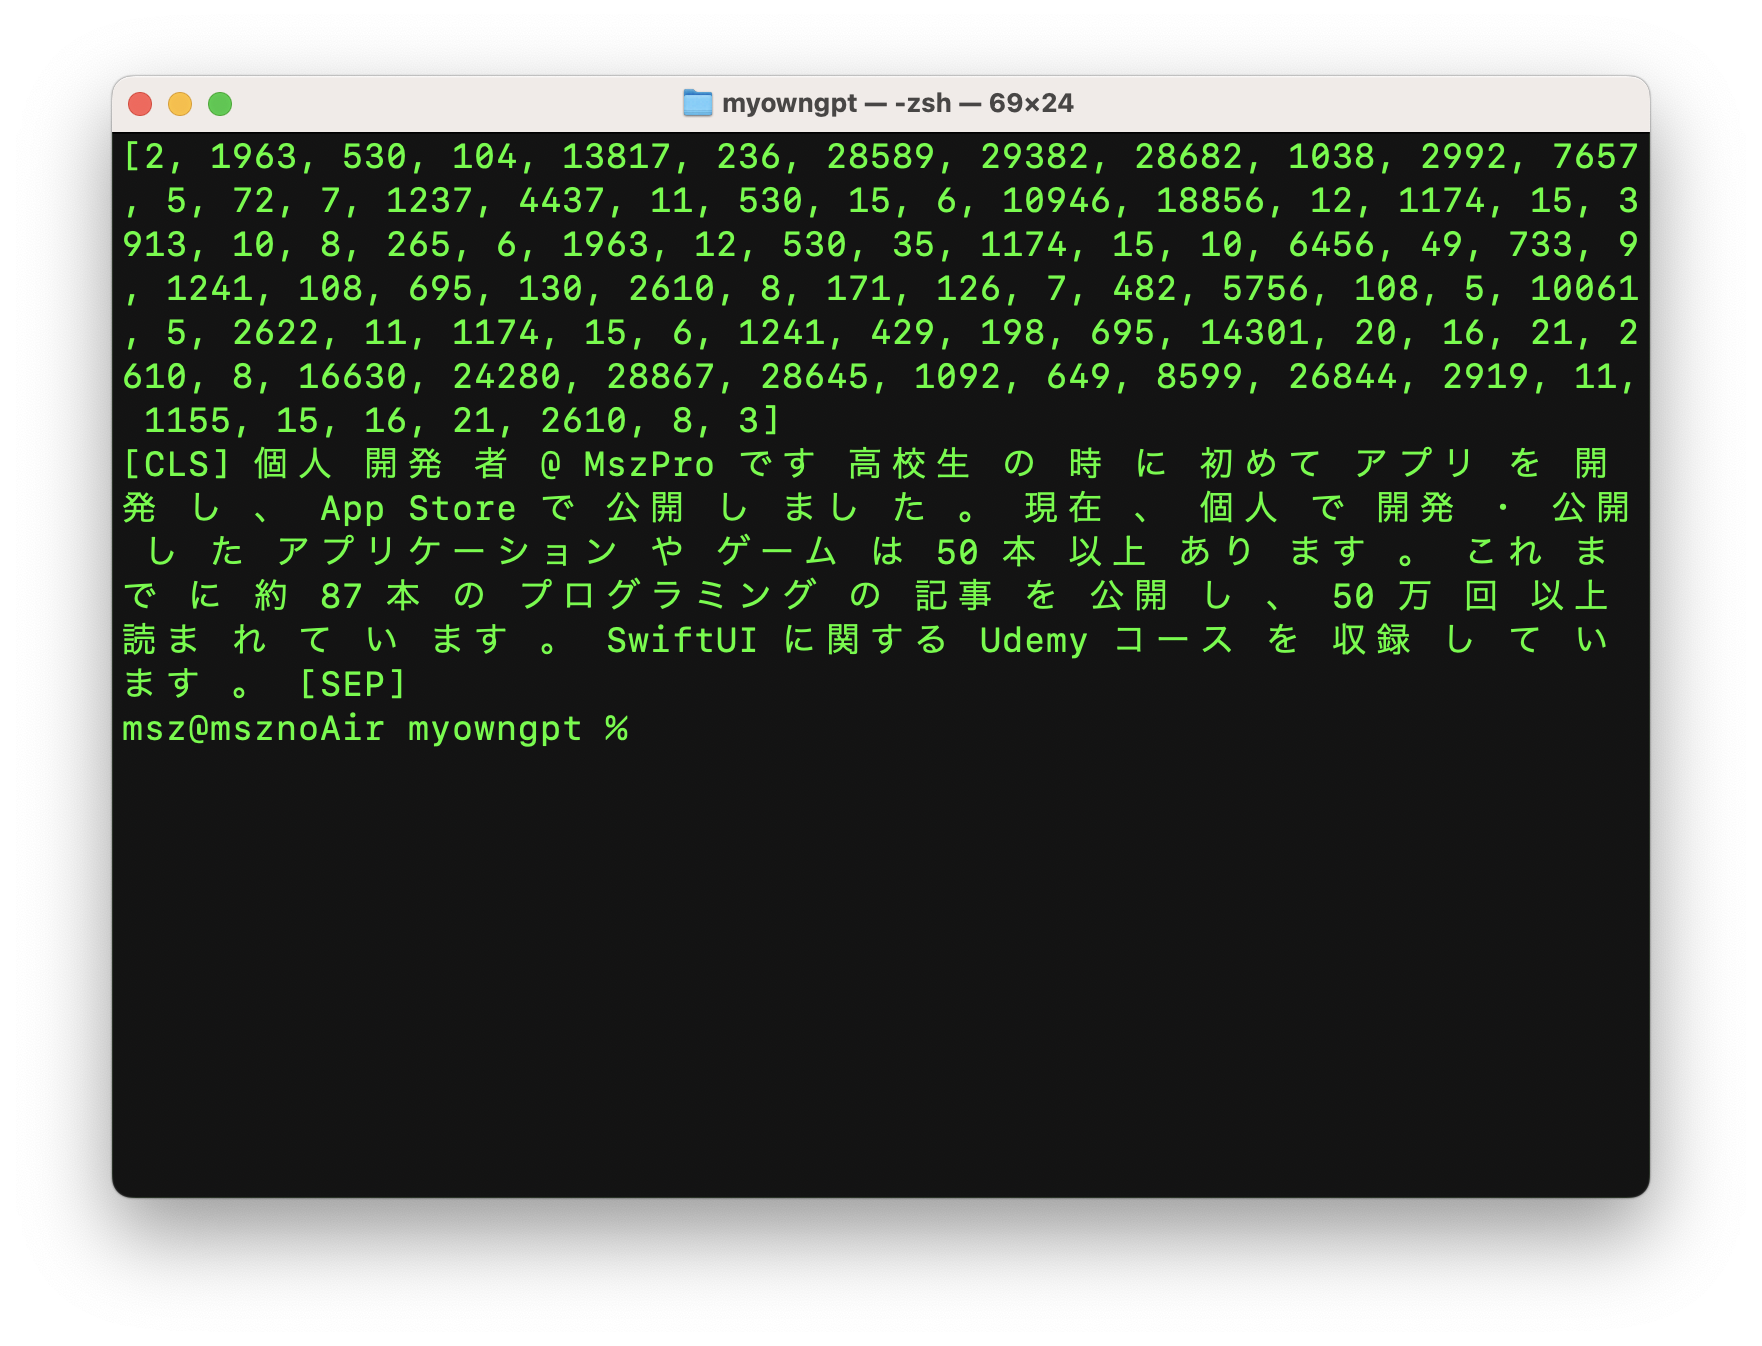
The tokenizer is the first major change, because the default GPT-2 tokenizer is not a good fit for Japanese text.
A tokenizer converts raw text into token IDs during training and converts generated token IDs back into human-readable text during sampling.
For Japanese, the article switches to BertJapaneseTokenizer from cl-tohoku/bert-base-japanese-whole-word-masking.
The article also demonstrates a simple sanity check: tokenize text from the article corpus, inspect the IDs, then decode those IDs back to text. That confirms the tokenizer is segmenting Japanese into meaningful units instead of forcing the default English-oriented assumptions.
The corpus is assembled by walking a folder of Markdown files, reading each article, and concatenating non-trivial lines into one long text source.
The article uses a folder of 88 personal Qiita posts stored as Markdown. The preprocessing code ignores .DS_Store,
reads each file as UTF-8, and appends lines longer than five characters into a single text string. That string becomes the raw training corpus.
def read_markdown_file(file_path):
    if file_path.endswith(".DS_Store"):
        return ""
    with open(file_path, mode="r", encoding="utf-8") as md_file:
        print("Reading", file_path)
        content = md_file.read()
    return content

datasetFolderPath = "/Users/office/Desktop/MyOwnGPT/dataset/"
dataSetFileNames = os.listdir(datasetFolderPath)

entries = ""
for filename in dataSetFileNames:
    file_path = datasetFolderPath + filename
    print("Processing ", file_path)
    markdown_content = read_markdown_file(file_path)
    for line in markdown_content.split("\n"):
        if len(line) > 5:
            entries += line + "\n\n"

n = len(entries)
print("Total input entry length", n)
After that, the article splits the text into a 90 percent training slice and a 10 percent evaluation slice.
trainEntries = entries[:int(n * 0.9)]
evalEntries = entries[int(n * 0.9):]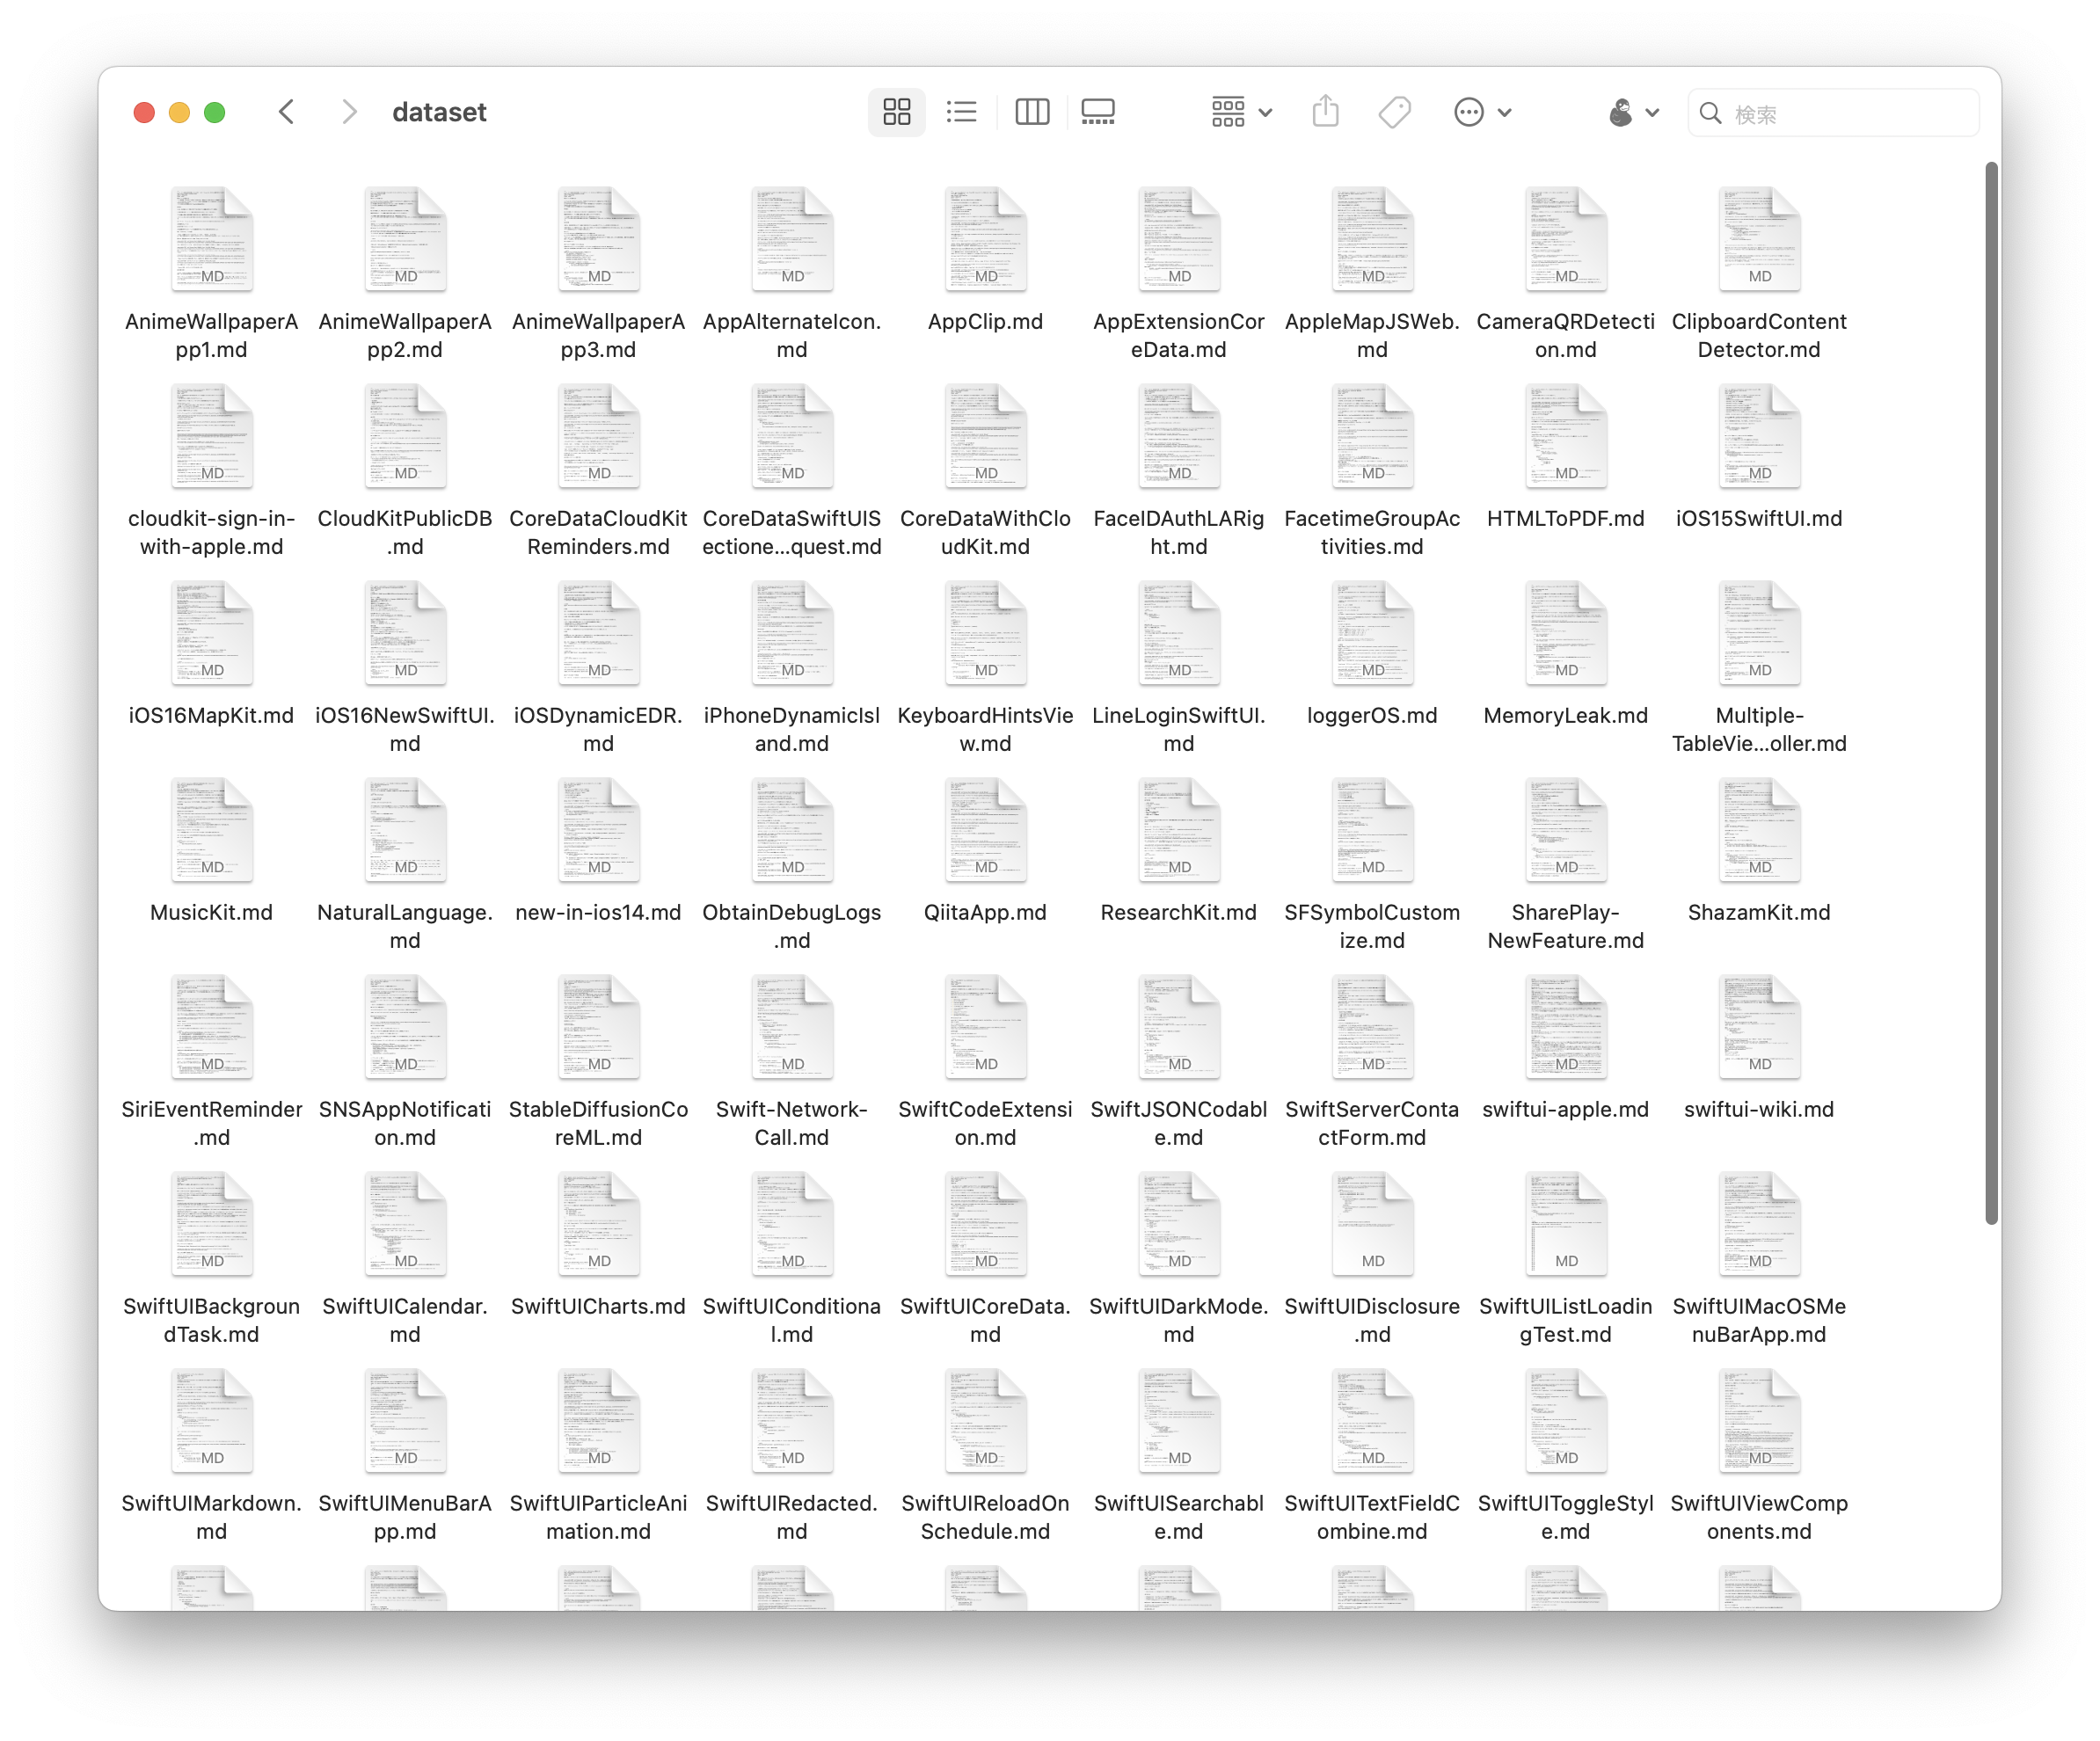
Before training, the text is segmented, tokenized, and written into binary files that nanoGPT can consume directly.
The article chunks the text by a maximum sequence length, encodes each segment with BertJapaneseTokenizer,
then saves the result into train.bin and val.bin inside a new TrainingSet folder.
max_length = 512
tokenizer = BertJapaneseTokenizer.from_pretrained(
    "cl-tohoku/bert-base-japanese-whole-word-masking",
    max_len=max_length
)

trainTokens = []
train_text_segments = [trainEntries[i:i + max_length] for i in range(0, len(trainEntries), max_length)]
for segment in train_text_segments:
    train_segment_tokens = tokenizer.encode(segment, add_special_tokens=True)
    trainTokens.extend(train_segment_tokens)

evalTokens = []
eval_text_segments = [evalEntries[i:i + max_length] for i in range(0, len(evalEntries), max_length)]
for segment in eval_text_segments:
    eval_segment_tokens = tokenizer.encode(segment, add_special_tokens=True)
    evalTokens.extend(eval_segment_tokens)
train_ids = np.array(trainTokens)
val_ids = np.array(evalTokens)
newFolderPath = os.path.join(os.path.dirname(__file__), "TrainingSet")
if not os.path.exists(newFolderPath):
os.makedirs(newFolderPath)
train_ids.tofile(os.path.join(newFolderPath, "train.bin"))
val_ids.tofile(os.path.join(newFolderPath, "val.bin"))
Those files are then copied into the data folder of the cloned nanoGPT repository, and training begins with a small model configuration:
python3 train.py \
  --dataset=TrainingSet \
  --n_layer=4 \
  --n_head=4 \
  --n_embd=64 \
  --compile=False \
  --eval_iters=1 \
  --block_size=64 \
  --batch_size=8 \
  --device=mps \
  --eval_interval=100
nanoGPT.
eval_interval=100, the article can test intermediate checkpoints without waiting for the full run to finish.The last major step is patching sample.py so it decodes with the Japanese tokenizer and keeps prompting for new input.
Because the training pipeline no longer uses the default GPT-2 tokenizer, the sampling script also has to change.
The custom version loads BertJapaneseTokenizer, asks for input in a loop, generates output from the current checkpoint,
then decodes the response back into Japanese text.
from transformers import BertJapaneseTokenizer

tokenizer = BertJapaneseTokenizer.from_pretrained(
    "cl-tohoku/bert-base-japanese-whole-word-masking"
)

while True:
    start = input("What do you want to ask?")
    start_ids = tokenizer.encode(start)
    x = torch.tensor(start_ids, dtype=torch.long, device=device)[None, ...]
    with torch.no_grad():
        with ctx:
            y = model.generate(x, max_new_tokens, temperature=temperature, top_k=top_k)
            decoded_text = tokenizer.decode(y[0].tolist(), skip_special_tokens=True)
            print(decoded_text)
            print("---------------")
That is enough to turn the training checkpoint into a basic interactive terminal chatbot.
The article notes that you can stop training or sampling with control-c when you want to inspect the current state.
More data and more iterations matter much more than clever framing when the base experiment is this small.
The article closes by making the obvious point explicit: if you want something closer to a GPT-2 style chatbot, you need far more training data and far more training time. Using only 88 posts and about an hour of training is enough for a learning exercise, but not enough for a robust assistant.
It also links to the public repository for the experiment: github.com/mszpro/MyOwnGPT.
The real value here is understanding the pipeline, not chasing a production-quality chatbot with a toy corpus.
This post is useful because it shows the whole path in one place: choose a training base, adapt tokenization for your language, build a dataset from your own writing, export token binaries, train a checkpointed model, and patch inference so you can test it interactively.
Even with a weak model, that full loop teaches more than a one-line API demo, especially if you want to understand how local text generation systems behave under tight data constraints.