The point of drag and drop is not just movement on screen. It is a clean handoff of row data from one table to another.
This article frames the feature through a playful example, but the implementation pattern is broadly useful. Once
UITableView drag and drop is wired in, users can long-press a cell, drag it away from its current list, and
hand that data to another list that knows how to accept it.
In this tutorial, the transferred value is only a toy name. That keeps the mechanics easy to see: a row becomes an
NSItemProvider, the target list checks whether it can accept that type, then the controller updates the real
arrays and reloads the UI.
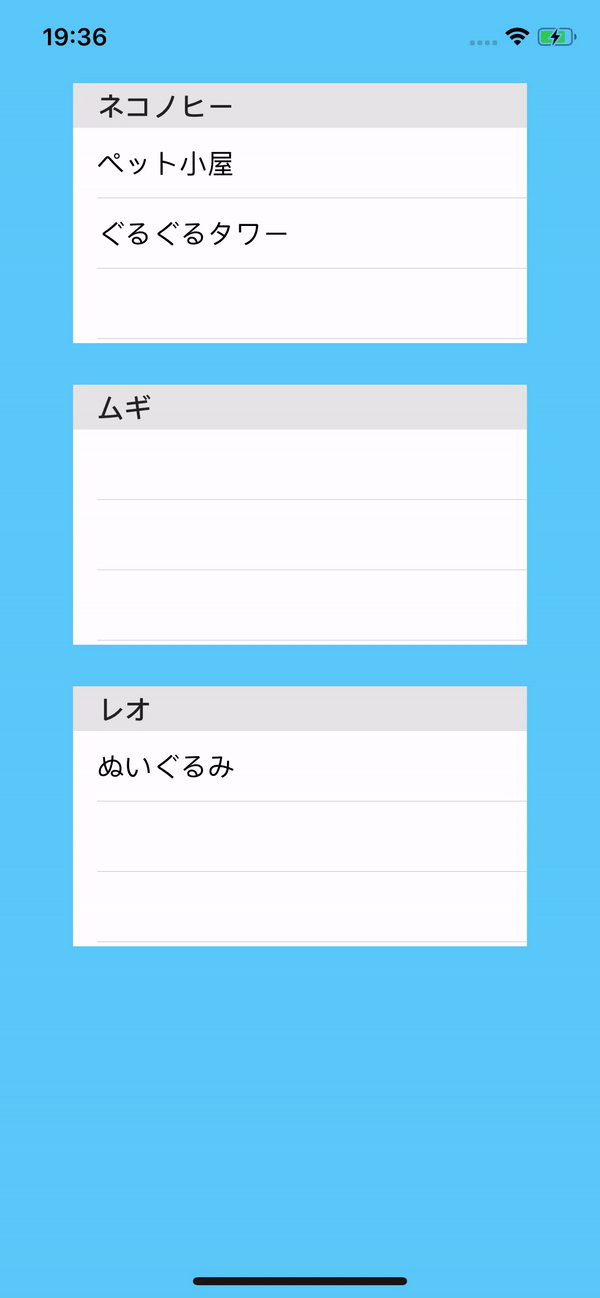
The sample app tracks toys owned by three cats, with each cat showing its own table inside a larger collection view layout.
This article uses a starter app where multiple table views already exist. In that project, each collection-view cell contains one table view for one cat, and dragging a toy from one cell to another effectively reassigns the toy to a different cat.
Enable drag support on the table view first, then make the view implement UITableViewDragDelegate.
The first UIKit step is small but required. Turn on drag interaction and assign the drag delegate to the object that owns the table, which in the source app is a collection-view cell subclass.
tableView.dragInteractionEnabled = true
tableView.dragDelegate = self
After that, conform to UITableViewDragDelegate and implement the method that begins a drag session:
extension CatCollectionViewCell: UITableViewDragDelegate {
    func tableView(
        _ tableView: UITableView,
        itemsForBeginning session: UIDragSession,
        at indexPath: IndexPath
    ) -> [UIDragItem] {
        // Build and return the dragged items here
    }
}A drag begins with the row's actual value, encoded into Data and exposed through NSItemProvider.
In the tutorial, the payload is just the selected toy name. The row string becomes UTF-8 data, then that data is
registered on an NSItemProvider as plain text.
let toyName = toys[indexPath.row]

guard let toyNameData = toyName.data(using: .utf8) else { return [] }

let provider = NSItemProvider()
provider.registerDataRepresentation(
    forTypeIdentifier: kUTTypePlainText as String,
    visibility: .all
) { completion in
    completion(toyNameData, nil)
    return nil
}

let item = UIDragItem(itemProvider: provider)
The article also stores the original cat name into the drag session so the drop side can later know where the item came from:
session.localContext = catName
return [item]The destination table needs its own drop delegate before it can receive any of those dragged providers.
The next setup step mirrors the drag side. Assign a drop delegate to the table, then implement
UITableViewDropDelegate.
tableView.dropDelegate = selfextension CatCollectionViewCell: UITableViewDropDelegate {
func tableView(
_ tableView: UITableView,
performDropWith coordinator: UITableViewDropCoordinator
) {
// Read and apply the dropped data here
}
}The core drop flow is: verify the type, load the dropped object, then read both the source cat and the target cat.
Because the dragged provider registered itself as plain text, the destination can check for that exact identifier before it tries to read anything.
if coordinator.session.hasItemsConforming(
    toTypeIdentifiers: [kUTTypePlainText as String]
) {
    coordinator.session.loadObjects(ofClass: NSString.self) { fetchedItems in
        guard let toyName = fetchedItems.first as? String else { return }

        if let originalCatName = coordinator.session.localDragSession?.localContext as? String {
            let targetCatName = self.catName
            // Move the toy from originalCatName to targetCatName
        }
    }
}
At that point the drop side knows all three pieces of information this article cares about:
toyName, the original cat from localContext, and the destination cat from
self.catName.
The real data change happens in the controller: remove the toy from one list, append it to the other, then reload.
This article keeps the actual data arrays in the view controller, so the table-owning cell should not mutate them directly. The article therefore routes the move through a delegate callback.
protocol DragAndDropActionDelegate: AnyObject {
    func moveToy(toyName: String, fromCat: String, toCat: String)
}
extension ViewController: DragAndDropActionDelegate {
func moveToy(toyName: String, fromCat: String, toCat: String) {
var fromCatToys = catToys[fromCat] ?? []
fromCatToys.removeAll { toyNameInArray in
toyNameInArray == toyName
}
catToys[fromCat] = fromCatToys
var toCatToys = catToys[toCat] ?? []
toCatToys.append(toyName)
catToys[toCat] = toCatToys
collectionView.reloadData()
}
}The collection-view cell only needs a weak delegate reference and one call when the drop finishes.
To connect the drop handler back to the controller-owned data model, the cell stores a weak delegate, the controller sets it during collection-cell creation, and the drop handler forwards the move request.
// CatCollectionViewCell.swift
weak var delegate: DragAndDropActionDelegate?
override func collectionView(
_ collectionView: UICollectionView,
cellForItemAt indexPath: IndexPath
) -> UICollectionViewCell {
...
cell.delegate = self
...
}self.delegate?.moveToy(
toyName: toyName,
fromCat: originalCatName,
toCat: self.catName
)UITableView drag and drop becomes manageable once you separate three concerns: packaging data, accepting data, and mutating the real model.
That is the practical lesson from the original tutorial. The drag delegate should only describe what is being dragged, the drop delegate should only recover and validate what arrived, and the controller or shared model layer should stay responsible for the real data mutation.
With that split in place, moving rows between multiple table views becomes a straightforward UIKit workflow instead of a one-off special case.