Category: iOS 18

  • Adapt to physical camera control button within your own iOS app (for SwiftUI, Zoom, Exposure, & Custom Controls)

    This article talks about adapting the new physical camera button within your iOS app.
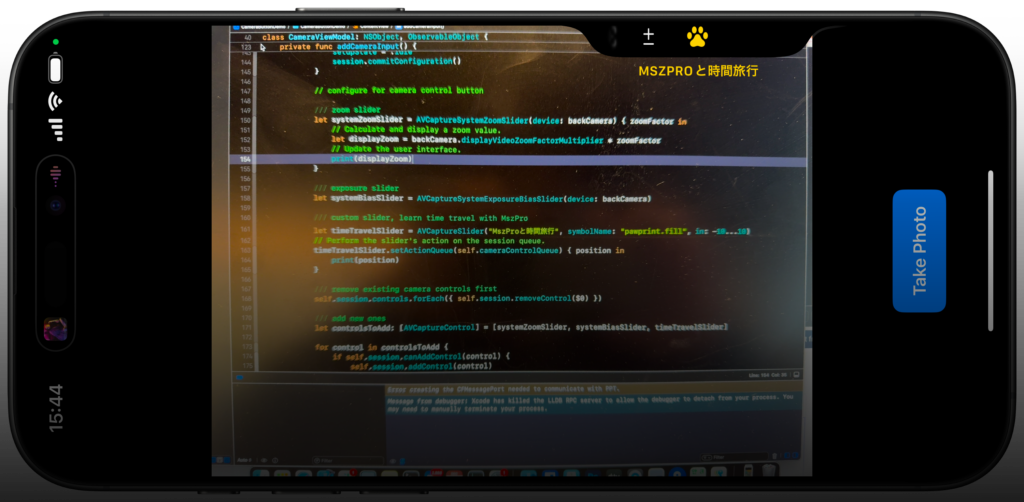
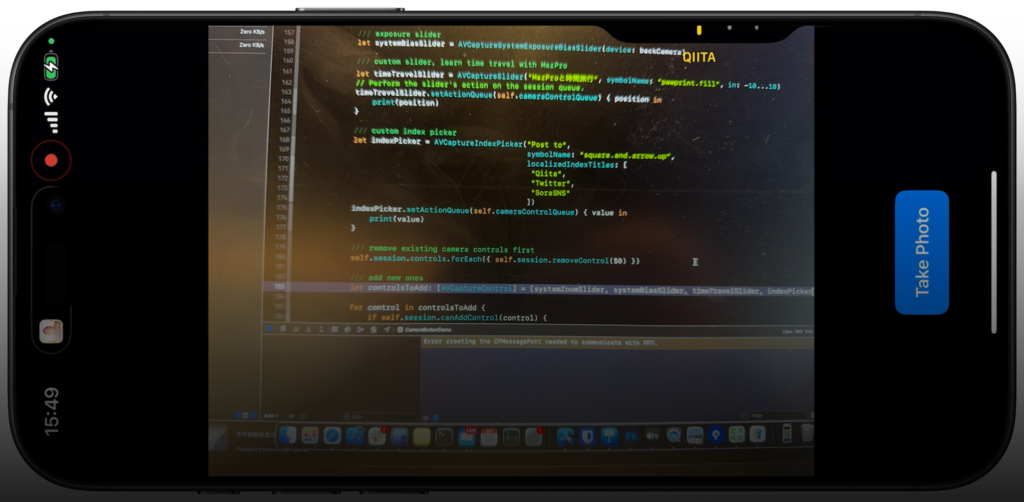
    Why?

    If you do nothing, and when the user presses the camera button within your app, it always goes to the system Camera app. However, with some minor adjustments, user can use the camera button to take pictures within your own app, and your app can provide custom controls to the camera, for example, allow the user to change the filter by swiping on the physical camera button.

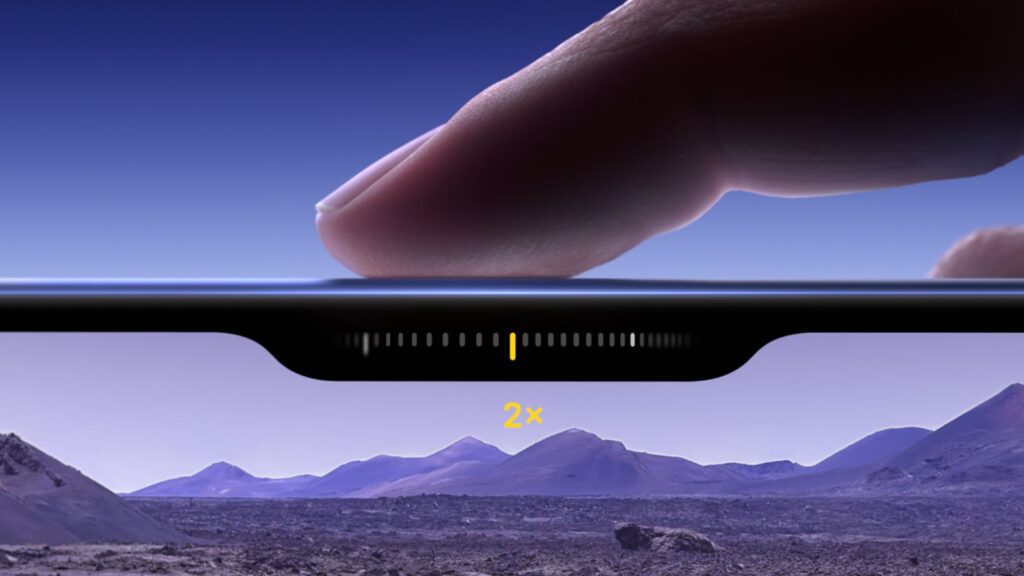
    Also, you can add cool new control options, like shown in the above 2 screenshots.

    Let’s get started!

    Starting point

    We will start from a very simple SwiftUI view that shows a camera and a capture button:

    This is the view model that manages the permission to access camera, and take actions when we need to take a picture, and receives the image and saves it to a variable.

    // MARK: - Unified Camera ViewModel
    class CameraViewModel: NSObject, ObservableObject {
        
        // Session states
        enum CameraSetupState {
            case idle
            case configured
            case permissionDenied
            case failed
        }
        
        @Published var setupState: CameraSetupState = .idle
        @Published var capturedPhoto: UIImage? = nil
        @Published var permissionGranted: Bool = false
        
        let session = AVCaptureSession()
        private let photoOutput = AVCapturePhotoOutput()
        private var videoInput: AVCaptureDeviceInput?
        
        // Dispatch queue for configuring the session
        private let configurationQueue = DispatchQueue(label: "com.example.camera.config")
        
        override init() {
            super.init()
        }
        
        deinit {
            stopSession()
        }
        
        // MARK: - Public API
        
        /// Checks camera permissions and configures session if authorized.
        func requestAccessIfNeeded() {
            let authStatus = AVCaptureDevice.authorizationStatus(for: .video)
            switch authStatus {
                case .authorized:
                    permissionGranted = true
                    configureSessionIfIdle()
                case .notDetermined:
                    AVCaptureDevice.requestAccess(for: .video) { [weak self] granted in
                        guard let self = self else { return }
                        DispatchQueue.main.async {
                            if granted {
                                self.permissionGranted = true
                                self.configureSessionIfIdle()
                            } else {
                                self.setupState = .permissionDenied
                            }
                        }
                    }
                default:
                    // Denied or Restricted
                    setupState = .permissionDenied
            }
        }
        
        /// Initiate photo capture.
        func capturePhoto() {
            guard setupState == .configured else { return }
            let settings = AVCapturePhotoSettings()
            photoOutput.capturePhoto(with: settings, delegate: self)
        }
        
        // MARK: - Session Configuration
        
        private func configureSessionIfIdle() {
            configurationQueue.async { [weak self] in
                guard let self = self, self.setupState == .idle else { return }
                
                self.session.beginConfiguration()
                self.session.sessionPreset = .photo
                
                self.addCameraInput()
                self.addPhotoOutput()
                
                self.session.commitConfiguration()
                self.startSessionIfReady()
            }
        }
        
        private func addCameraInput() {
            do {
                guard let backCamera = AVCaptureDevice.default(.builtInWideAngleCamera,
                                                               for: .video,
                                                               position: .back) else {
                    print("CameraViewModel: Back camera is unavailable.")
                    setupState = .idle
                    session.commitConfiguration()
                    return
                }
                
                let cameraInput = try AVCaptureDeviceInput(device: backCamera)
                if session.canAddInput(cameraInput) {
                    session.addInput(cameraInput)
                    videoInput = cameraInput
                    DispatchQueue.main.async {
                        self.setupState = .configured
                    }
                } else {
                    print("CameraViewModel: Unable to add camera input to session.")
                    setupState = .idle
                    session.commitConfiguration()
                }
            } catch {
                print("CameraViewModel: Error creating camera input - \(error)")
                setupState = .failed
                session.commitConfiguration()
            }
        }
        
        private func addPhotoOutput() {
            guard session.canAddOutput(photoOutput) else {
                print("CameraViewModel: Cannot add photo output.")
                setupState = .failed
                session.commitConfiguration()
                return
            }
            session.addOutput(photoOutput)
            photoOutput.maxPhotoQualityPrioritization = .quality
            DispatchQueue.main.async {
                self.setupState = .configured
            }
        }
        
        private func startSessionIfReady() {
            guard setupState == .configured else { return }
            session.startRunning()
        }
        
        private func stopSession() {
            configurationQueue.async { [weak self] in
                guard let self = self else { return }
                if self.session.isRunning {
                    self.session.stopRunning()
                }
            }
        }
    }
    
    // MARK: - AVCapturePhotoCaptureDelegate
    extension CameraViewModel: AVCapturePhotoCaptureDelegate {
        func photoOutput(_ output: AVCapturePhotoOutput,
                         didFinishProcessingPhoto photo: AVCapturePhoto,
                         error: Error?) {
            
            guard error == nil else {
                print("CameraViewModel: Error capturing photo - \(error!)")
                return
            }
            guard let photoData = photo.fileDataRepresentation() else {
                print("CameraViewModel: No photo data found.")
                return
            }
            self.capturedPhoto = UIImage(data: photoData)
        }
    }

    This is our UIKit compatible view so we can show the camera preview layer within SwiftUI:

    // MARK: - SwiftUI Representable for Camera Preview
    struct CameraLayerView: UIViewRepresentable {
        
        let cameraSession: AVCaptureSession
        
        func makeUIView(context: Context) -> CameraContainerView {
            let container = CameraContainerView()
            container.backgroundColor = .black
            container.previewLayer.session = cameraSession
            container.previewLayer.videoGravity = .resizeAspect
            return container
        }
        
        func updateUIView(_ uiView: CameraContainerView, context: Context) {
            // No dynamic updates needed
        }
        
        // A UIView subclass that hosts an AVCaptureVideoPreviewLayer
        class CameraContainerView: UIView {
            
            override class var layerClass: AnyClass {
                AVCaptureVideoPreviewLayer.self
            }
            
            var previewLayer: AVCaptureVideoPreviewLayer {
                guard let layer = self.layer as? AVCaptureVideoPreviewLayer else {
                    fatalError("CameraContainerView: Failed casting layer to AVCaptureVideoPreviewLayer.")
                }
                return layer
            }
        }
    }

    And this is our main SwiftUI view:

    // MARK: - SwiftUI Main View
    struct ContentView: View {
        
        @ObservedObject var viewModel = CameraViewModel()
        
        var body: some View {
            GeometryReader { _ in
                ZStack(alignment: .bottom) {
                    CameraLayerView(cameraSession: viewModel.session)
                        .onAppear {
                            viewModel.requestAccessIfNeeded()
                        }
                        .edgesIgnoringSafeArea(.all)
                    
                    // Capture button
                    VStack {
                        Spacer()
                        
                        Button {
                            viewModel.capturePhoto()
                        } label: {
                            Text("Take Photo")
                                .font(.headline)
                                .foregroundColor(.white)
                                .padding()
                                .background(Color.blue)
                                .cornerRadius(10)
                        }
                        .padding(.bottom, 20)
                    }
                    
                    // Thumbnail of the captured photo
                    if let image = viewModel.capturedPhoto {
                        Image(uiImage: image)
                            .resizable()
                            .aspectRatio(contentMode: .fit)
                            .frame(width: 120, height: 90)
                            .padding(.bottom, 80)
                    }
                }
            }
        }
    }
    
    // MARK: - SwiftUI Preview
    #Preview {
        ContentView()
    }
    

    Capture picture when pressing camera button
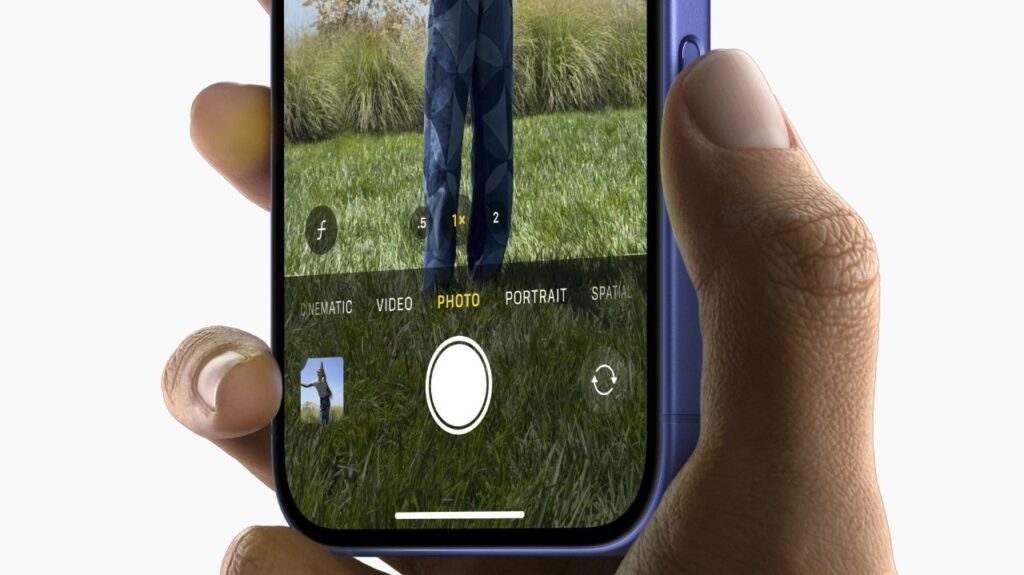
    As we talked about, if your app does not adapt this, when the user presses on the camera button, it will jump to the camera app.

    To allow your app to handle the take picture action, simply import the AVKit framework and add a view modifier onCameraCaptureEvent() view modifier to your camera preview layer CameraLayerView:

    CameraLayerView(cameraSession: viewModel.session)
        .onAppear {
            viewModel.requestAccessIfNeeded()
        }
        .edgesIgnoringSafeArea(.all)
        .onCameraCaptureEvent() { event in
            if event.phase == .began {
                self.viewModel.capturePhoto()
            }
        }

    Now, whenever the user presses the camera button on the side, it will call the code block you provided, which you can call the capture photo function within your view model.

    Checking support

    You can check if the user’s device has support for camera button by checking the supportsControls parameter within your camera session AVCaptureSession:

    In our provided starting point code, you can call it like this

    struct ContentView: View {
        
        @ObservedObject var viewModel = CameraViewModel()
        
        var body: some View {
            GeometryReader { _ in
                // ... //
            }
            .task {
                let supportsCameraButton = self.viewModel.session.supportsControls
                
            }
        }
    }

    Add zoom control

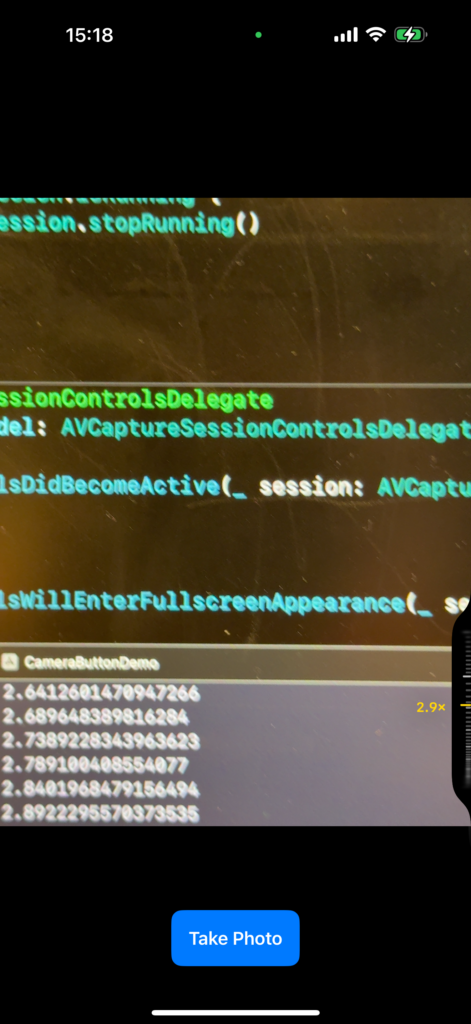
    We can easily add a control for the zoom level. What’s great is that iOS system handles the zoom automatically, and your app get notified the zoom level to be shown in your own UI:
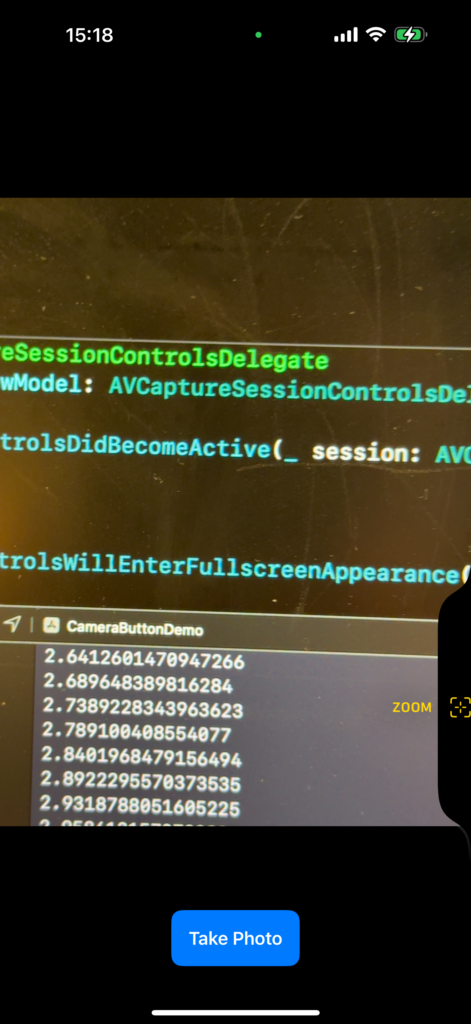
    To get started, first, set a camera control delegate to your camera session:

    self.session.setControlsDelegate(self, queue: self.cameraControlQueue)

    Now, conform your class to AVCaptureSessionControlsDelegate and add the required functions.

    // MARK: - AVCaptureSessionControlsDelegate
    extension CameraViewModel: AVCaptureSessionControlsDelegate {
        
        func sessionControlsDidBecomeActive(_ session: AVCaptureSession) {
            return
        }
        
        func sessionControlsWillEnterFullscreenAppearance(_ session: AVCaptureSession) {
            return
        }
        
        func sessionControlsWillExitFullscreenAppearance(_ session: AVCaptureSession) {
            return
        }
        
        func sessionControlsDidBecomeInactive(_ session: AVCaptureSession) {
            return
        }
        
    }

    Even if you do nothing in the above functions, you have to implement the delegate in order to use the camera control features.

    Now, we will initialize the system zoom control:

    let systemZoomSlider = AVCaptureSystemZoomSlider(device: backCamera) { zoomFactor in
        // Calculate and display a zoom value.
        let displayZoom = backCamera.displayVideoZoomFactorMultiplier * zoomFactor
        // Update the user interface.
        print(displayZoom)
    }

    Here, we provide the camera device as the input. Within the code block, the system will run our code whenever the zoom level changes.

    We will then remove all existing controls of the camera, and add the system zoom slider:

    /// remove existing camera controls first
    self.session.controls.forEach({ self.session.removeControl($0) })
    
    /// add new ones
    let controlsToAdd: [AVCaptureControl] = [systemZoomSlider]
    
    for control in controlsToAdd {
        if self.session.canAddControl(control) {
            self.session.addControl(control)
        }
    }

    Here is my updated CameraViewModel

    // MARK: - Unified Camera ViewModel
    class CameraViewModel: NSObject, ObservableObject {
        
        // Session states
        enum CameraSetupState {
            case idle
            case configured
            case permissionDenied
            case failed
        }
        
        @Published var setupState: CameraSetupState = .idle
        @Published var capturedPhoto: UIImage? = nil
        @Published var permissionGranted: Bool = false
        
        let session = AVCaptureSession()
        private let photoOutput = AVCapturePhotoOutput()
        private var videoInput: AVCaptureDeviceInput?
        
        // Dispatch queue for configuring the session
        private let configurationQueue = DispatchQueue(label: "com.example.camera.config")
        private let cameraControlQueue = DispatchQueue(label: "com.example.camera.control")
        
        override init() {
            super.init()
        }
        
        deinit {
            stopSession()
        }
        
        // MARK: - Public API
        
        /// Checks camera permissions and configures session if authorized.
        func requestAccessIfNeeded() { ... }
        
        /// Initiate photo capture.
        func capturePhoto() { ... }
        
        // MARK: - Session Configuration
        
        private func configureSessionIfIdle() { ... }
        
        private func addCameraInput() {
            do {
                guard let backCamera = AVCaptureDevice.default(.builtInWideAngleCamera,
                                                               for: .video,
                                                               position: .back) else {
                    print("CameraViewModel: Back camera is unavailable.")
                    setupState = .idle
                    session.commitConfiguration()
                    return
                }
                
                let cameraInput = try AVCaptureDeviceInput(device: backCamera)
                if session.canAddInput(cameraInput) {
                    session.addInput(cameraInput)
                    videoInput = cameraInput
                    DispatchQueue.main.async {
                        self.setupState = .configured
                    }
                } else {
                    print("CameraViewModel: Unable to add camera input to session.")
                    setupState = .idle
                    session.commitConfiguration()
                }
                
                // configure for camera control button
                let systemZoomSlider = AVCaptureSystemZoomSlider(device: backCamera) { zoomFactor in
                    // Calculate and display a zoom value.
                    let displayZoom = backCamera.displayVideoZoomFactorMultiplier * zoomFactor
                    // Update the user interface.
                    print(displayZoom)
                }
                
                /// remove existing camera controls first
                self.session.controls.forEach({ self.session.removeControl($0) })
                
                /// add new ones
                let controlsToAdd: [AVCaptureControl] = [systemZoomSlider]
                
                for control in controlsToAdd {
                    if self.session.canAddControl(control) {
                        self.session.addControl(control)
                    }
                }
                
                /// set delegate
                self.session.setControlsDelegate(self, queue: self.cameraControlQueue)
                //
            } catch {
                print("CameraViewModel: Error creating camera input - \(error)")
                setupState = .failed
                session.commitConfiguration()
            }
        }
        
        private func addPhotoOutput() { ... }
        
        private func startSessionIfReady() { ... }
        
        private func stopSession() { ... }
    }
    
    // MARK: - AVCaptureSessionControlsDelegate
    extension CameraViewModel: AVCaptureSessionControlsDelegate {
        
        func sessionControlsDidBecomeActive(_ session: AVCaptureSession) {
            return
        }
        
        func sessionControlsWillEnterFullscreenAppearance(_ session: AVCaptureSession) {
            return
        }
        
        func sessionControlsWillExitFullscreenAppearance(_ session: AVCaptureSession) {
            return
        }
        
        func sessionControlsDidBecomeInactive(_ session: AVCaptureSession) {
            return
        }
        
    }

    Notice that I have added a cameraControlQueue, set the delegate, and set the system zoom slider within my addCameraInput function.

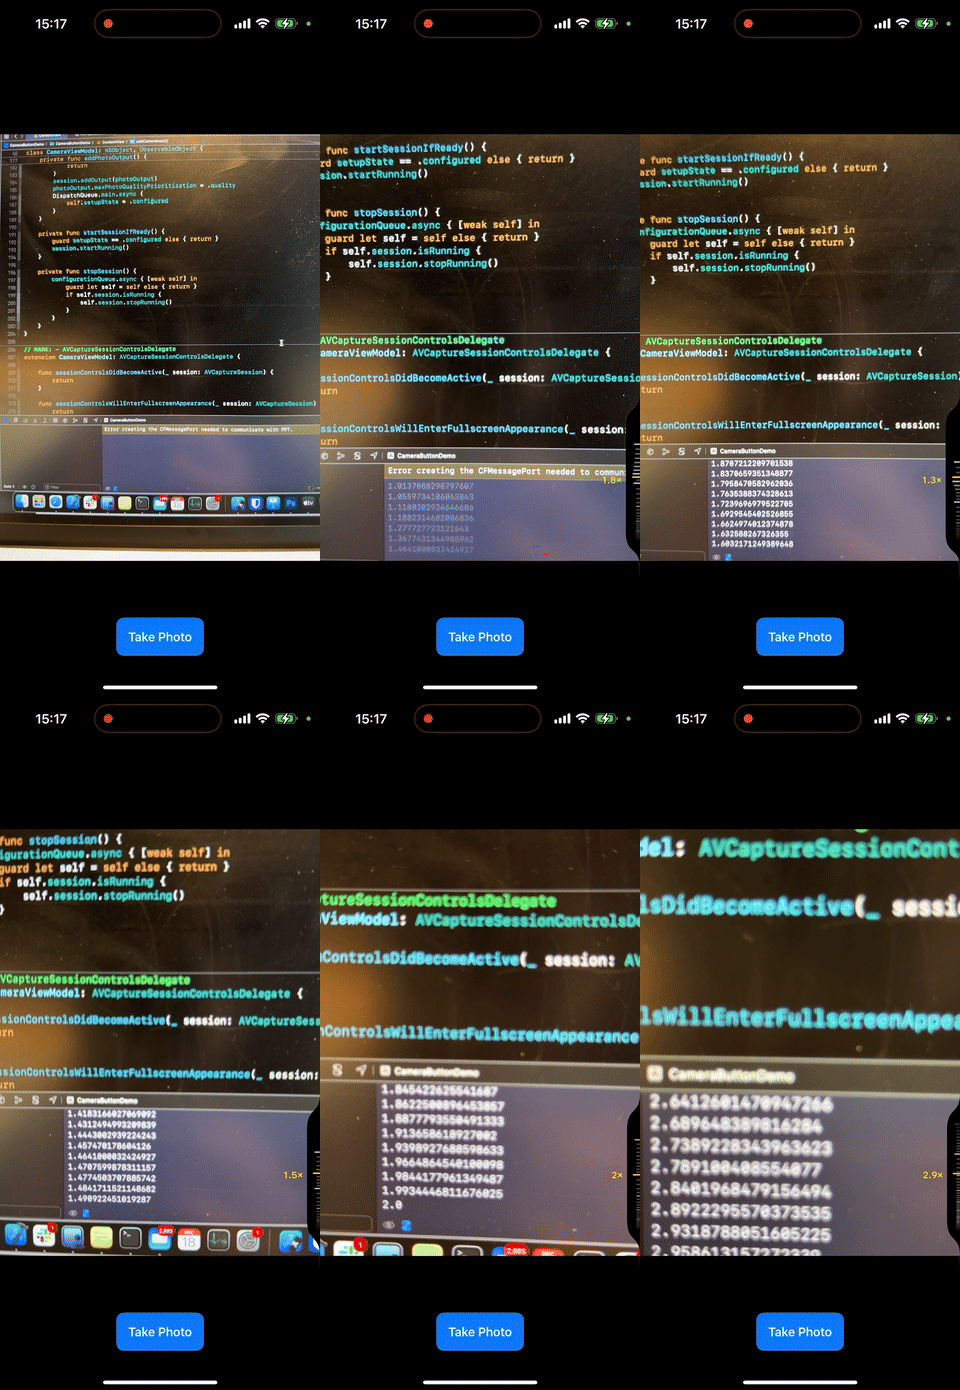
    Now, if you run your program on your iPhone, you will notice that you can use the zoom slider within your own app:
    Add exposure control

    You can easily add control for exposure by adding one more camera control to the array:

    // configure for camera control button
    let systemZoomSlider = AVCaptureSystemZoomSlider(device: backCamera) { zoomFactor in
        // Calculate and display a zoom value.
        let displayZoom = backCamera.displayVideoZoomFactorMultiplier * zoomFactor
        // Update the user interface.
        print(displayZoom)
    }
    
    let systemBiasSlider = AVCaptureSystemExposureBiasSlider(device: backCamera)
    
    /// remove existing camera controls first
    self.session.controls.forEach({ self.session.removeControl($0) })
    
    /// add new ones
    let controlsToAdd: [AVCaptureControl] = [systemZoomSlider, systemBiasSlider]
    
    for control in controlsToAdd {
        if self.session.canAddControl(control) {
            self.session.addControl(control)
        }
    }

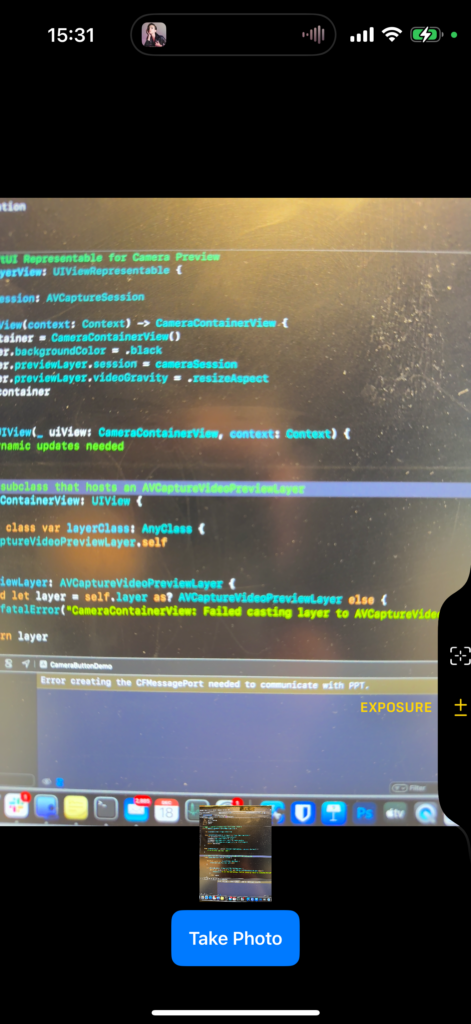
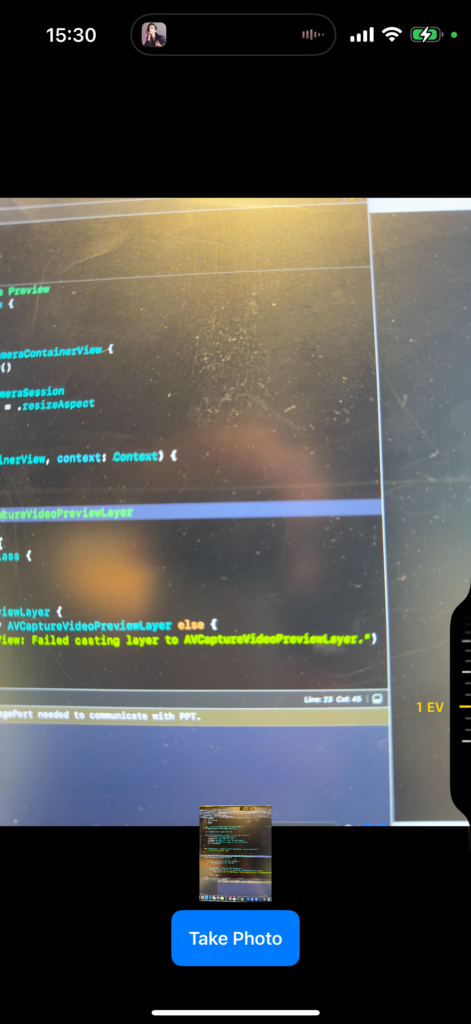
    Now, when you launch the app and quickly double tap (not press) on the camera button, you will see 2 options, and you can switch to the exposure control (which is a slider provided by the system)
    Add custom slider

    You can initialize a custom slider, and use setActionQueue to get notified when the value changes.

    Here is a little joke where you control the time (4th dimension( with my camera app (fancy right?)

    let timeTravelSlider = AVCaptureSlider("MszProと時間旅行", symbolName: "pawprint.fill", in: -10...10)
    // Perform the slider's action on the session queue.
    timeTravelSlider.setActionQueue(self.cameraControlQueue) { position in
        print(position)
    }

    Add custom picker

    You can also allow the user to pick one of the many given options (for example, a list of filters)
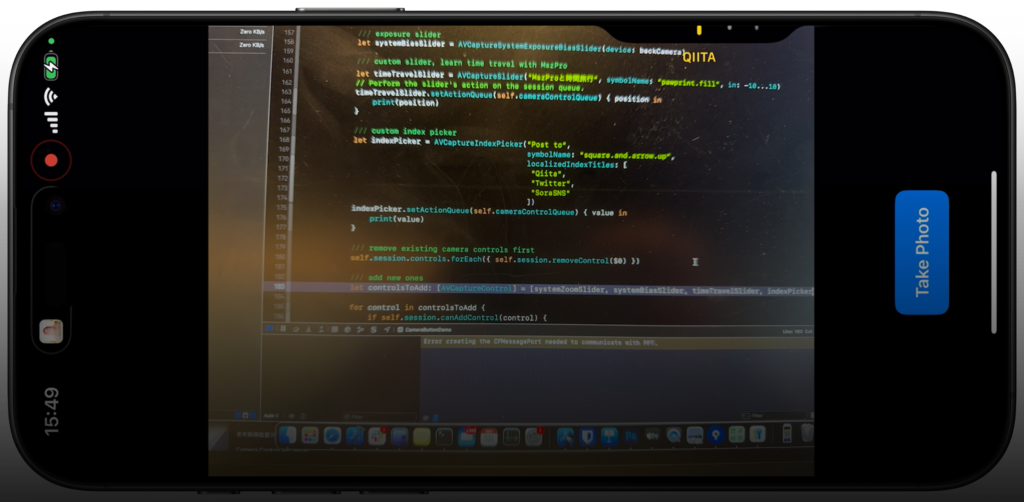
    let indexPicker = AVCaptureIndexPicker("Post to",
                                           symbolName: "square.and.arrow.up",
                                           localizedIndexTitles: [
                                            "Qiita",
                                            "Twitter",
                                            "SoraSNS"
                                           ])
    indexPicker.setActionQueue(self.cameraControlQueue) { value in
        print(value)
    }

    Notice, the value you get within the function is an index number.

    That is how you do it!

    Did you learn how to add custom camera control options within your own app? Here is the complete code:

    import SwiftUI
    import AVFoundation
    import Combine
    import AVKit
    
    // MARK: - SwiftUI Representable for Camera Preview
    struct CameraLayerView: UIViewRepresentable {
        
        let cameraSession: AVCaptureSession
        
        func makeUIView(context: Context) -> CameraContainerView {
            let container = CameraContainerView()
            container.backgroundColor = .black
            container.previewLayer.session = cameraSession
            container.previewLayer.videoGravity = .resizeAspect
            return container
        }
        
        func updateUIView(_ uiView: CameraContainerView, context: Context) {
            // No dynamic updates needed
        }
        
        // A UIView subclass that hosts an AVCaptureVideoPreviewLayer
        class CameraContainerView: UIView {
            
            override class var layerClass: AnyClass {
                AVCaptureVideoPreviewLayer.self
            }
            
            var previewLayer: AVCaptureVideoPreviewLayer {
                guard let layer = self.layer as? AVCaptureVideoPreviewLayer else {
                    fatalError("CameraContainerView: Failed casting layer to AVCaptureVideoPreviewLayer.")
                }
                return layer
            }
        }
    }
    
    // MARK: - Unified Camera ViewModel
    class CameraViewModel: NSObject, ObservableObject {
        
        // Session states
        enum CameraSetupState {
            case idle
            case configured
            case permissionDenied
            case failed
        }
        
        @Published var setupState: CameraSetupState = .idle
        @Published var capturedPhoto: UIImage? = nil
        @Published var permissionGranted: Bool = false
        
        let session = AVCaptureSession()
        private let photoOutput = AVCapturePhotoOutput()
        private var videoInput: AVCaptureDeviceInput?
        
        // Dispatch queue for configuring the session
        private let configurationQueue = DispatchQueue(label: "com.example.camera.config")
        private let cameraControlQueue = DispatchQueue(label: "com.example.camera.control")
        
        override init() {
            super.init()
        }
        
        deinit {
            stopSession()
        }
        
        // MARK: - Public API
        
        /// Checks camera permissions and configures session if authorized.
        func requestAccessIfNeeded() {
            let authStatus = AVCaptureDevice.authorizationStatus(for: .video)
            switch authStatus {
                case .authorized:
                    permissionGranted = true
                    configureSessionIfIdle()
                case .notDetermined:
                    AVCaptureDevice.requestAccess(for: .video) { [weak self] granted in
                        guard let self = self else { return }
                        DispatchQueue.main.async {
                            if granted {
                                self.permissionGranted = true
                                self.configureSessionIfIdle()
                            } else {
                                self.setupState = .permissionDenied
                            }
                        }
                    }
                default:
                    // Denied or Restricted
                    setupState = .permissionDenied
            }
        }
        
        /// Initiate photo capture.
        func capturePhoto() {
            guard setupState == .configured else { return }
            let settings = AVCapturePhotoSettings()
            photoOutput.capturePhoto(with: settings, delegate: self)
        }
        
        // MARK: - Session Configuration
        
        private func configureSessionIfIdle() {
            configurationQueue.async { [weak self] in
                guard let self = self, self.setupState == .idle else { return }
                
                self.session.beginConfiguration()
                
                self.session.sessionPreset = .photo
                
                self.addCameraInput()
                self.addPhotoOutput()
                
                // save configuration and start camera session
                self.session.commitConfiguration()
                self.startSessionIfReady()
            }
        }
        
        private func addCameraInput() {
            do {
                guard let backCamera = AVCaptureDevice.default(.builtInWideAngleCamera,
                                                               for: .video,
                                                               position: .back) else {
                    print("CameraViewModel: Back camera is unavailable.")
                    setupState = .idle
                    session.commitConfiguration()
                    return
                }
                
                let cameraInput = try AVCaptureDeviceInput(device: backCamera)
                if session.canAddInput(cameraInput) {
                    session.addInput(cameraInput)
                    videoInput = cameraInput
                    DispatchQueue.main.async {
                        self.setupState = .configured
                    }
                } else {
                    print("CameraViewModel: Unable to add camera input to session.")
                    setupState = .idle
                    session.commitConfiguration()
                }
                
                // configure for camera control button
                
                /// zoom slider
                let systemZoomSlider = AVCaptureSystemZoomSlider(device: backCamera) { zoomFactor in
                    // Calculate and display a zoom value.
                    let displayZoom = backCamera.displayVideoZoomFactorMultiplier * zoomFactor
                    // Update the user interface.
                    print(displayZoom)
                }
                
                /// exposure slider
                let systemBiasSlider = AVCaptureSystemExposureBiasSlider(device: backCamera)
                
                /// custom slider, learn time travel with MszPro
                let timeTravelSlider = AVCaptureSlider("MszProと時間旅行", symbolName: "pawprint.fill", in: -10...10)
                // Perform the slider's action on the session queue.
                timeTravelSlider.setActionQueue(self.cameraControlQueue) { position in
                    print(position)
                }
                
                /// custom index picker
                let indexPicker = AVCaptureIndexPicker("Post to",
                                                       symbolName: "square.and.arrow.up",
                                                       localizedIndexTitles: [
                                                        "Qiita",
                                                        "Twitter",
                                                        "SoraSNS"
                                                       ])
                indexPicker.setActionQueue(self.cameraControlQueue) { value in
                    print(value)
                }
                
                /// remove existing camera controls first
                self.session.controls.forEach({ self.session.removeControl($0) })
                
                /// add new ones
                let controlsToAdd: [AVCaptureControl] = [systemZoomSlider, systemBiasSlider, timeTravelSlider, indexPicker]
                
                for control in controlsToAdd {
                    if self.session.canAddControl(control) {
                        self.session.addControl(control)
                    }
                }
                
                /// set delegate
                self.session.setControlsDelegate(self, queue: self.cameraControlQueue)
                //
            } catch {
                print("CameraViewModel: Error creating camera input - \(error)")
                setupState = .failed
                session.commitConfiguration()
            }
        }
        
        private func addPhotoOutput() {
            guard session.canAddOutput(photoOutput) else {
                print("CameraViewModel: Cannot add photo output.")
                setupState = .failed
                session.commitConfiguration()
                return
            }
            session.addOutput(photoOutput)
            photoOutput.maxPhotoQualityPrioritization = .quality
            DispatchQueue.main.async {
                self.setupState = .configured
            }
        }
        
        private func startSessionIfReady() {
            guard setupState == .configured else { return }
            session.startRunning()
        }
        
        private func stopSession() {
            configurationQueue.async { [weak self] in
                guard let self = self else { return }
                if self.session.isRunning {
                    self.session.stopRunning()
                }
            }
        }
    }
    
    // MARK: - AVCaptureSessionControlsDelegate
    extension CameraViewModel: AVCaptureSessionControlsDelegate {
        
        func sessionControlsDidBecomeActive(_ session: AVCaptureSession) {
            return
        }
        
        func sessionControlsWillEnterFullscreenAppearance(_ session: AVCaptureSession) {
            return
        }
        
        func sessionControlsWillExitFullscreenAppearance(_ session: AVCaptureSession) {
            return
        }
        
        func sessionControlsDidBecomeInactive(_ session: AVCaptureSession) {
            return
        }
        
    }
    
    // MARK: - AVCapturePhotoCaptureDelegate
    extension CameraViewModel: AVCapturePhotoCaptureDelegate {
        func photoOutput(_ output: AVCapturePhotoOutput,
                         didFinishProcessingPhoto photo: AVCapturePhoto,
                         error: Error?) {
            
            guard error == nil else {
                print("CameraViewModel: Error capturing photo - \(error!)")
                return
            }
            guard let photoData = photo.fileDataRepresentation() else {
                print("CameraViewModel: No photo data found.")
                return
            }
            self.capturedPhoto = UIImage(data: photoData)
        }
    }
    
    // MARK: - SwiftUI Main View
    struct ContentView: View {
        
        @ObservedObject var viewModel = CameraViewModel()
        
        var body: some View {
            GeometryReader { _ in
                ZStack(alignment: .bottom) {
                    CameraLayerView(cameraSession: viewModel.session)
                        .onAppear {
                            viewModel.requestAccessIfNeeded()
                        }
                        .edgesIgnoringSafeArea(.all)
                        .onCameraCaptureEvent() { event in
                            if event.phase == .began {
                                self.viewModel.capturePhoto()
                            }
                        }
                    
                    // Capture button
                    VStack {
                        Spacer()
                        
                        Button {
                            viewModel.capturePhoto()
                        } label: {
                            Text("Take Photo")
                                .font(.headline)
                                .foregroundColor(.white)
                                .padding()
                                .background(Color.blue)
                                .cornerRadius(10)
                        }
                        .padding(.bottom, 20)
                    }
                    
                    // Thumbnail of the captured photo
                    if let image = viewModel.capturedPhoto {
                        Image(uiImage: image)
                            .resizable()
                            .aspectRatio(contentMode: .fit)
                            .frame(width: 120, height: 90)
                            .padding(.bottom, 80)
                    }
                }
            }
            .task {
                let supportsCameraButton = self.viewModel.session.supportsControls
                
            }
        }
    }
    
    // MARK: - SwiftUI Preview
    #Preview {
        ContentView()
    }
    

    Enjoy!

  • Free translation API — using the iOS 18’s system Translation framework in your app (SwiftUI or UIKit)

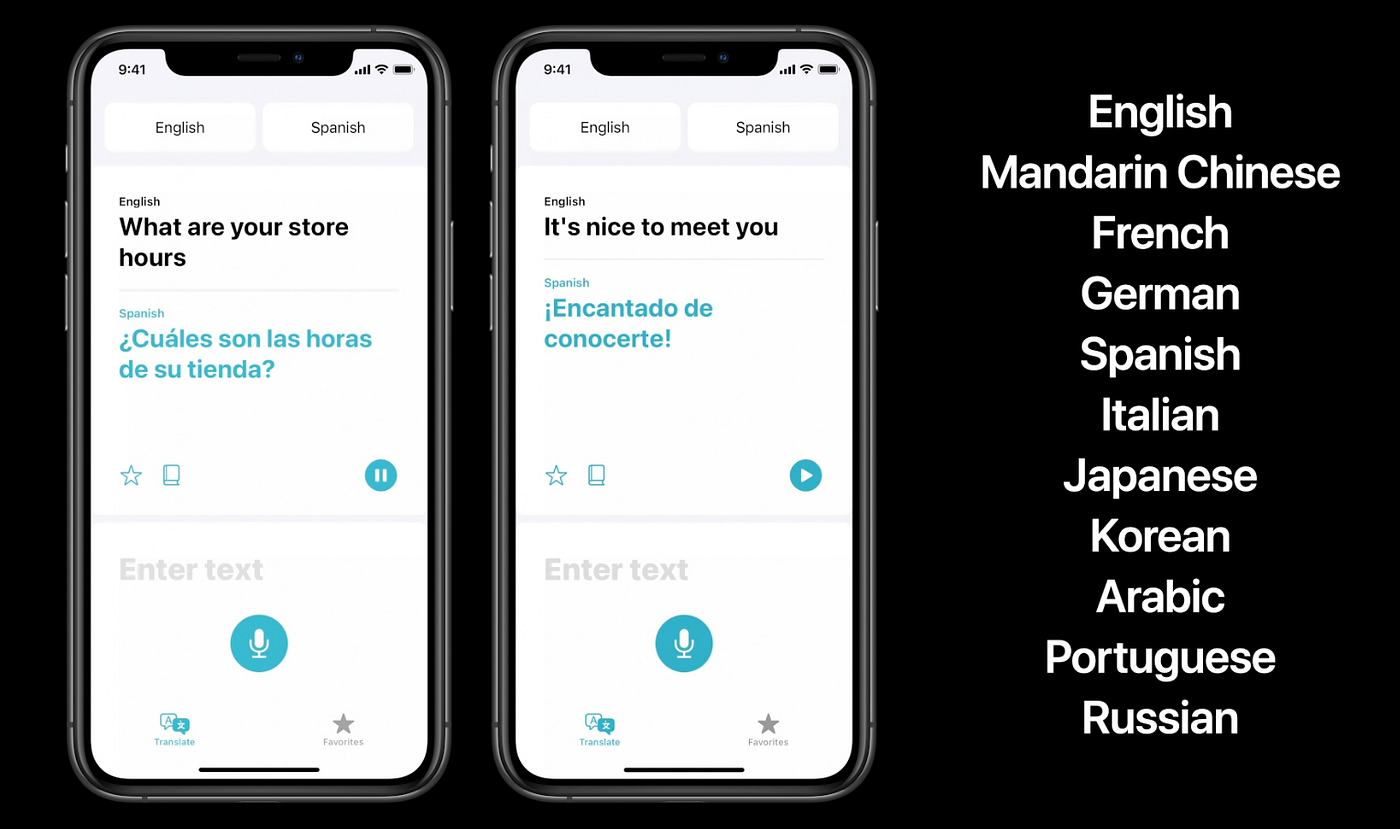
    Photo from Apple documentation

    If you offer contents within your app and are targeting users around the world, you probably want translation feature. User submitted texts can be in all kinds of languages, and providing a translation feature will enrich your user experience.

    For example, in my Mastodon, Misskey, Bluesky, Nostr all in one client SoraSNS, I used the similar technique described in this article for free translation API.

    Using online API provided by companies like Google or DeepL can incur a fee, which indie developers like myself find it difficult.

    The answer: The Translation Framework

    Ever since iOS 14 in 2020, Apple has introduced the system Translation app. It is a very simple yet elegant app with just a single text box. What’s more, Apple’s translation app allows you to download for local translation as well.

    In iOS 18, Apple has opened the translation API, so your app can use it to translate content.

    Enough story telling. Let’s get started!

    Notice: You have to test these APIs on real devices. The Translation feature does not work in simulator! (wired-ly sometimes the pre-build UI does work in simulator LOL)

    Present pre-built translation UI in SwiftUI

    Your SwiftUI app can present a pre-built Apple translate app popup, within your own app.

    First, import the Translation framework. You can also use the #if canImport(Translation)statement to check if the system supports it. For example, if the user is running iOS 18 and up, provide the translation feature; if the user is running iOS 17 and below, fallback to an online translation service or hide the translation button.

    #if canImport(Translation)
    import Translation
    #endif

    Then, create a @State variable that controls when the translation dialog is shown. Initially, it is false and you set it to true once you want to present the translated result:

    @State private var isTranslationShown: Bool = false

    Then, attach the translationPresentation view modifier to your view component, with the isPresented parameter set to the binding of the variable that controls whether it is shown or not, and the text parameter set to the text you want to translate.

    Form {
    // ... //
    }
    #if canImport(Translation)
    .translationPresentation(isPresented: $isTranslationShown,
    text: self.sourceText)
    #endif

    Here is the full example code:

    import SwiftUI

    #if canImport(Translation)
    import Translation
    #endif

    struct PopupTranslation: View {

    @State private var sourceText = "Hello, World! This is a test."

    @State private var isTranslationShown: Bool = false

    var body: some View {

    NavigationStack {
    Form {

    Section {
    Label("Source text", systemImage: "globe")

    TextField("What do you want to translate?",
    text: $sourceText,
    axis: .vertical)
    }

    }
    .toolbar {
    ToolbarItem(placement: .topBarTrailing) {
    Button("Translate") {
    self.isTranslationShown = true
    }
    }
    }
    #if canImport(Translation)
    .translationPresentation(isPresented: $isTranslationShown,
    text: self.sourceText)
    #endif
    }

    }

    }

    #Preview {
    PopupTranslation()
    }

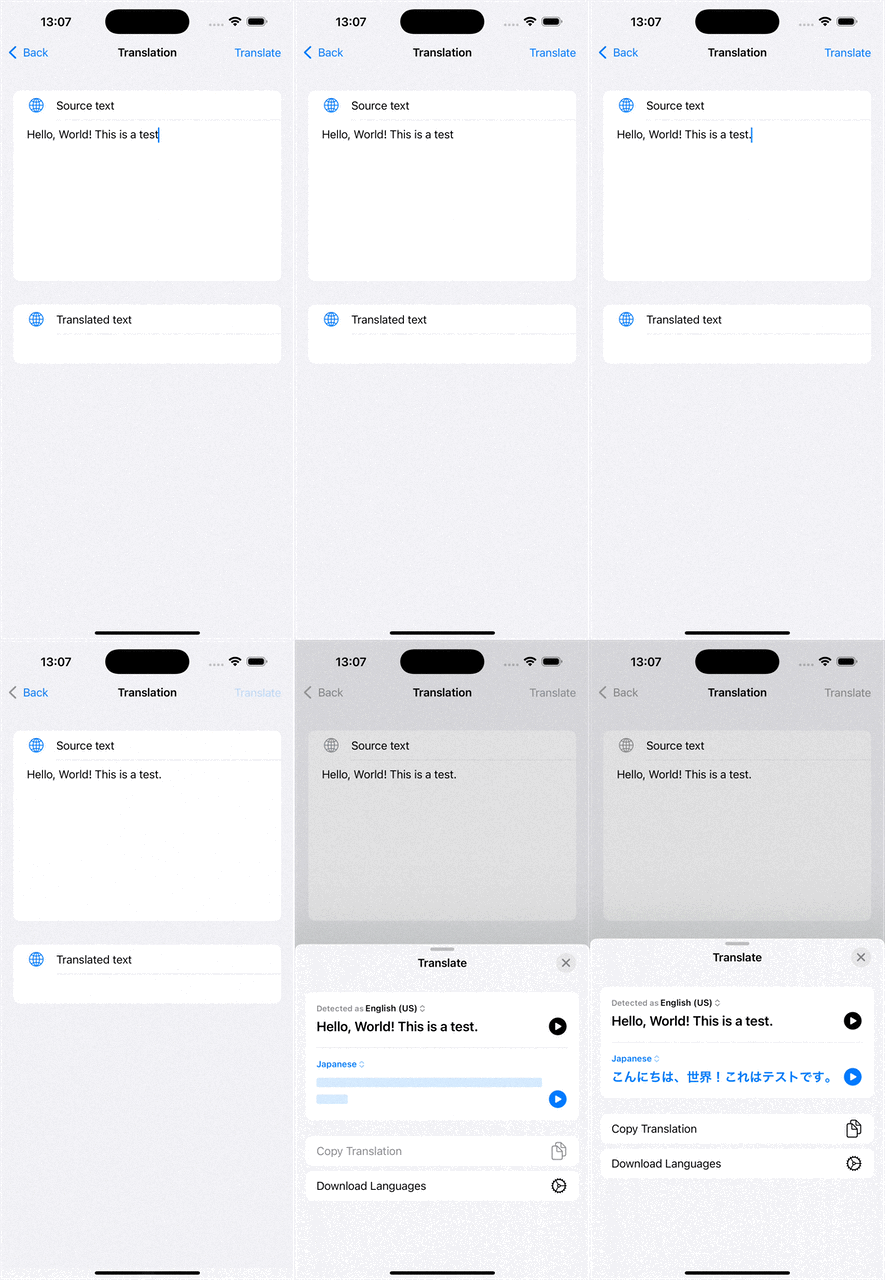
    Now, if you run it, you will get a simple translation popup when the user presses the translate button:

    You can also add a button within the present popup so user can quickly provide the translated text to your app:

    //
    // PopupTranslation.swift
    // iOSTranslationVideo
    //
    // Created by msz on 2024/12/01.
    //

    import SwiftUI

    #if canImport(Translation)
    import Translation
    #endif

    struct PopupTranslation: View {

    @State private var sourceText = "Hello, World!"
    + @State private var targetText = ""

    @State private var isTranslationShown: Bool = false

    var body: some View {

    NavigationStack {
    Form {

    Section {
    Label("Source text", systemImage: "globe")

    TextField("What do you want to translate?",
    text: $sourceText,
    axis: .vertical)
    }

    + Section {
    + Label("Translated text", systemImage: "globe")
    + Text(targetText)
    + }

    }
    .toolbar {
    ToolbarItem(placement: .topBarTrailing) {
    Button("Translate") {
    self.isTranslationShown = true
    }
    }
    }
    #if canImport(Translation)
    .translationPresentation(isPresented: $isTranslationShown,
    text: self.sourceText)
    + { newString in
    + self.targetText = newString
    + }
    #endif
    }

    }

    }

    #Preview {
    PopupTranslation()
    }

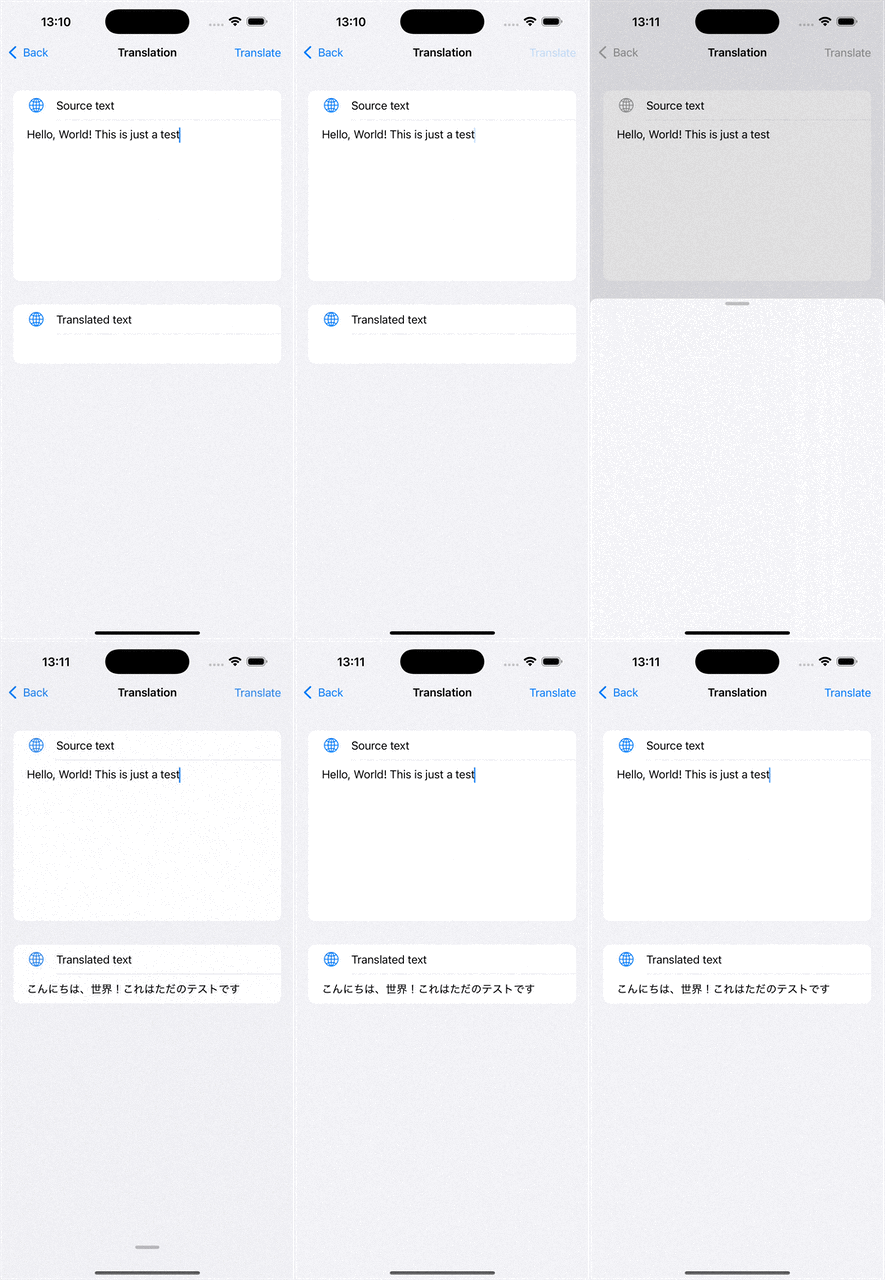
    In the above code, we added a code block for the translationPresentationview modifier. We then set the result text to the targetText variable of the app.

    This will not automatically provide the translated result to the app. Instead, user will see a button called Replace with translation

    The benefit of the above is that it uses system pre-designed UI, and you do not need to provide the source and target language, all are auto configured and detected by the system.

    But if you want to get the translated result programmatically, read on!

    Check if language is supported by iOS system

    iOS system offers translation service for some popular languages. To check which language pair is available, you can use

    func checkSpecificLanguagePairs() async {
    let availability = LanguageAvailability()

    // English to Japanese
    let english = Locale.Language(identifier: "en")
    let japanese = Locale.Language(identifier: "ja")
    let statusEnJa = await availability.status(from: english, to: japanese)
    print("English to Japanese: \(statusDescription(statusEnJa))")

    // English to Simplified Chinese
    let chinese = Locale.Language(identifier: "zh-Hans")
    let statusEnCh = await availability.status(from: english, to: chinese)
    print("English to Simplified Chinese: \(statusDescription(statusEnCh))")


    // English to German
    let german = Locale.Language(identifier: "de")
    let statusEnDe = await availability.status(from: english, to: german)
    print("English to German: \(statusDescription(statusEnDe))")
    }

    // Helper function to describe the status
    func statusDescription(_ status: LanguageAvailability.Status) -> String {
    switch status {
    case .installed:
    return "Translation installed and ready to use."
    case .supported:
    return "Translation supported but requires download of translation model."
    case .unsupported:
    return "Translation unsupported between the given language pair."
    @unknown default:
    return "Unknown status"
    }
    }

    Now, if the returned status is installed, it means you can translate normally. If it is unsupported , it means iOS does not support translation of that language peer. If it is supported but not installed it means the iOS system has not yet downloaded the files necessary for this translation.

    These translation model files only need to be downloaded once every device.

    Bonus topic: checking the language of a text

    Your app can actually detect the language of a given text by using NaturalLanguage framework

    import NaturalLanguage

    static func detectLanguage(for string: String) -> String? {
    let recognizer = NLLanguageRecognizer()
    recognizer.processString(string)
    guard let languageCode = recognizer.dominantLanguage?.rawValue else {
    return nil
    }
    return languageCode
    }

    Download translation models

    You can ask iOS to present the download dialog for the translation files.

    struct TranslationModelDownloader: View {

    var configuration: TranslationSession.Configuration {
    TranslationSession.Configuration(
    source: Locale.Language(identifier: "en"),
    target: Locale.Language(identifier: "ja")
    )
    }

    var body: some View {
    NavigationView {
    Text("Download translation files between \(configuration.source?.minimalIdentifier ?? "?") and \(configuration.target?.minimalIdentifier ?? "?")")
    .translationTask(configuration) { session in
    do {
    try await session.prepareTranslation()
    } catch {
    // Handle any errors.
    print("Error downloading translation: \(error)")
    }
    }
    }
    }
    }

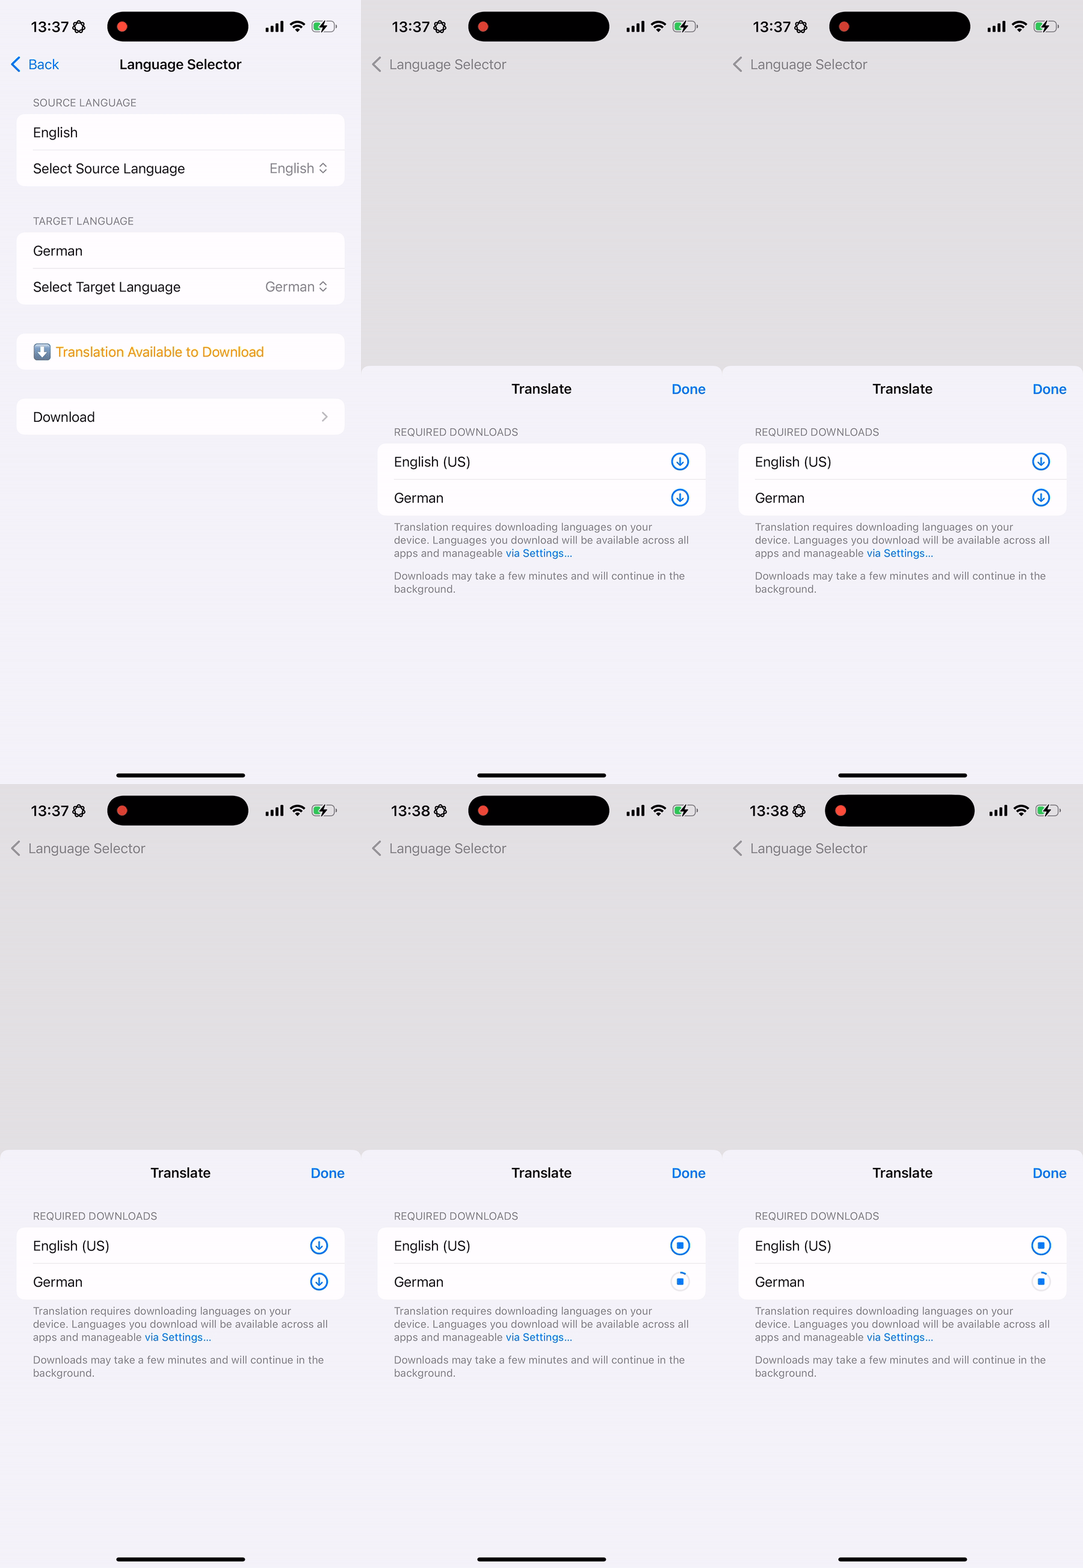
    In the above code, you will attach the translationTask view modifier to your SwiftUI view. You will define the language configuration (source language and target language) within the configuration parameter. Then, you will call session.prepareTranslation() within the translation task view modifier.

    When the view shows up, it will present a system dialog for downloading translation files.

    Here is a full SwiftUI demo code for checking available languages and downloading the models:

    //
    // LanguageAvailabilityChecker.swift
    // iOSTranslationVideo
    //
    // Created by msz on 2024/12/01.
    //

    import SwiftUI
    import Translation

    fileprivate class ViewModel: ObservableObject {
    @Published var sourceLanguage: Locale.Language = Locale.current.language
    @Published var targetLanguage: Locale.Language = Locale.current.language

    @Published var languageStatus: LanguageAvailability.Status = .unsupported

    @Published var sourceFilter: String = "English"
    @Published var targetFilter: String = "German"

    let languages: [Locale.Language]

    init() {
    // Initialize the list of available languages
    let languageCodes = Locale.LanguageCode.isoLanguageCodes
    self.languages = languageCodes.compactMap { Locale.Language(languageCode: $0) }
    }

    func displayName(for language: Locale.Language) -> String {
    guard let languageCode = language.languageCode?.identifier else {
    return language.maximalIdentifier
    }
    return Locale.current.localizedString(forLanguageCode: languageCode) ?? languageCode
    }

    var filteredSourceLanguages: [Locale.Language] {
    if sourceFilter.isEmpty {
    return languages
    } else {
    return languages.filter {
    displayName(for: $0).localizedCaseInsensitiveContains(sourceFilter)
    }
    }
    }

    var filteredTargetLanguages: [Locale.Language] {
    if targetFilter.isEmpty {
    return languages
    } else {
    return languages.filter {
    displayName(for: $0).localizedCaseInsensitiveContains(targetFilter)
    }
    }
    }

    func checkLanguageSupport() async {
    let availability = LanguageAvailability()
    let status = await availability.status(from: sourceLanguage, to: targetLanguage)

    DispatchQueue.main.async {
    self.languageStatus = status
    }
    }
    }


    struct LanguageAvailabilityChecker: View {
    @StateObject fileprivate var viewModel = ViewModel()

    var body: some View {
    Form {
    // Source Language Section
    Section("Source Language") {
    TextField("Filter languages", text: $viewModel.sourceFilter)
    .padding(.vertical, 4)

    Picker("Select Source Language", selection: $viewModel.sourceLanguage) {
    ForEach(viewModel.filteredSourceLanguages, id: \.maximalIdentifier) { language in
    Button {} label: {
    Text(viewModel.displayName(for: language))
    Text(language.minimalIdentifier)
    }
    .tag(language)
    }
    }
    .disabled(viewModel.filteredSourceLanguages.isEmpty)
    .onChange(of: viewModel.sourceLanguage) { _, _ in
    Task {
    await viewModel.checkLanguageSupport()
    }
    }
    }

    // Target Language Section
    Section("Target Language") {
    TextField("Filter languages", text: $viewModel.targetFilter)

    Picker("Select Target Language", selection: $viewModel.targetLanguage) {
    ForEach(viewModel.filteredTargetLanguages, id: \.maximalIdentifier) { language in
    Button {} label: {
    Text(viewModel.displayName(for: language))
    Text(language.minimalIdentifier)
    }
    .tag(language)
    }
    }
    .disabled(viewModel.filteredTargetLanguages.isEmpty)
    .onChange(of: viewModel.targetLanguage) { _, _ in
    Task {
    await viewModel.checkLanguageSupport()
    }
    }
    }

    // Status Section
    Section {
    if viewModel.languageStatus == .installed {
    Text("✅ Translation Installed")
    .foregroundColor(.green)
    } else if viewModel.languageStatus == .supported {
    Text("⬇️ Translation Available to Download")
    .foregroundColor(.orange)
    } else {
    Text("❌ Translation Not Supported")
    .foregroundColor(.red)
    }
    }

    // Download Button Section
    if viewModel.languageStatus == .supported {
    NavigationLink("Download") {
    TranslationModelDownloader(sourceLanguage: viewModel.sourceLanguage,
    targetLanguage: viewModel.targetLanguage)
    }
    }
    }
    .navigationTitle("Language Selector")
    .onAppear {
    Task {
    await viewModel.checkLanguageSupport()
    }
    }
    }
    }

    #Preview {
    LanguageAvailabilityChecker()
    }

    struct TranslationModelDownloader: View {

    var configuration: TranslationSession.Configuration

    init(sourceLanguage: Locale.Language, targetLanguage: Locale.Language) {
    self.configuration = TranslationSession.Configuration(source: sourceLanguage, target: targetLanguage)
    }

    var body: some View {
    NavigationView {
    Text("Download translation files between \(configuration.source?.minimalIdentifier ?? "?") and \(configuration.target?.minimalIdentifier ?? "?")")
    .translationTask(configuration) { session in
    do {
    try await session.prepareTranslation()
    } catch {
    // Handle any errors.
    print("Error downloading translation: \(error)")
    }
    }
    }
    }
    }

    Get translated result programmatically

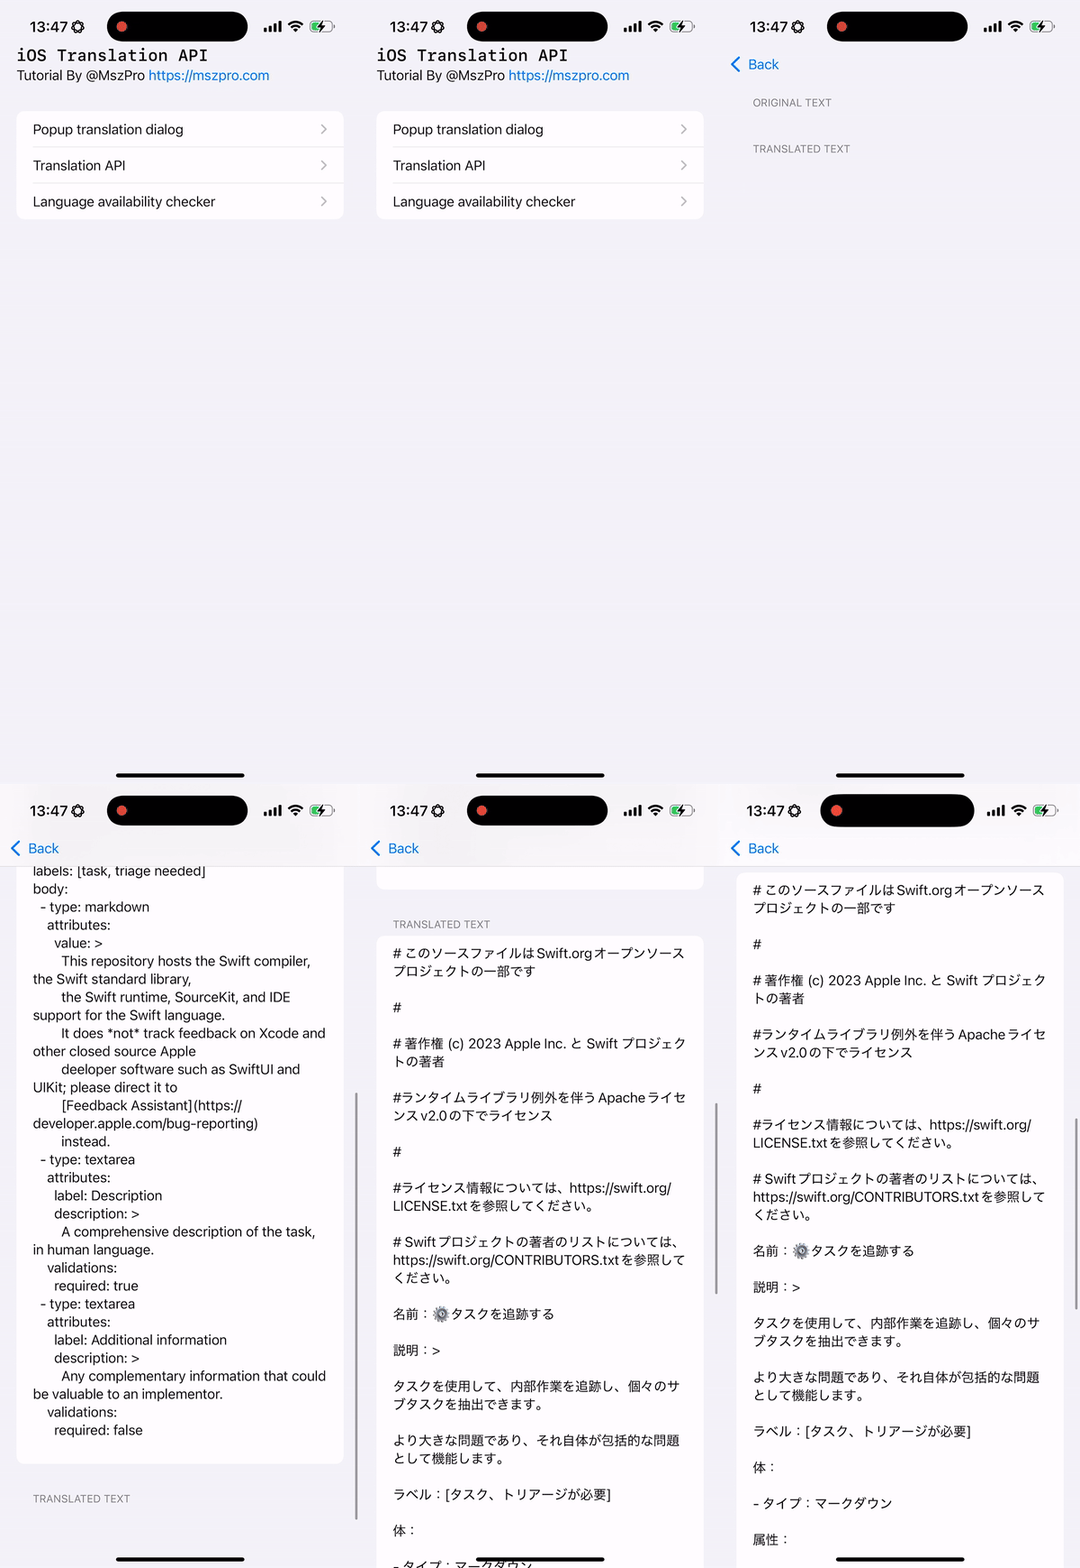
    If you want to show the translated result within your app’s view. You can use a translation session.

    To get the translation result programmatically, you still need a SwiftUI shown on screen.

    First, set up the variables to store the text to translate, an optional translation configuration, and one to store the result:

    @State private var textToTranslate: String?
    @State private var translationConfiguration: TranslationSession.Configuration?
    @State private var translationResult: String?

    Then, add a translationTask view modifier:

    .translationTask(translationConfiguration) { session in
    do {
    guard let textToTranslate else { return }
    let response = try await session.translate(textToTranslate)
    self.translationResult = response.targetText
    } catch {
    print("Error: \(error)")
    }
    }

    Now, when you are ready to translate (for example, you have fetched the text for translation, you can set a value to the variables). For example, in the below code, we fetch the content of a web page and translate it to Japanese.

    let (data, _) = try await URLSession.shared.data(from: URL(string: "https://raw.githubusercontent.com/swiftlang/swift/refs/heads/main/.github/ISSUE_TEMPLATE/task.yml")!)
    guard let webPageContent = String(data: data, encoding: .utf8) else { return }
    // start a translation to Japanese
    self.textToTranslate = webPageContent
    self.translationConfiguration = .init(target: .init(identifier: "ja"))

    Notice that the self.translationConfiguration can take no parameters, just the source language code, just the target language code, or both. For the parameters that you do not provide, the system will infer automatically based on user configuration.

    It is recommended that you define the source and target language by yourself.

    Here is the complete code:

    import SwiftUI
    import Translation

    struct CustomTranslation: View {

    @State private var textToTranslate: String?
    @State private var translationConfiguration: TranslationSession.Configuration?
    @State private var translationResult: String?

    var body: some View {
    Form {

    Section("Original text") {
    if let textToTranslate {
    Text(textToTranslate)
    }
    }

    Section("Translated text") {
    if let translationResult {
    Text(translationResult)
    }
    }

    }
    .translationTask(translationConfiguration) { session in
    do {
    guard let textToTranslate else { return }
    let response = try await session.translate(textToTranslate)
    self.translationResult = response.targetText
    } catch {
    print("Error: \(error)")
    }
    }
    .task {
    // fetch the text
    do {
    let (data, response) = try await URLSession.shared.data(from: URL(string: "https://raw.githubusercontent.com/swiftlang/swift/refs/heads/main/.github/ISSUE_TEMPLATE/task.yml")!)
    guard let webPageContent = String(data: data, encoding: .utf8) else { return }
    // start a translation to Japanese
    self.textToTranslate = webPageContent
    self.translationConfiguration = .init(target: .init(identifier: "ja"))
    } catch {
    print("Error: \(error)")
    }
    }
    }

    }

    #Preview {
    CustomTranslation()
    }

    Compatibility for older iOS versions

    The translationTask view modifier is only available for iOS 18 and higher. If you also want your app to support iOS 17, you can create a custom SwiftUI view modifier (that runs the translation task if it is iOS 18 or higher, and do nothing when it is not supported):

    @ViewBuilder
    public func translationTaskCompatible(
    shouldRun: Bool,
    textToTranslate: String,
    targetLanguage: Locale.Language = Locale.current.language,
    action: @escaping (_ detectedSourceLanguage: String, _ translationResult: String) -> Void
    ) -> some View {
    if shouldRun, #available(iOS 18.0, *) {
    self
    .translationTask(.init(target: targetLanguage), action: { session in
    do {
    let response = try await session.translate(textToTranslate)
    action(response.sourceLanguage.minimalIdentifier, response.targetText)
    } catch {
    print("Translation failed: \(error.localizedDescription)")
    }
    })
    } else {
    self // No-op for unsupported iOS versions
    }
    }

    Then, in your iOS code, you can use it like this:

    .translationTaskCompatible(shouldRun: self.runAppleTranslation,
    textToTranslate: self.displayedPostContent,
    targetLanguage: Locale.current.language, action: { detectedSourceLanguageCode, translationResult in
    self.displayedPostContent = translationResult
    })

    Submit multiple translation requests

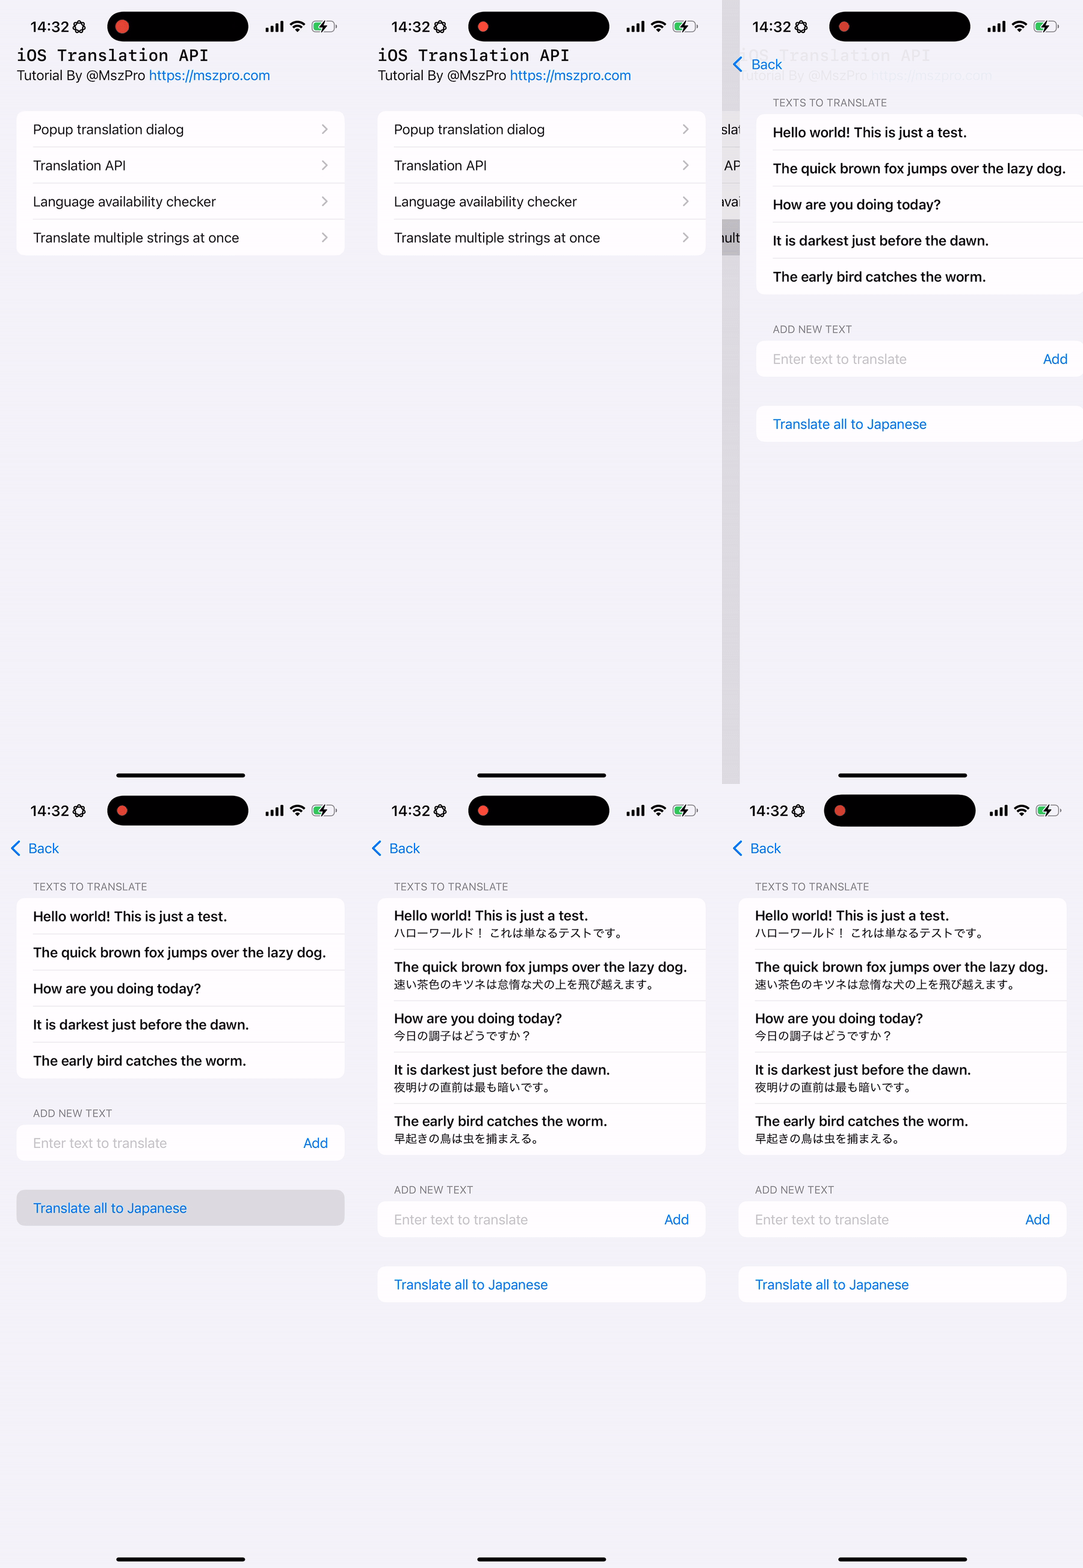
    You can submit multiple translation requests, and have results coming with unique IDs whenever it becomes available:

    Within a Task block and a SwiftUI view, you can create an array of translation requests, and submit them all in once. Within each request, you can specify a request ID, so you know which original text it is referring to when you get the result back.

    //
    // MultipleTranslate.swift
    // iOSTranslationVideo
    //
    // Created by msz on 2024/12/05.
    //

    import SwiftUI
    import Translation

    struct MultipleTranslate: View {

    // translation struct with the original text and optional translated text String
    struct TranslationEntry: Identifiable {
    let id: String
    let originalText: String
    var translatedText: String?

    init(id: String = UUID().uuidString, originalText: String, translatedText: String? = nil) {
    self.id = id
    self.originalText = originalText
    self.translatedText = translatedText
    }
    }

    @State private var textsToTranslate: [TranslationEntry] = [
    .init(originalText: "Hello world! This is just a test."),
    .init(originalText: "The quick brown fox jumps over the lazy dog."),
    .init(originalText: "How are you doing today?"),
    .init(originalText: "It is darkest just before the dawn."),
    .init(originalText: "The early bird catches the worm."),
    ]
    @State private var userEnteredNewText: String = ""

    @State private var configuration: TranslationSession.Configuration?

    var body: some View {

    Form {

    // list all text
    Section("Texts to translate") {
    List {
    ForEach(textsToTranslate) { text in
    VStack(alignment: .leading) {
    // original text
    Text(text.originalText)
    .font(.headline)
    // translated text, if available
    if let translatedText = text.translatedText {
    Text(translatedText)
    .font(.subheadline)
    }
    }
    }
    }
    }

    // allow user to add a new text, using a TextField and a Button
    Section("Add new text") {
    HStack {
    TextField("Enter text to translate",
    text: $userEnteredNewText)
    Button("Add") {
    textsToTranslate.append(.init(originalText: userEnteredNewText))
    userEnteredNewText = ""
    }
    }
    }

    Button("Translate all to Japanese") {
    self.configuration = .init(target: .init(identifier: "ja"))
    }

    }
    .translationTask(configuration) { session in
    let allRequests = textsToTranslate.map {
    return TranslationSession.Request(
    sourceText: $0.originalText,
    clientIdentifier: $0.id)
    }
    do {
    for try await response in session.translate(batch: allRequests) {
    print(response.targetText, response.clientIdentifier ?? "")
    if let i = self.textsToTranslate.firstIndex(where: { $0.id == response.clientIdentifier }) {
    var entry = self.textsToTranslate[i]
    entry.translatedText = response.targetText
    self.textsToTranslate.remove(at: i)
    self.textsToTranslate.insert(entry, at: i)
    }
    }
    } catch {
    print(error.localizedDescription)
    }
    }

    }

    }

    #Preview {
    MultipleTranslate()
    }

    Using in UIKit

    You might notice that all the above need a view modifier attached to a SwiftUI View.

    Here is a quote from Apple Engineer:

    “While the Translation APIs do need to be triggered from SwiftUI, there’s still a straightforward workaround to get this working from a mostly UIKit (or AppKit) app. You can add UIHostingController (or NSHostingController) to the place in your app you want any translation UI to present from. You can add the .translationPresentation or .translationTask modifier to a simple SwiftUI view, even though most of your app doesn’t use SwiftUI.” https://developer.apple.com/forums/thread/756837?answerId=791116022#791116022

    So the translation API needs to be triggered from a SwiftUI view.

    If you are using UIKit, you can use a UIHostingController

    //
    // TranslationUIKit.swift
    // iOSTranslationVideo
    //
    // Created by msz on 2024/12/05.
    //

    import Foundation
    import UIKit
    import SwiftUI

    #if canImport(Translation)
    import Translation
    #endif

    struct EmbeddedTranslationView: View {
    var sourceText: String
    @State private var isTranslationShown: Bool = false

    var body: some View {
    VStack {
    #if canImport(Translation)
    Button("Translate") {
    self.isTranslationShown = true
    }
    .translationPresentation(isPresented: $isTranslationShown,
    text: self.sourceText)
    #else
    Text("Translation feature not available.")
    #endif
    }
    }
    }

    // UIKit ViewController
    class ViewController: UIViewController {
    override func viewDidLoad() {
    super.viewDidLoad()
    view.backgroundColor = .systemBackground

    // Create the SwiftUI view
    let embeddedSwiftUIView = EmbeddedTranslationView(sourceText: "Hello world! This is a test.")

    // Embed the SwiftUI view in a UIHostingController
    let hostingController = UIHostingController(rootView: embeddedSwiftUIView)

    // Add the UIHostingController as a child view controller
    addChild(hostingController)
    hostingController.view.translatesAutoresizingMaskIntoConstraints = false
    view.addSubview(hostingController.view)
    hostingController.didMove(toParent: self)

    // Layout the SwiftUI view
    NSLayoutConstraint.activate([
    hostingController.view.centerXAnchor.constraint(equalTo: view.centerXAnchor),
    hostingController.view.centerYAnchor.constraint(equalTo: view.centerYAnchor),
    hostingController.view.widthAnchor.constraint(equalTo: view.widthAnchor, multiplier: 0.8),
    hostingController.view.heightAnchor.constraint(equalTo: view.heightAnchor, multiplier: 0.5)
    ])
    }
    }

    // Wrap UIKit ViewController for SwiftUI
    struct UIKitViewWrapper: UIViewControllerRepresentable {
    func makeUIViewController(context: Context) -> UIViewController {
    return ViewController()
    }

    func updateUIViewController(_ uiViewController: UIViewController, context: Context) {
    // No updates required for now
    }
    }

    // Add a SwiftUI Preview for Testing
    struct UIKitViewWrapper_Previews: PreviewProvider {
    static var previews: some View {
    UIKitViewWrapper()
    .edgesIgnoringSafeArea(.all)
    }
    }

    In the above view, you will embed the SwiftUI view (which shows a single translate button). When the user taps that button, you can present the translation view.

    Similarly, if you want to call the translation API, you can pass the translated value back from SwiftUI view to your UIKit view.

    Thank you for reading!

    The code in this article is available at: https://github.com/mszpro/iOS-System-Translation-Demo

    Japanese version: https://qiita.com/mashunzhe/items/d90ae92e7daba800abaf

    Follow me on Twitter: https://twitter.com/mszpro

    Subscribe on Youtube: https://www.youtube.com/@MszPro6

    Mastodon, Misskey: @[email protected]

    Bluesky: @mszpro.com

    Website: https://mszpro.com

    SoraSNS for Mastodon, Misskey, Bluesky, Nostr all in one: https://mszpro.com/sorasns