
If you follow through this article, you can learn to make a mini game that shows robot in random location in the room and you can tap it to hide it
This article talks about:
- Adding VisionOS target to your existing app
- Toggle the transparency of the view background
- Conditionally run code for VisionOS app only
- Load 3D asset (a .usdz file) using asset bundle
- Open an immersive space to display the 3D asset alongside 2D view
- Open a new window displaying the 3D asset, and allow user hand control to rotate and zoom the model
- Change the position, scale of the 3D asset
- Apply animation to the 3D asset
- Close the immersive space
- Allow using pinch and eye to select object
This article has been recorded by me as a Youtube video (but in English)
Github repository:
About my VisionOS journey
I have individually developed and published 3 VisionOS apps and games so far, with one featured on App Store home page story and one featured on WWDC 2024 keynote slide.
Spatial Dream
A tiny puzzle game in your room. Featured in WWDC 2024 Keynote slide.
SoraSNS for Mastodon, Misskey, Bluesky
A Fediverse SNS client. Feature on App Store home page story.
Spatial Boxer
Boxing in space!
Of course, I am working on some more exciting VisionOS apps.
Now, I will publish many articles on developing VisionOS apps, so you can make something cool too.
Writing an article like this takes days for me to prepare. Please consider follow me on Twitter (is that still a thing?) for emotional support, and buy a a coffee for realistic support.
Let’s get started!
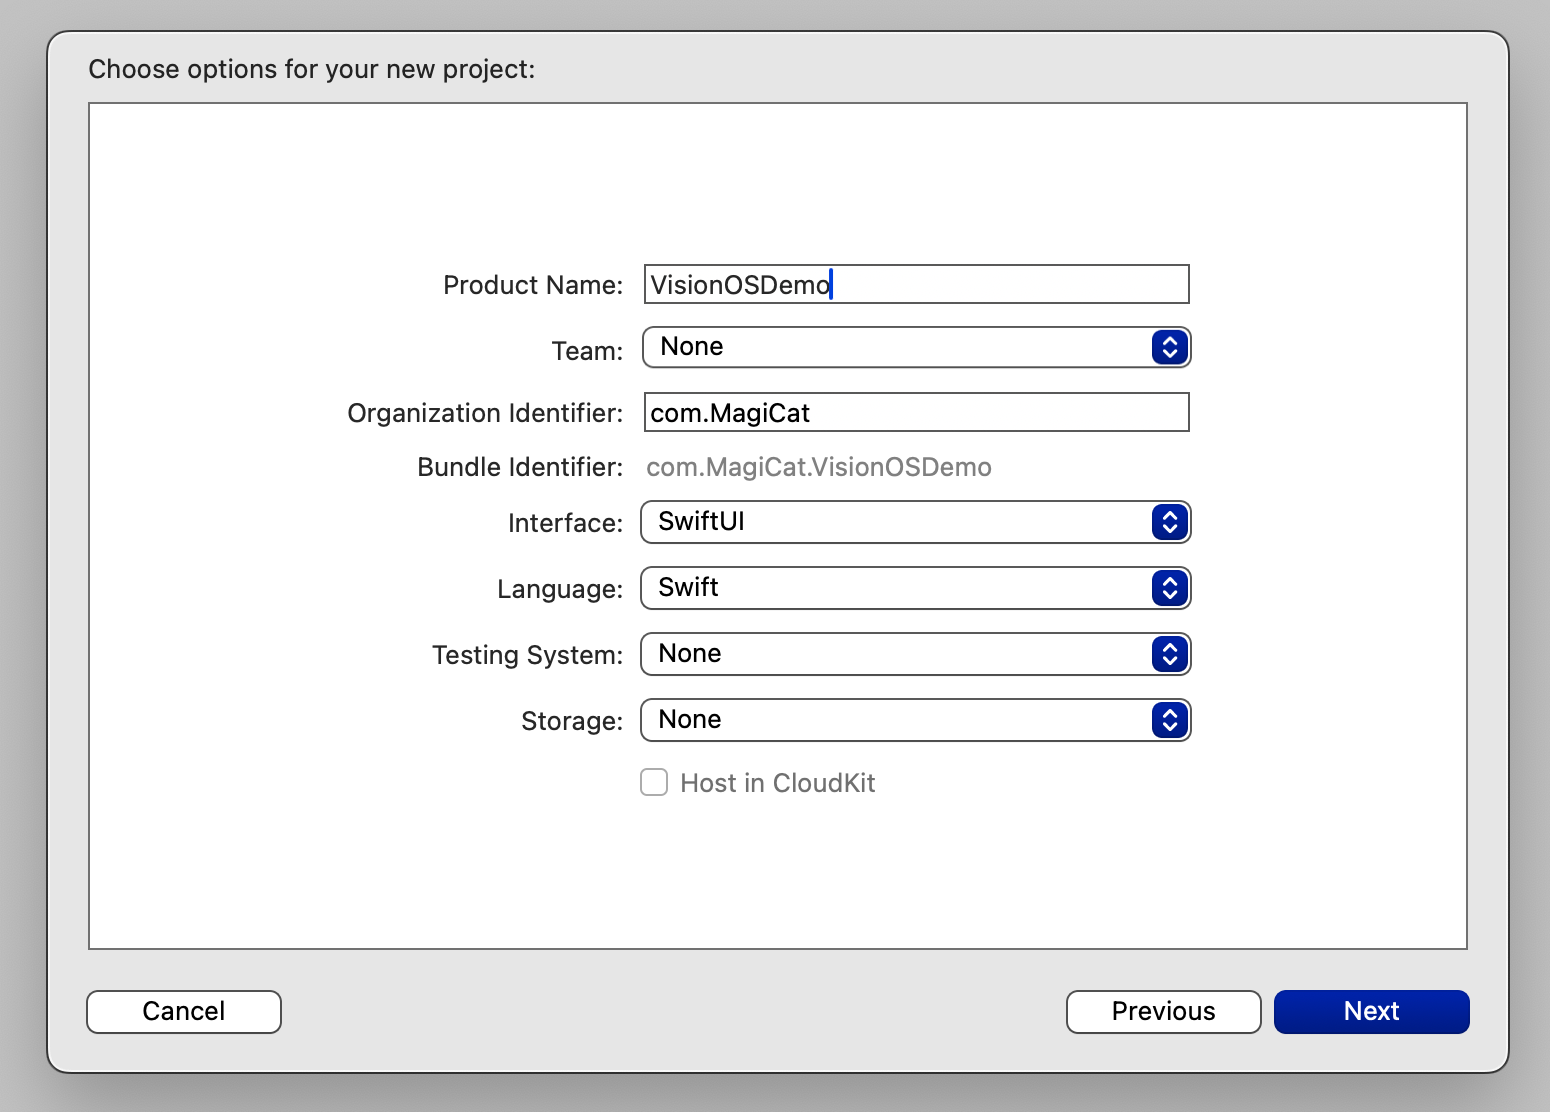
Starting point
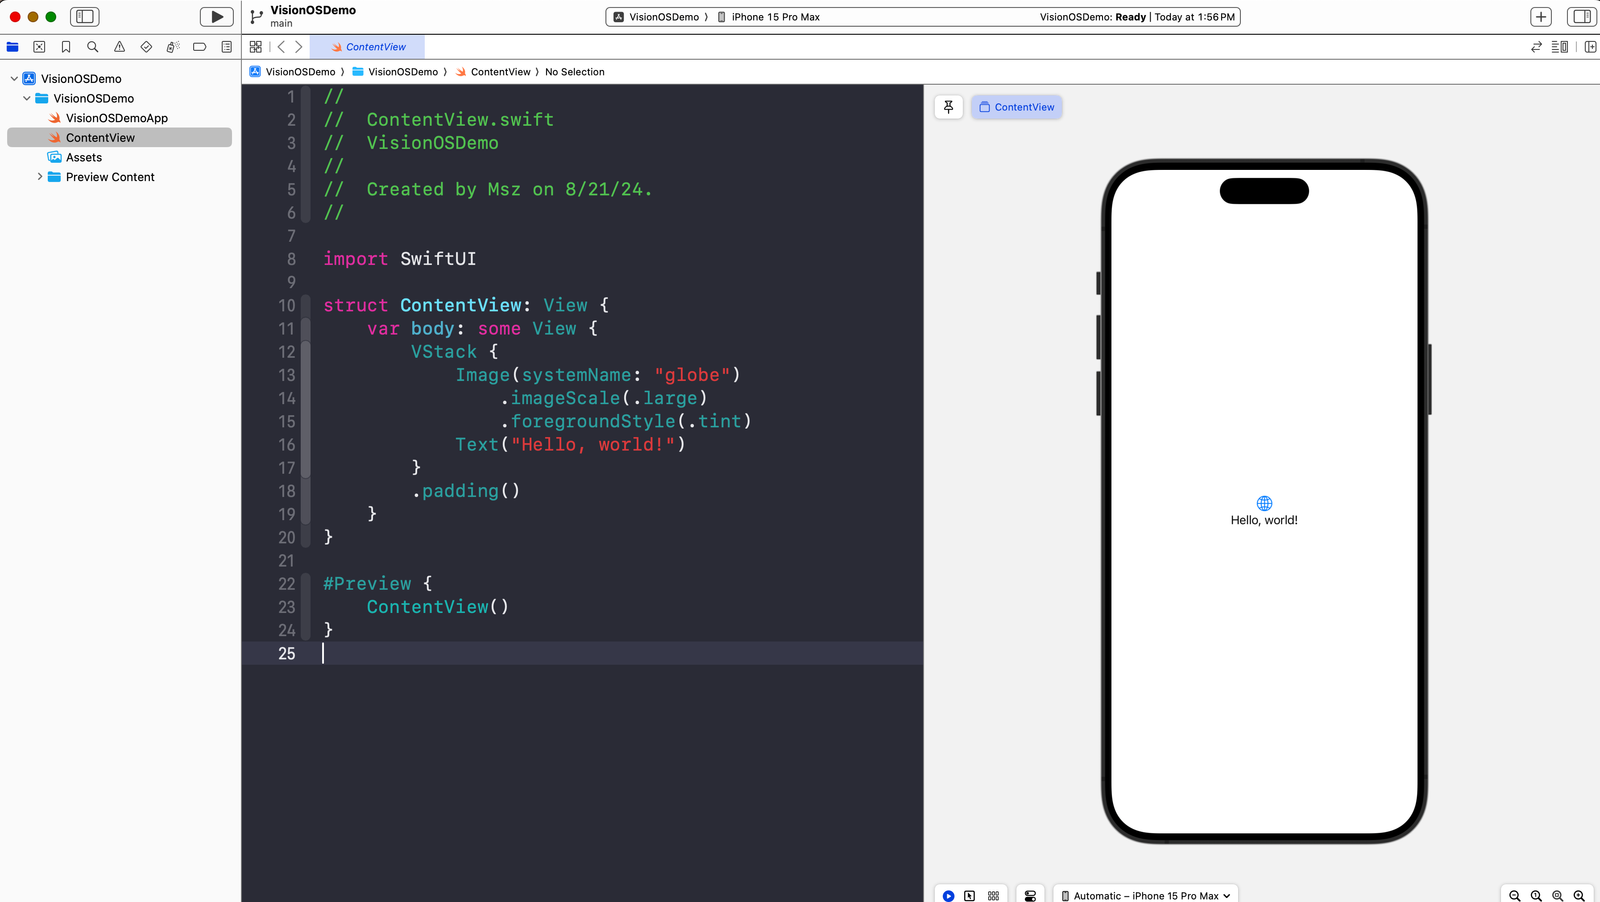
We will start from a regular SwiftUI application for iOS:
You will have the shown file structure and the basic SwiftUI view with the text Hello World
Now, switch to the project settings for the main target. You might see that the app already has Apple Vision support, but it says Designed for iPad.
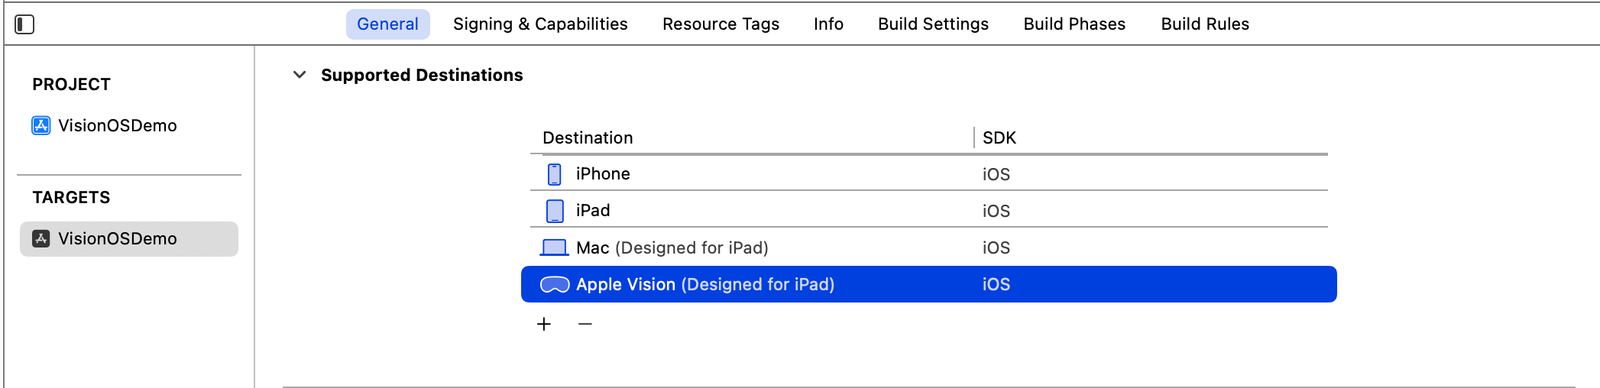
This means the app will run on VisionOS the same as running on iPad, without support for 3D spatial assets and with an ugly background.
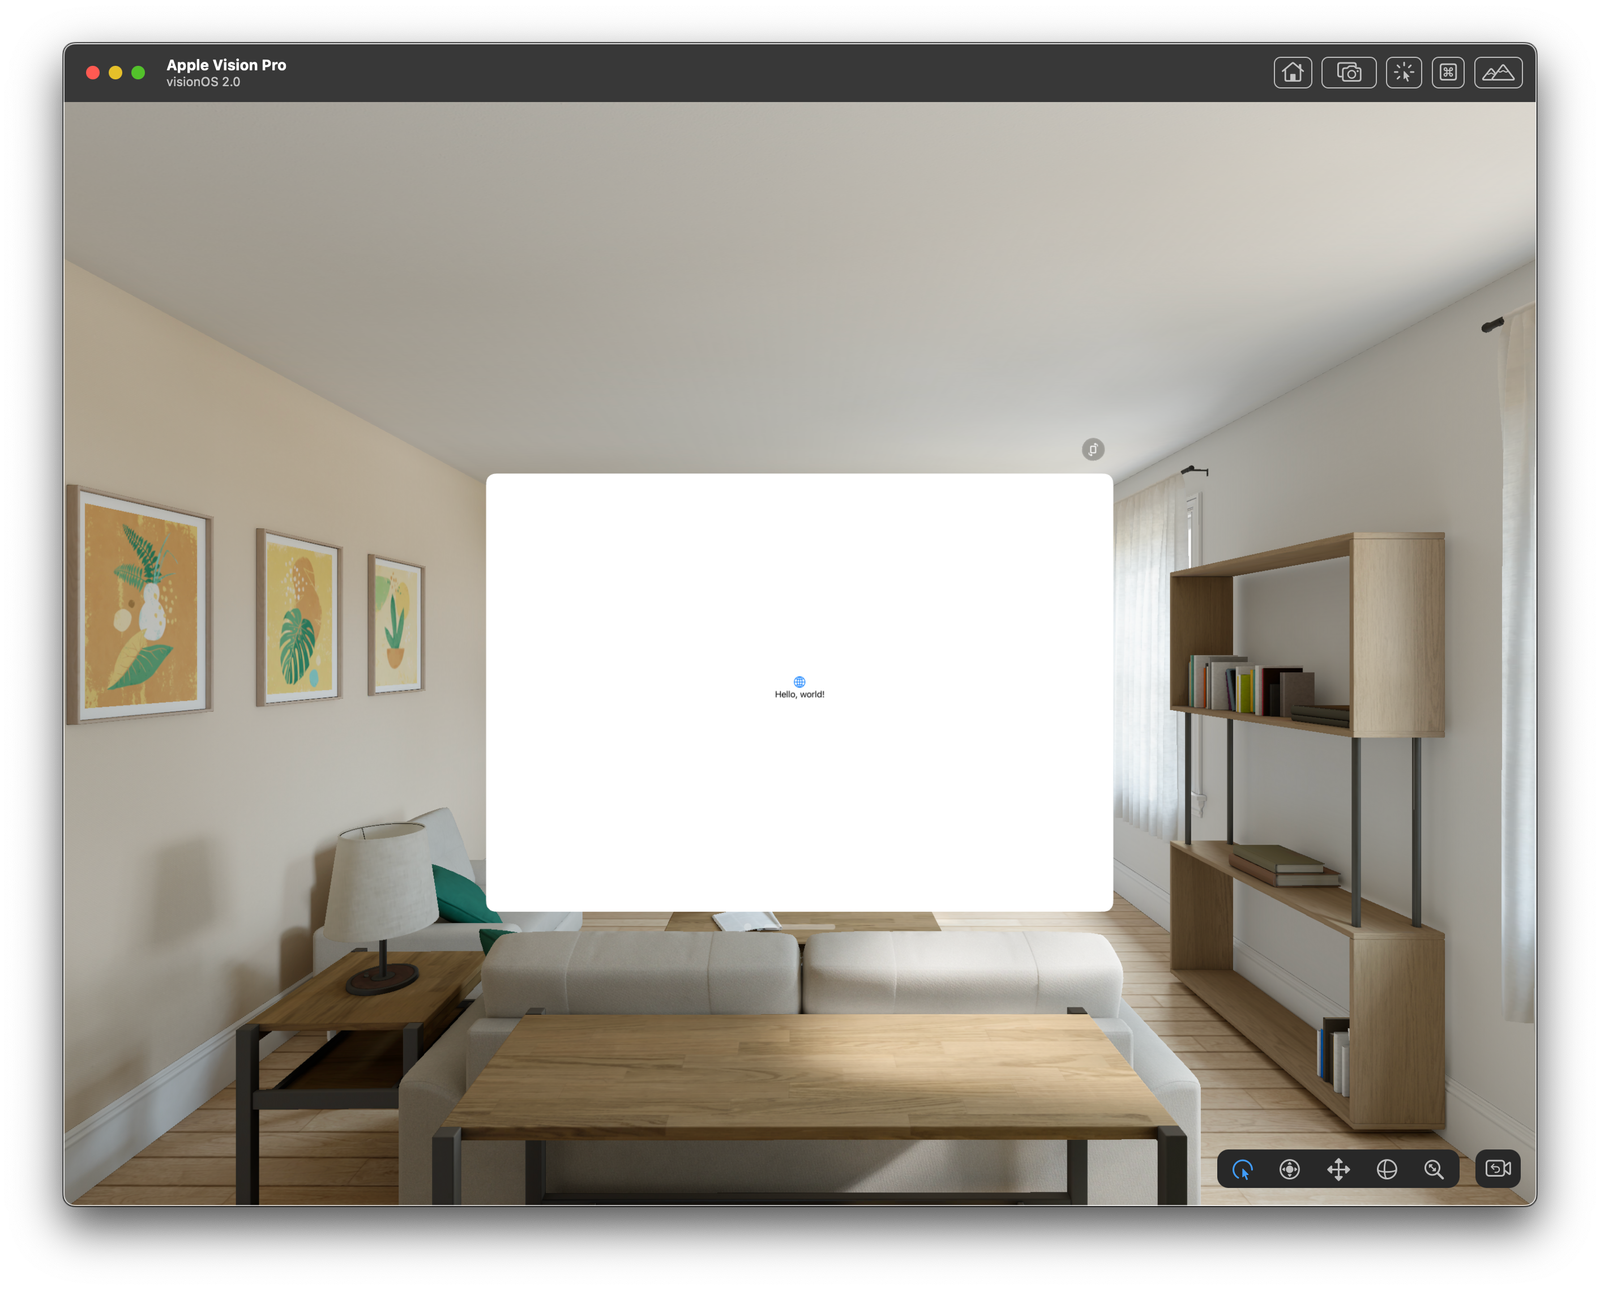
For example, we can run the app in the simulator now by switching the target to Apple Vision Pro and tap the run button:

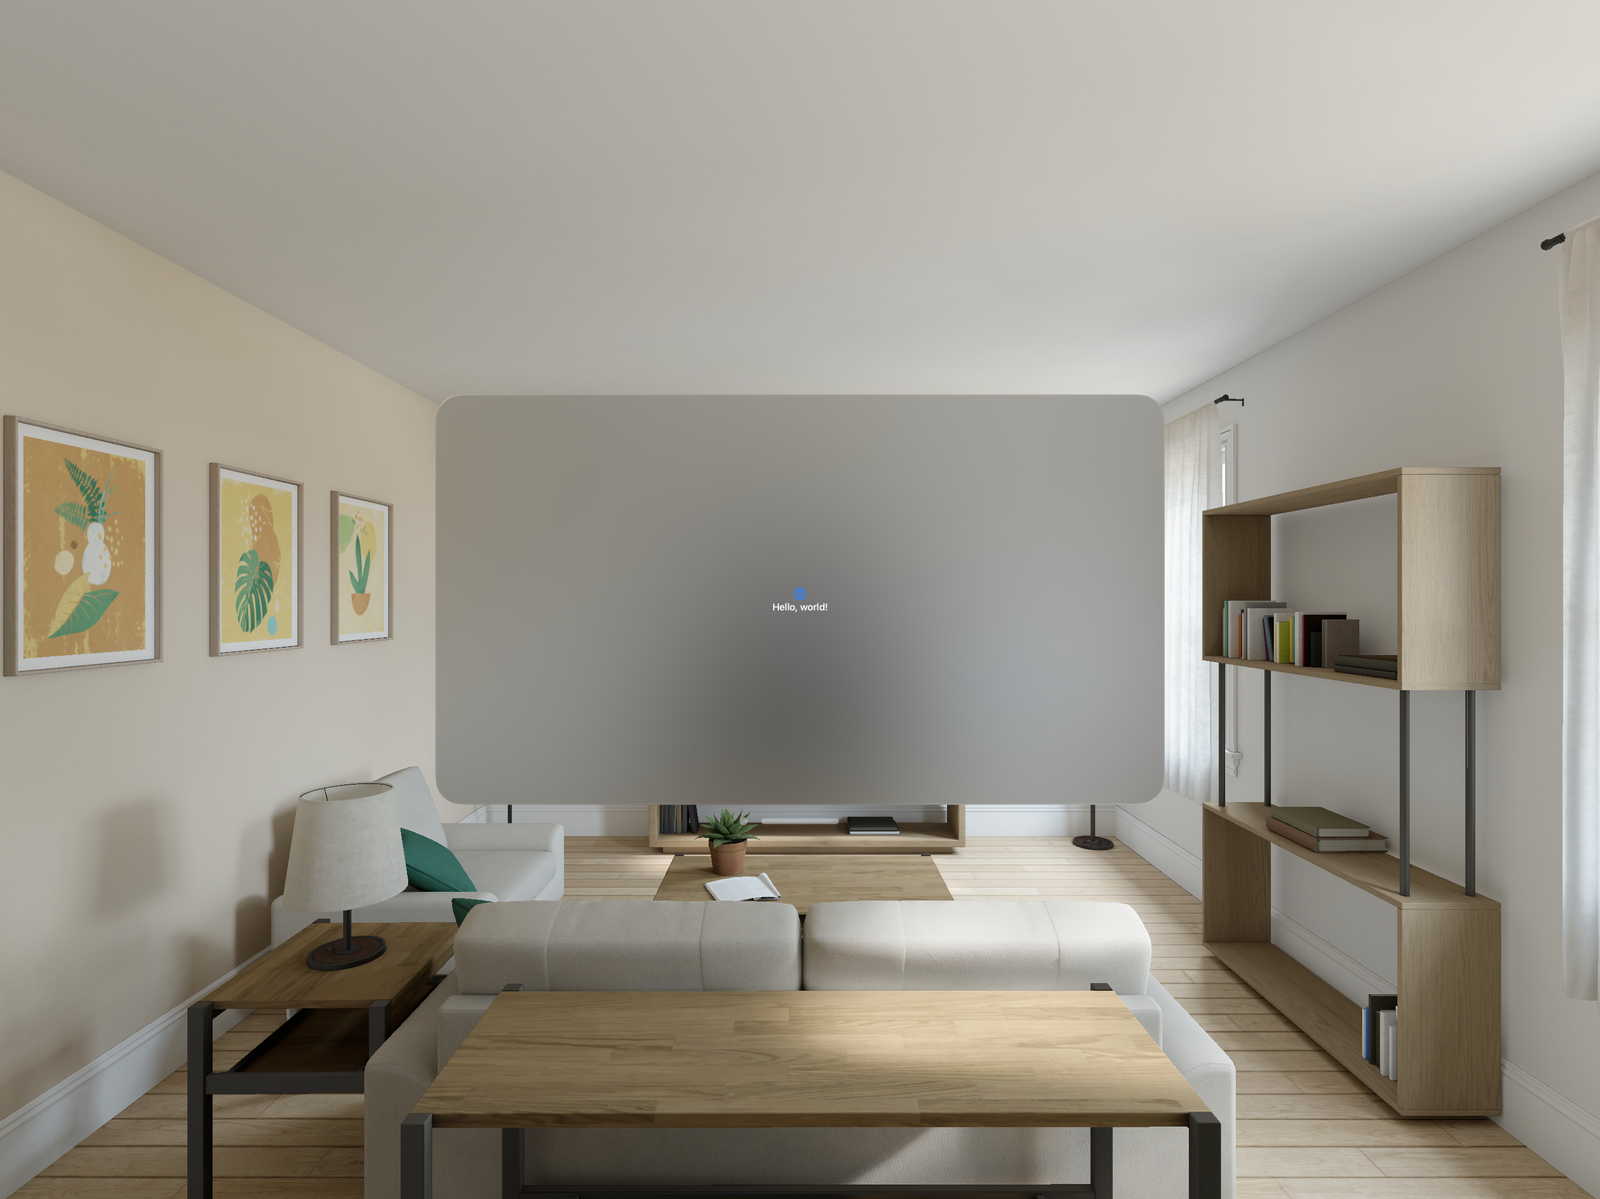
You can see the view has a white solid non-transparency background, and the user cannot resize the window at all.
Now, in the list of supported run destinations, remove the Apple Vision Pro (Designed for iPad), and add Apple Vision
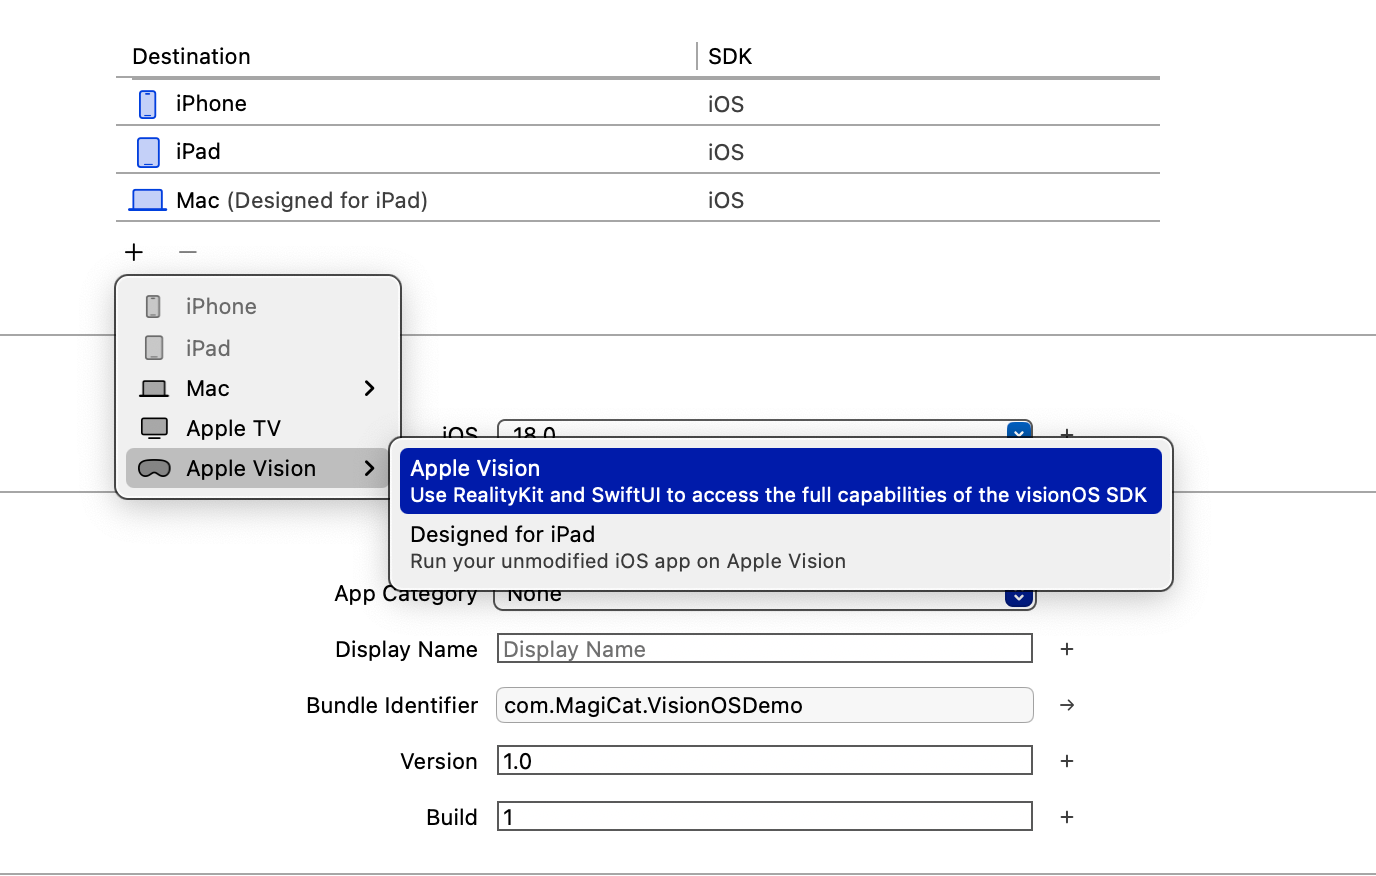
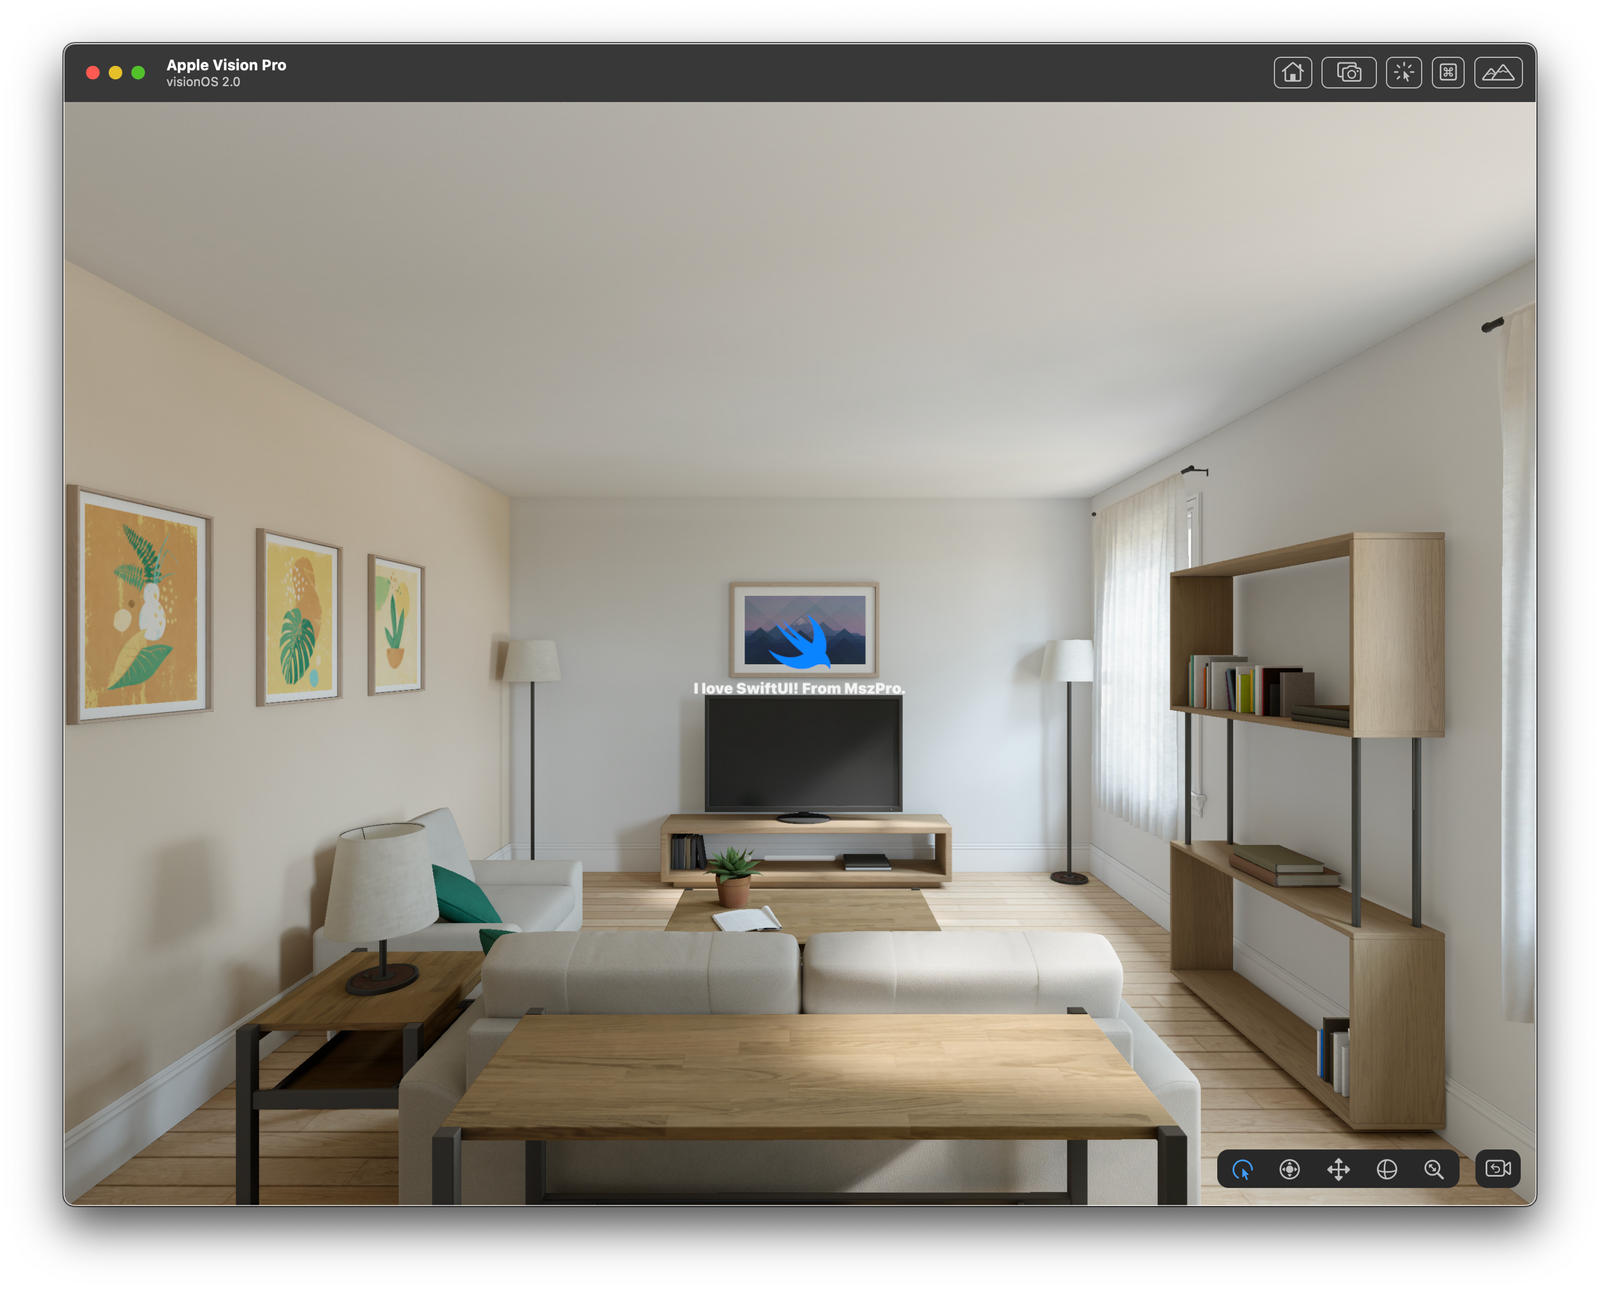
Now, run the app in the simulator again, you will see that it is now a native Apple Vision Pro app.
💡
If you apply the above changes for your existing iOS app, you might encounter compilation warnings. For example, the third party packages and libraries you use might not be compatible with Apple Vision OS, or, some of your code is not available for Vision OS. You will need to use the conditional check to run a separate branch of code for Vision OS, which I will talk about in later part of this article.
Control the background glassmorphism effect
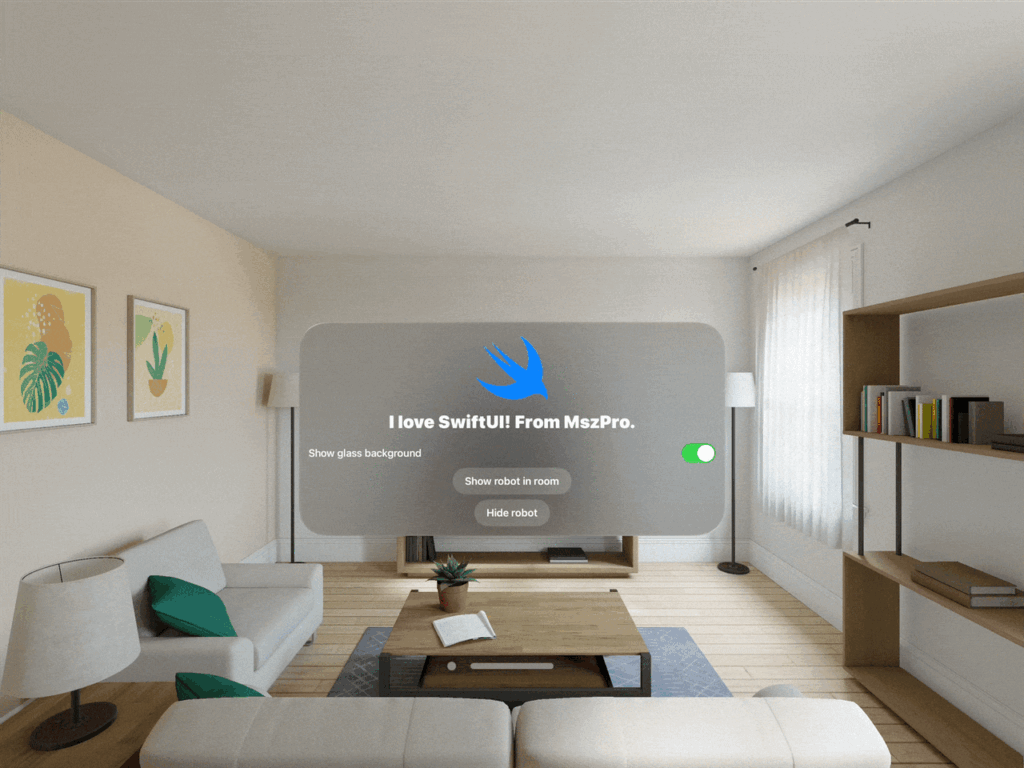
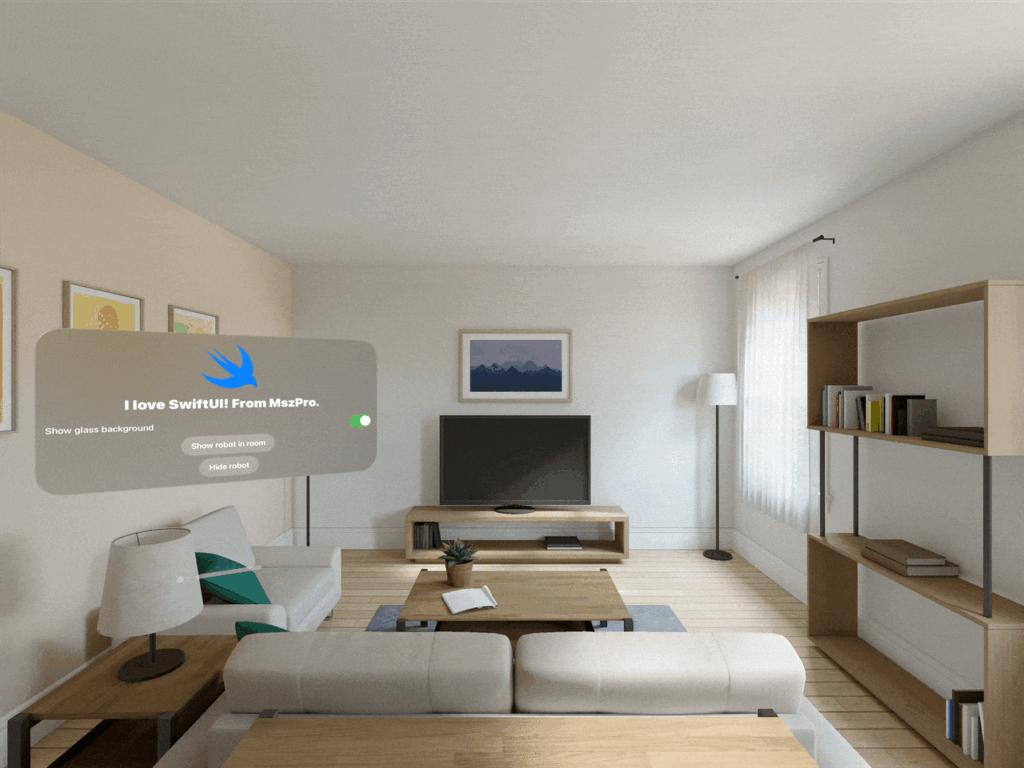
By default, you can see there is a glassmorphism (like a glass, and you can see what’s behind the window) background applied. We can control that.
First, since our application window displays 2D contents only, we can set the windowStyle to .plain in the main SwiftUI app:
import SwiftUI

@main
struct VisionOSDemoApp: App {
    var body: some Scene {
        WindowGroup {
            ContentView()
        }
        .windowStyle(.plain)
    }
}
Then, in our ContentView, we can set to not show the background glass effect:
struct ContentView: View {
var body: some View {
VStack {
Image(systemName: "swift")
.resizable()
.scaledToFit()
.frame(width: 120, height: 120)
.foregroundStyle(.tint)
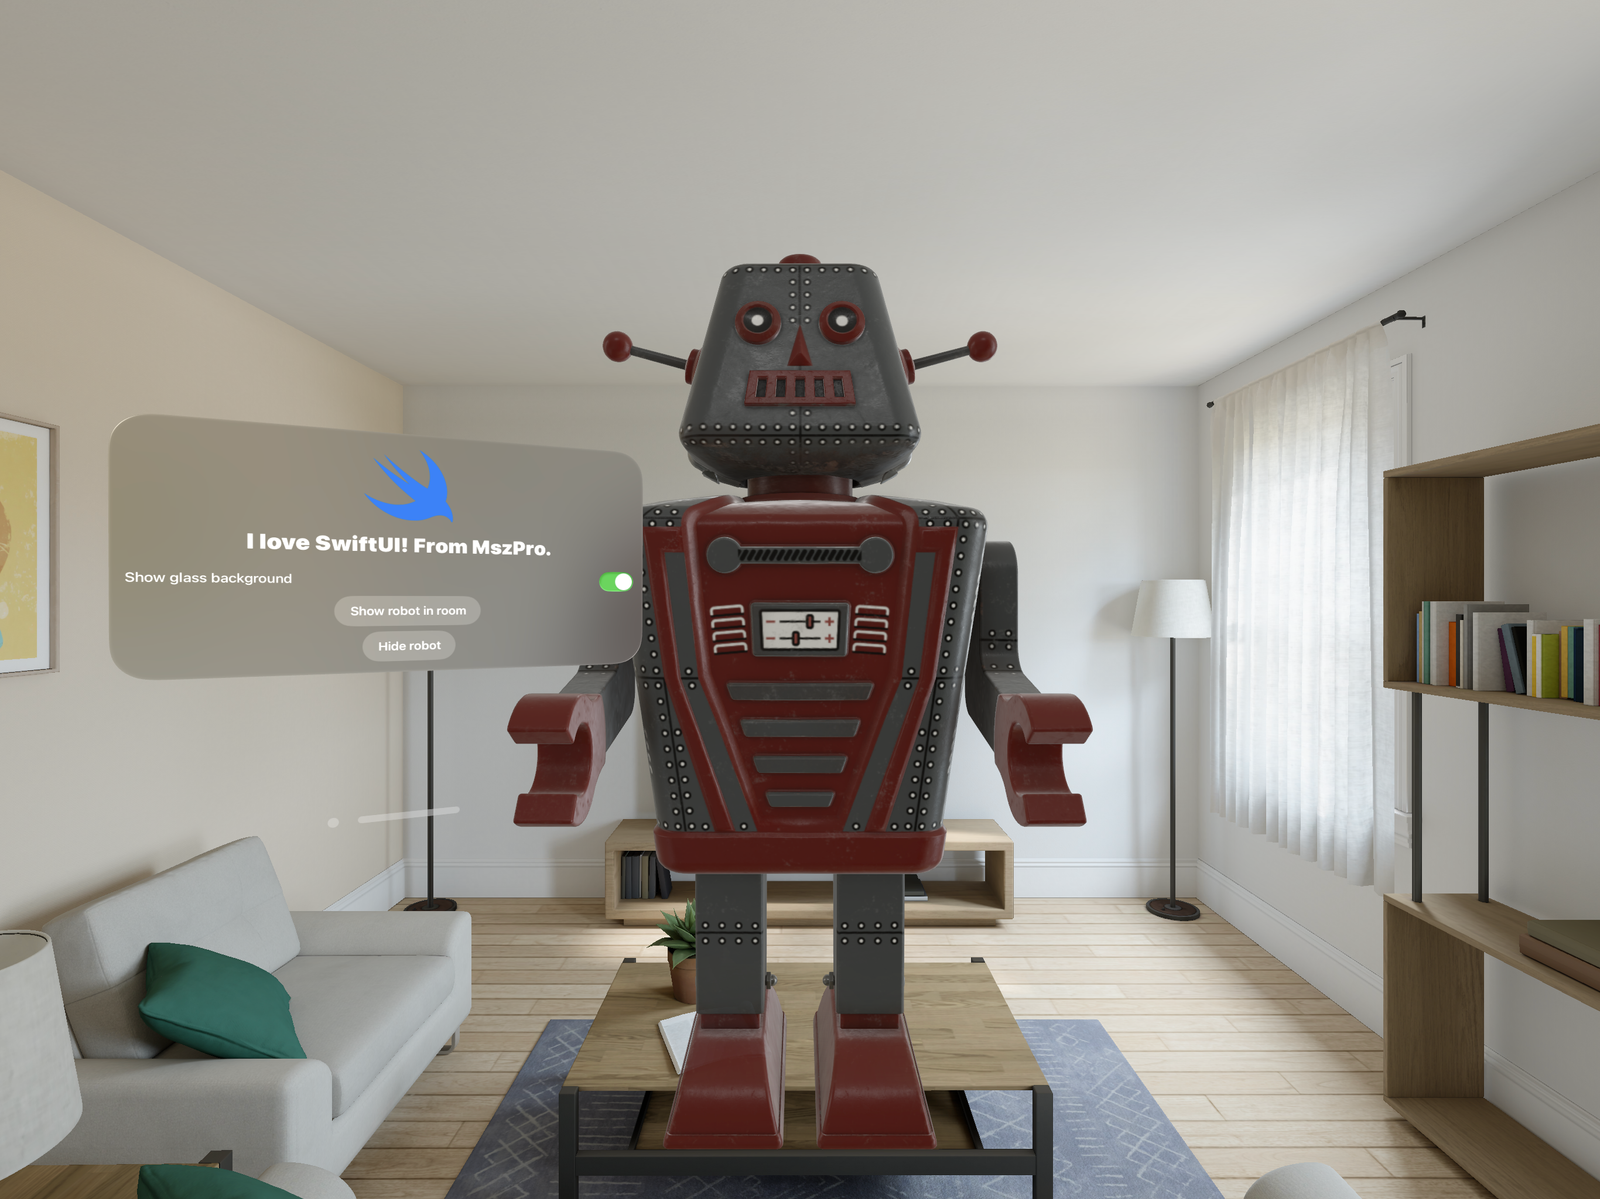
Text("I love SwiftUI! From MszPro.")
.font(.largeTitle)
.bold()
}
.padding()
.glassBackgroundEffect(displayMode: .never)
}
}Now, you will see the following:
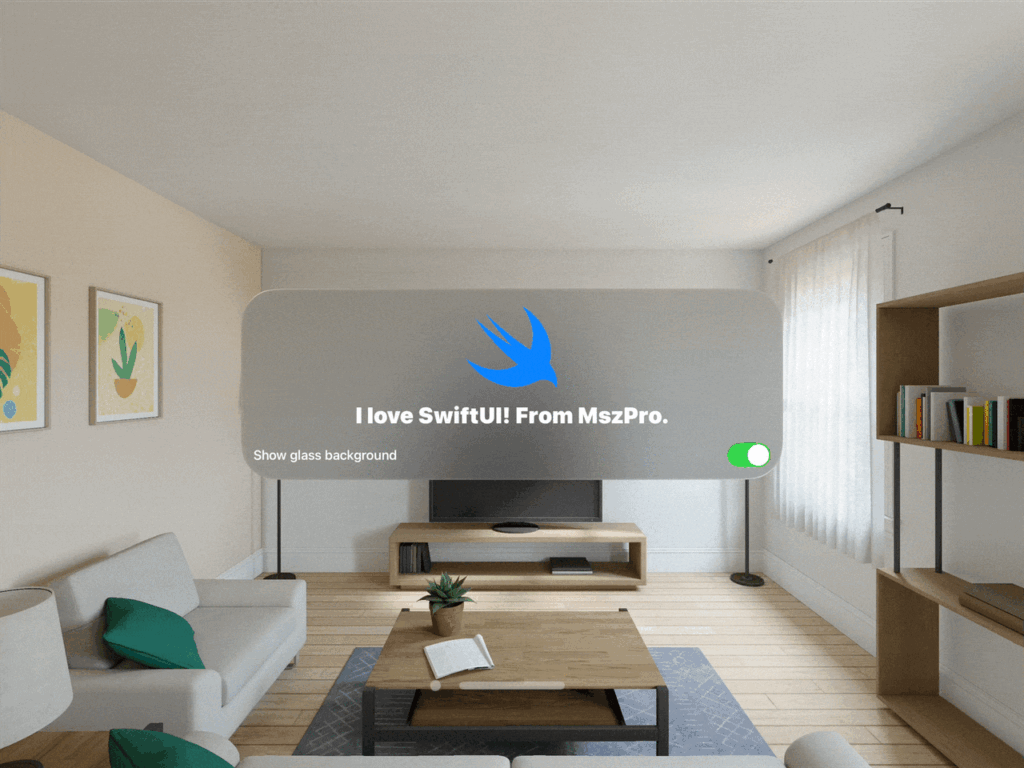
You can also control whether the background glass effect is shown dynamically. For example, here we can use a @State variable and a toggle:
struct ContentView: View {

    @State private var showGlassBackground: Bool = true

    var body: some View {

        VStack {

            Image(systemName: "swift")
                .resizable()
                .scaledToFit()
                .frame(width: 120, height: 120)
                .foregroundStyle(.tint)

            Text("I love SwiftUI! From MszPro.")
                .font(.largeTitle)
                .bold()

            Toggle("Show glass background", isOn: $showGlassBackground)

        }
        .padding()
        .frame(width: 700)
        .glassBackgroundEffect(displayMode: showGlassBackground ? .always : .never)

    }

}
Creating a 3D asset bundle
To embed 3D assets in your app, you should create a special Swift Package that contains your 3D asset files (typically .usdz).
To do this, first you open the Reality Composer Pro application:
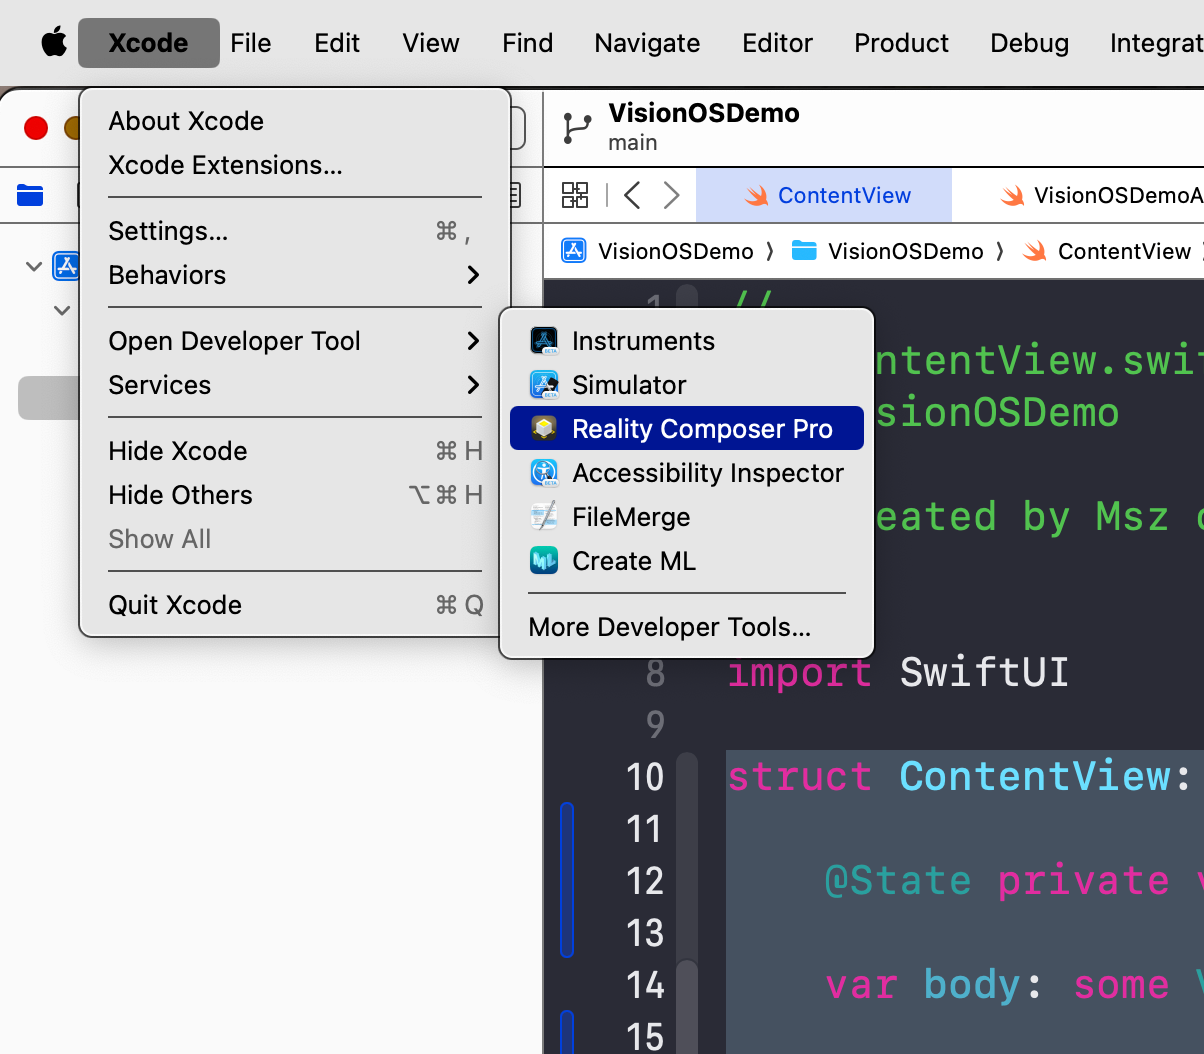
Tap on Create new project , and create a project within the same folder of your Xcode project.
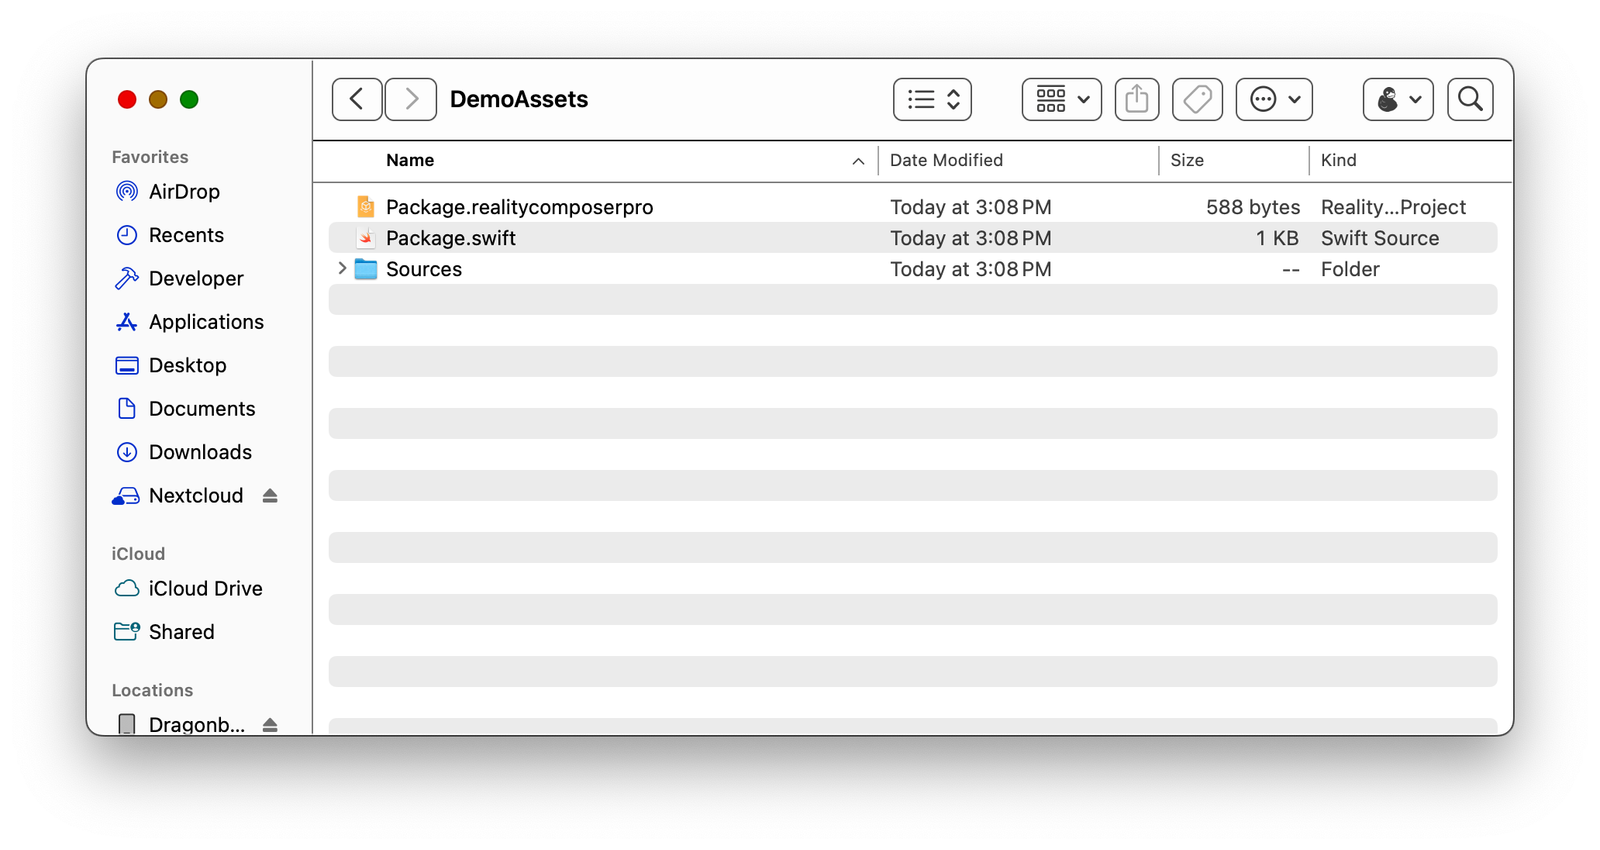
If you view that newly created project folder, you will see it is actually a Swift Package:
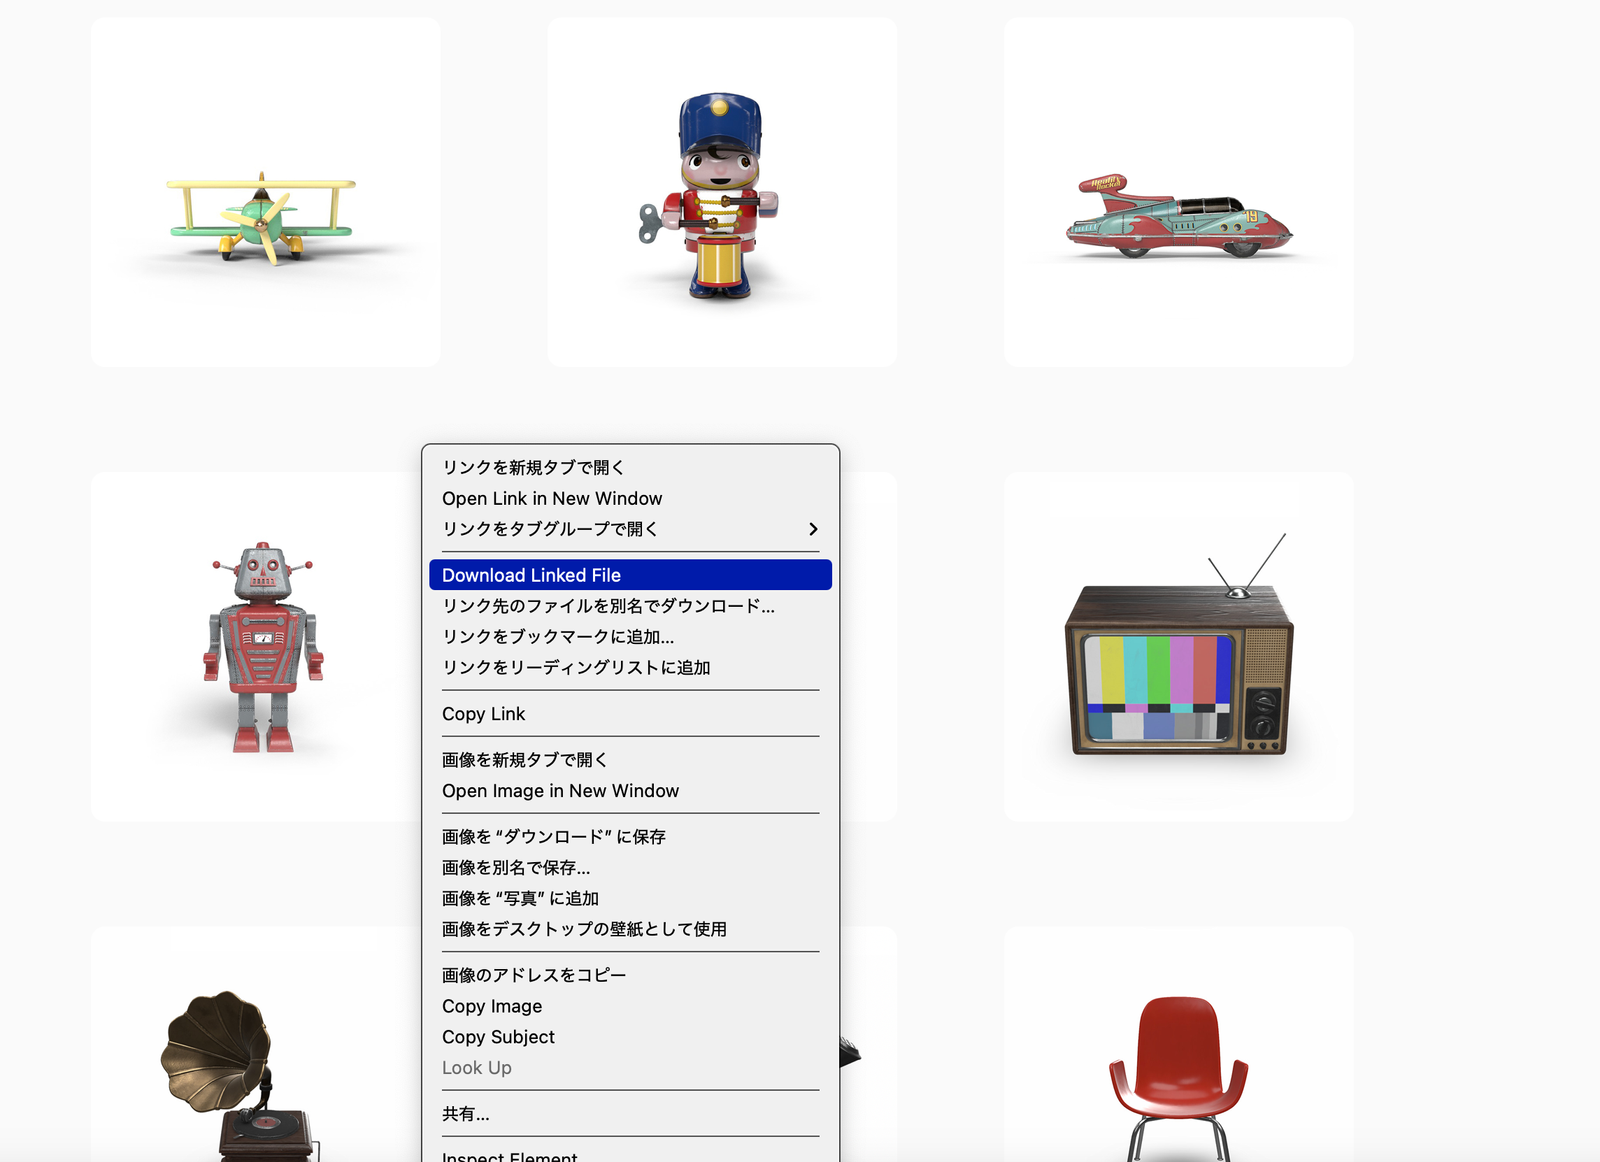
Next up, we are going to add a 3D asset to it. You can use one of the example 3D model on Apple Developer website here: https://developer.apple.com/augmented-reality/quick-look/
Because we will also talk about animation, you should go and pick a model that has animation, for example, the robot (you should use the robot in order to follow along with this article tutorial). Right click and download the .usdz file
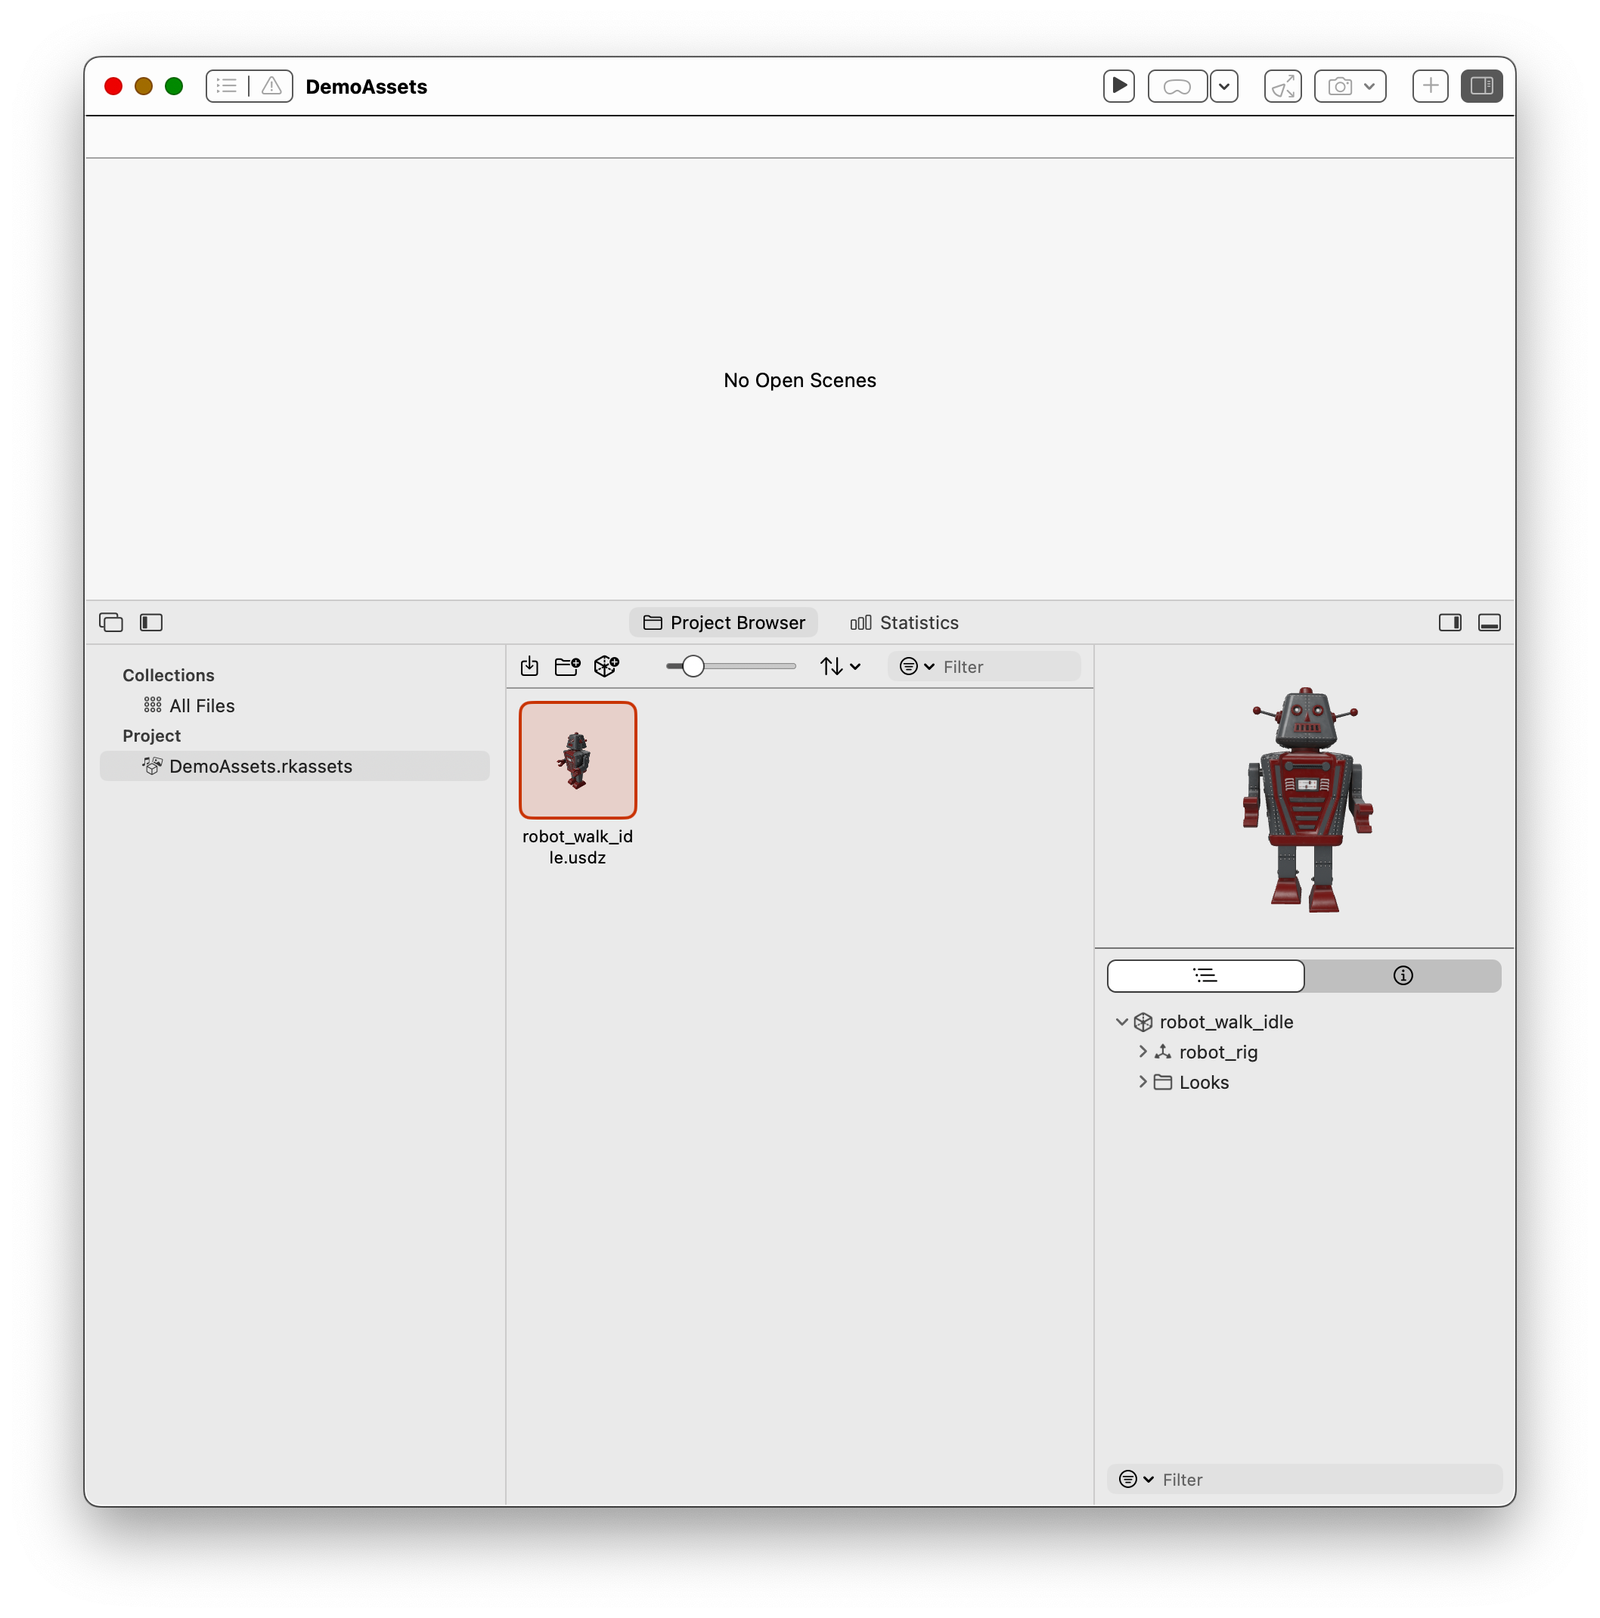
Drag the download file to the Reality Composer Pro project browser. And you will see the animated model playing on the right panel:
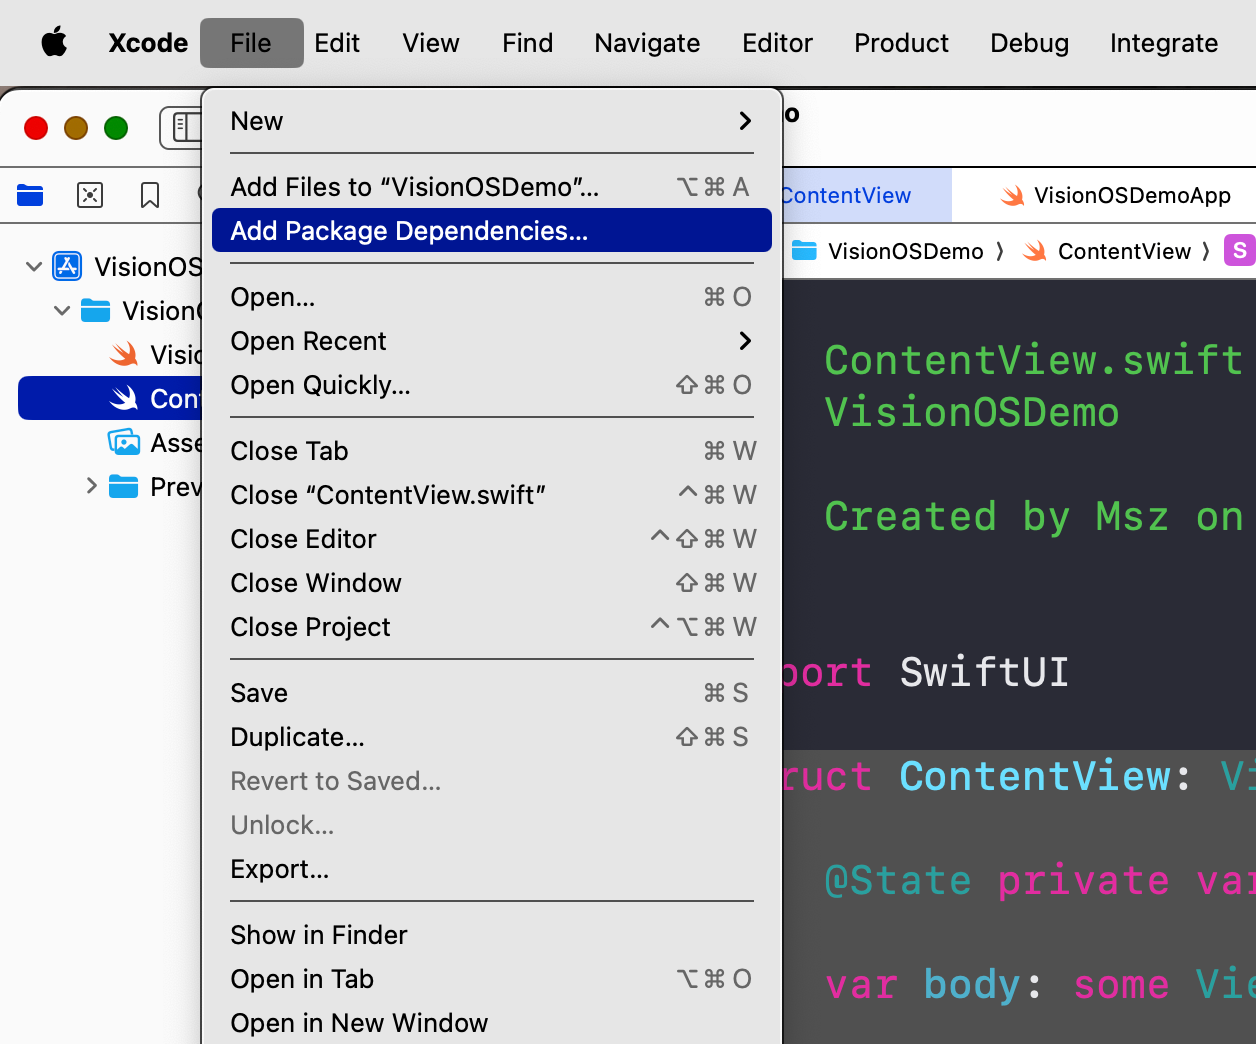
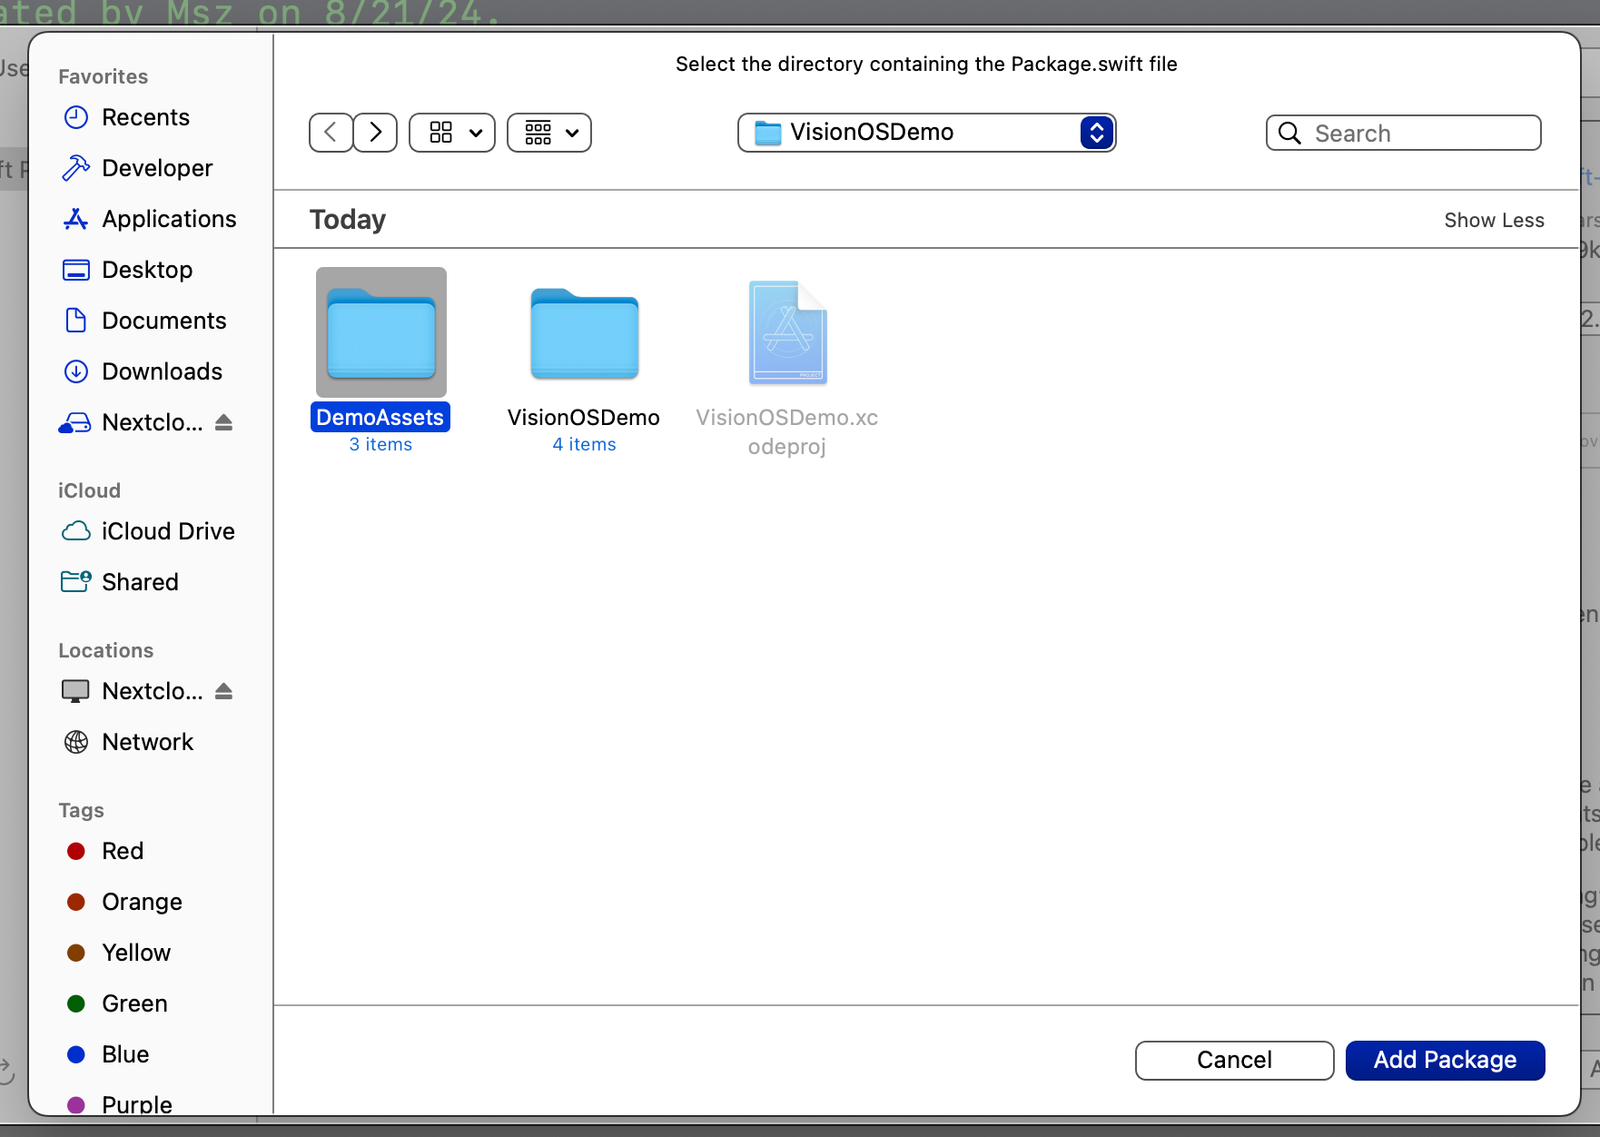
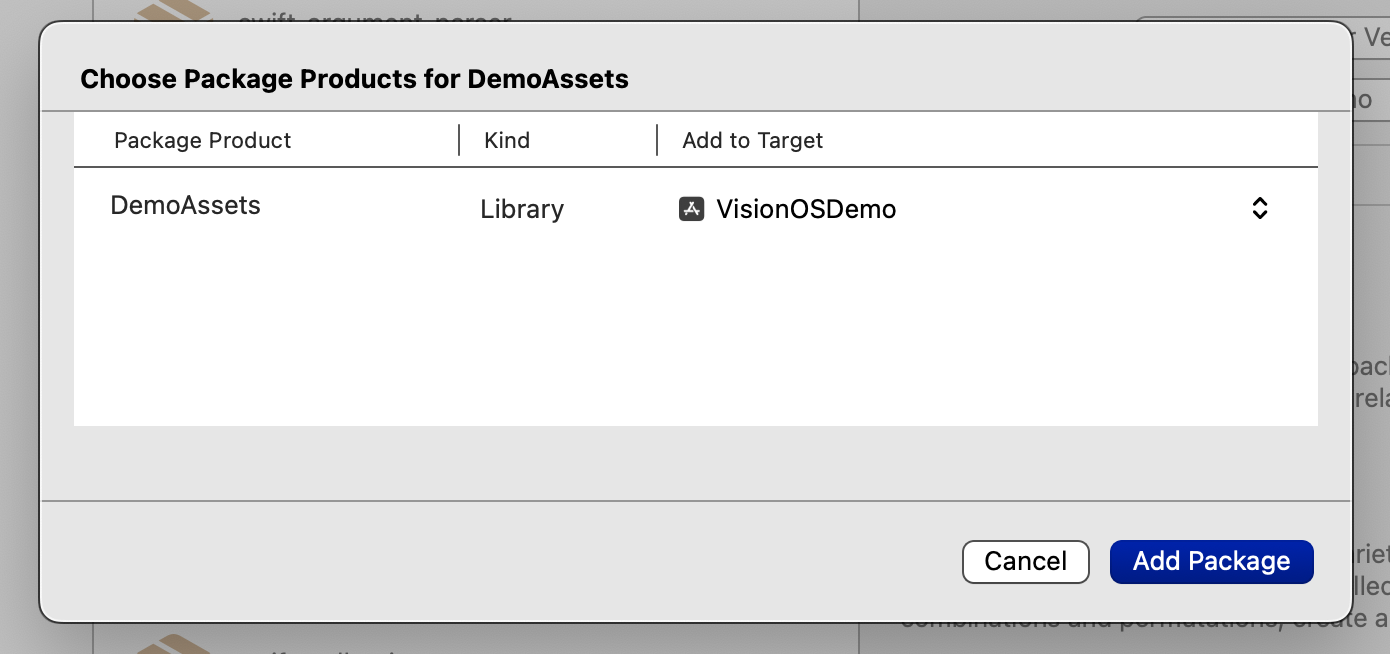
Now, in your project in Xcode, import this Reality Composer Pro project like you are importing a Swift Package:
Function to load asset from the bundle
Now, we need to write a function to load a specific asset from the Reality Composer Pro bundle:
#if os(visionOS)

import Foundation
import RealityKit
import DemoAssets

@MainActor
func loadFromRealityComposerProject(nodeName: String, sceneFileName: String) async -> Entity? {
    var entity: Entity? = nil
    do {
        let scene = try await Entity(named: sceneFileName,
                                     in: demoAssetsBundle)
        entity = scene.findEntity(named: nodeName)
    } catch {
        print("Failed to load asset named \(nodeName) within the file \(sceneFileName)")
    }
    return entity
}

#endif
Notice here, we have used a if os(visionOS) check so this code only compiles if we are building for VisionOS.
The input of this function takes the name of the node (optional), and the name of the file.
It is optional, since the above code uses the root node if you do not provide a specific entity name. However, if you’d like to, you can easily list all child nodes.
First, open the .usdz file, export to SceneKit, and then view the list of nodes included in the file:
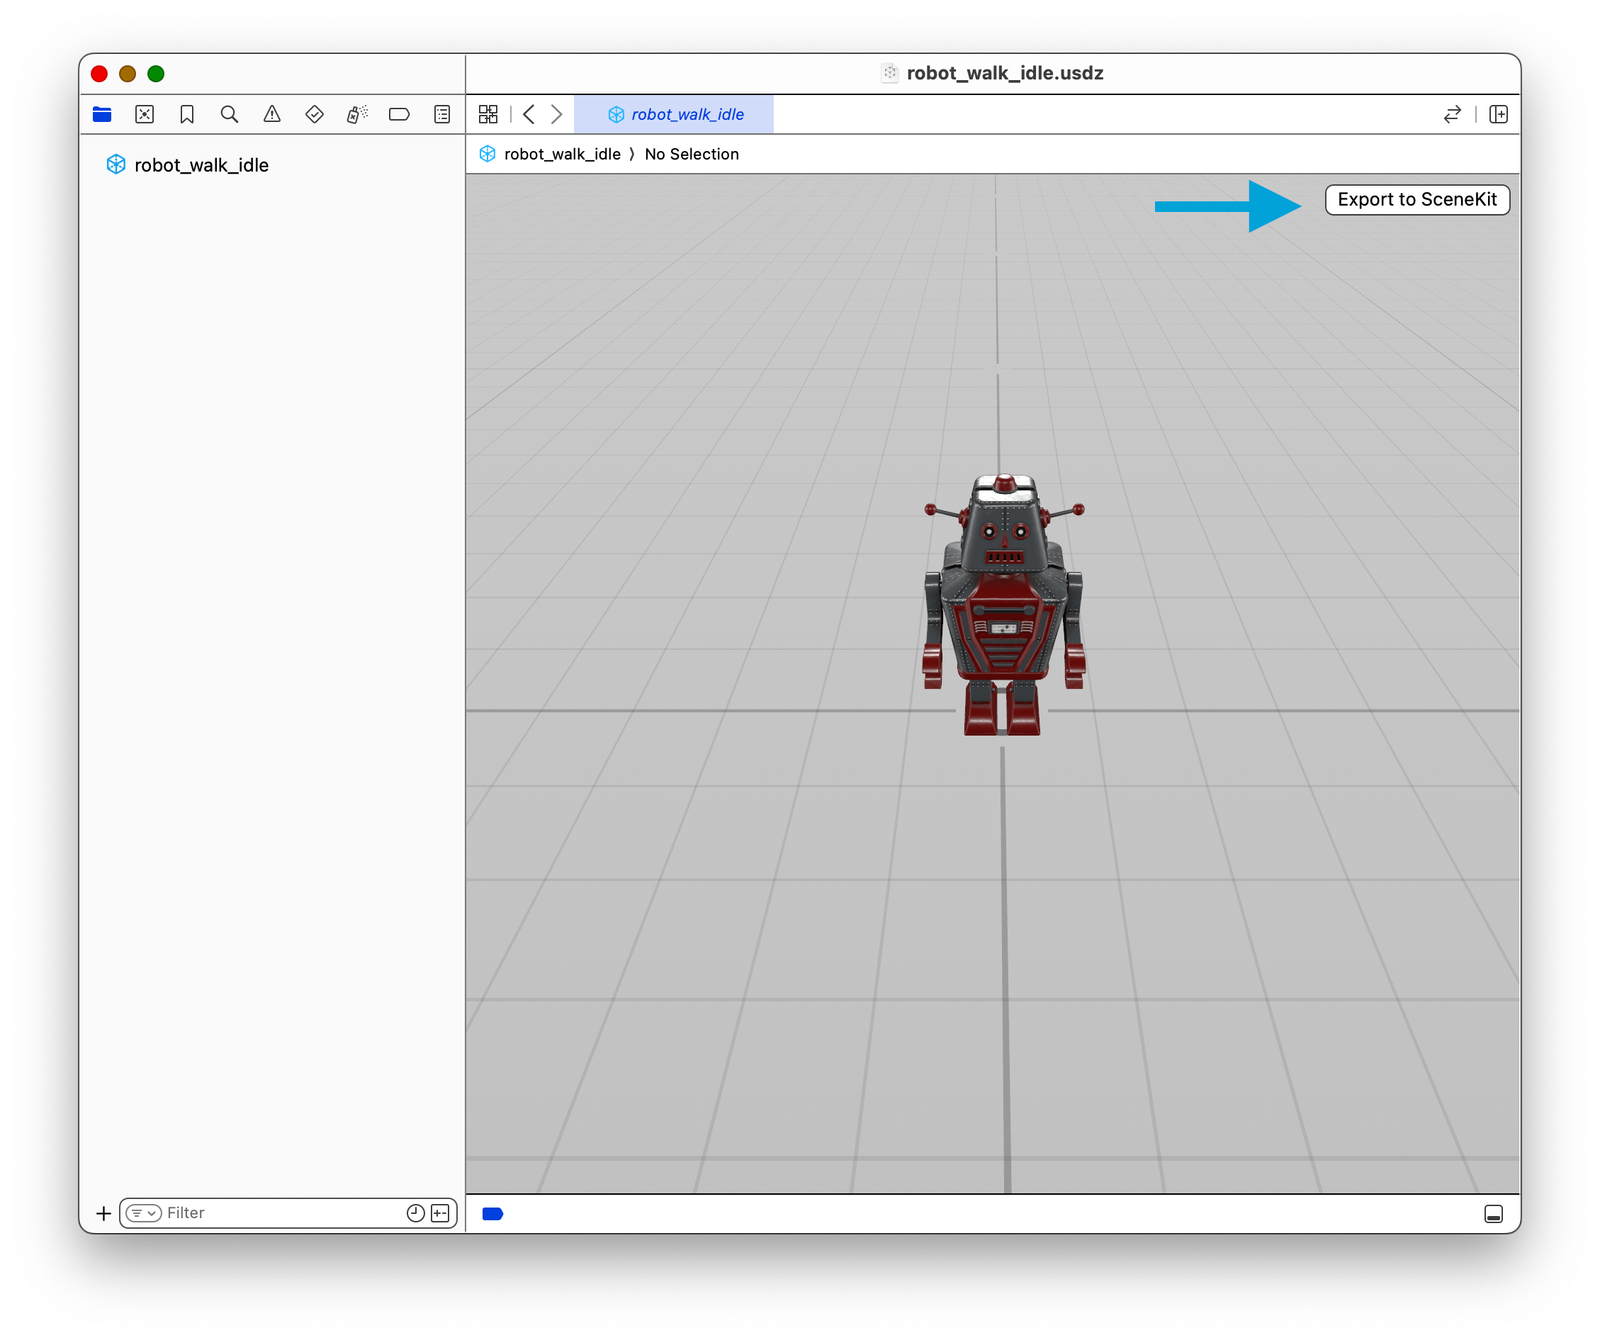
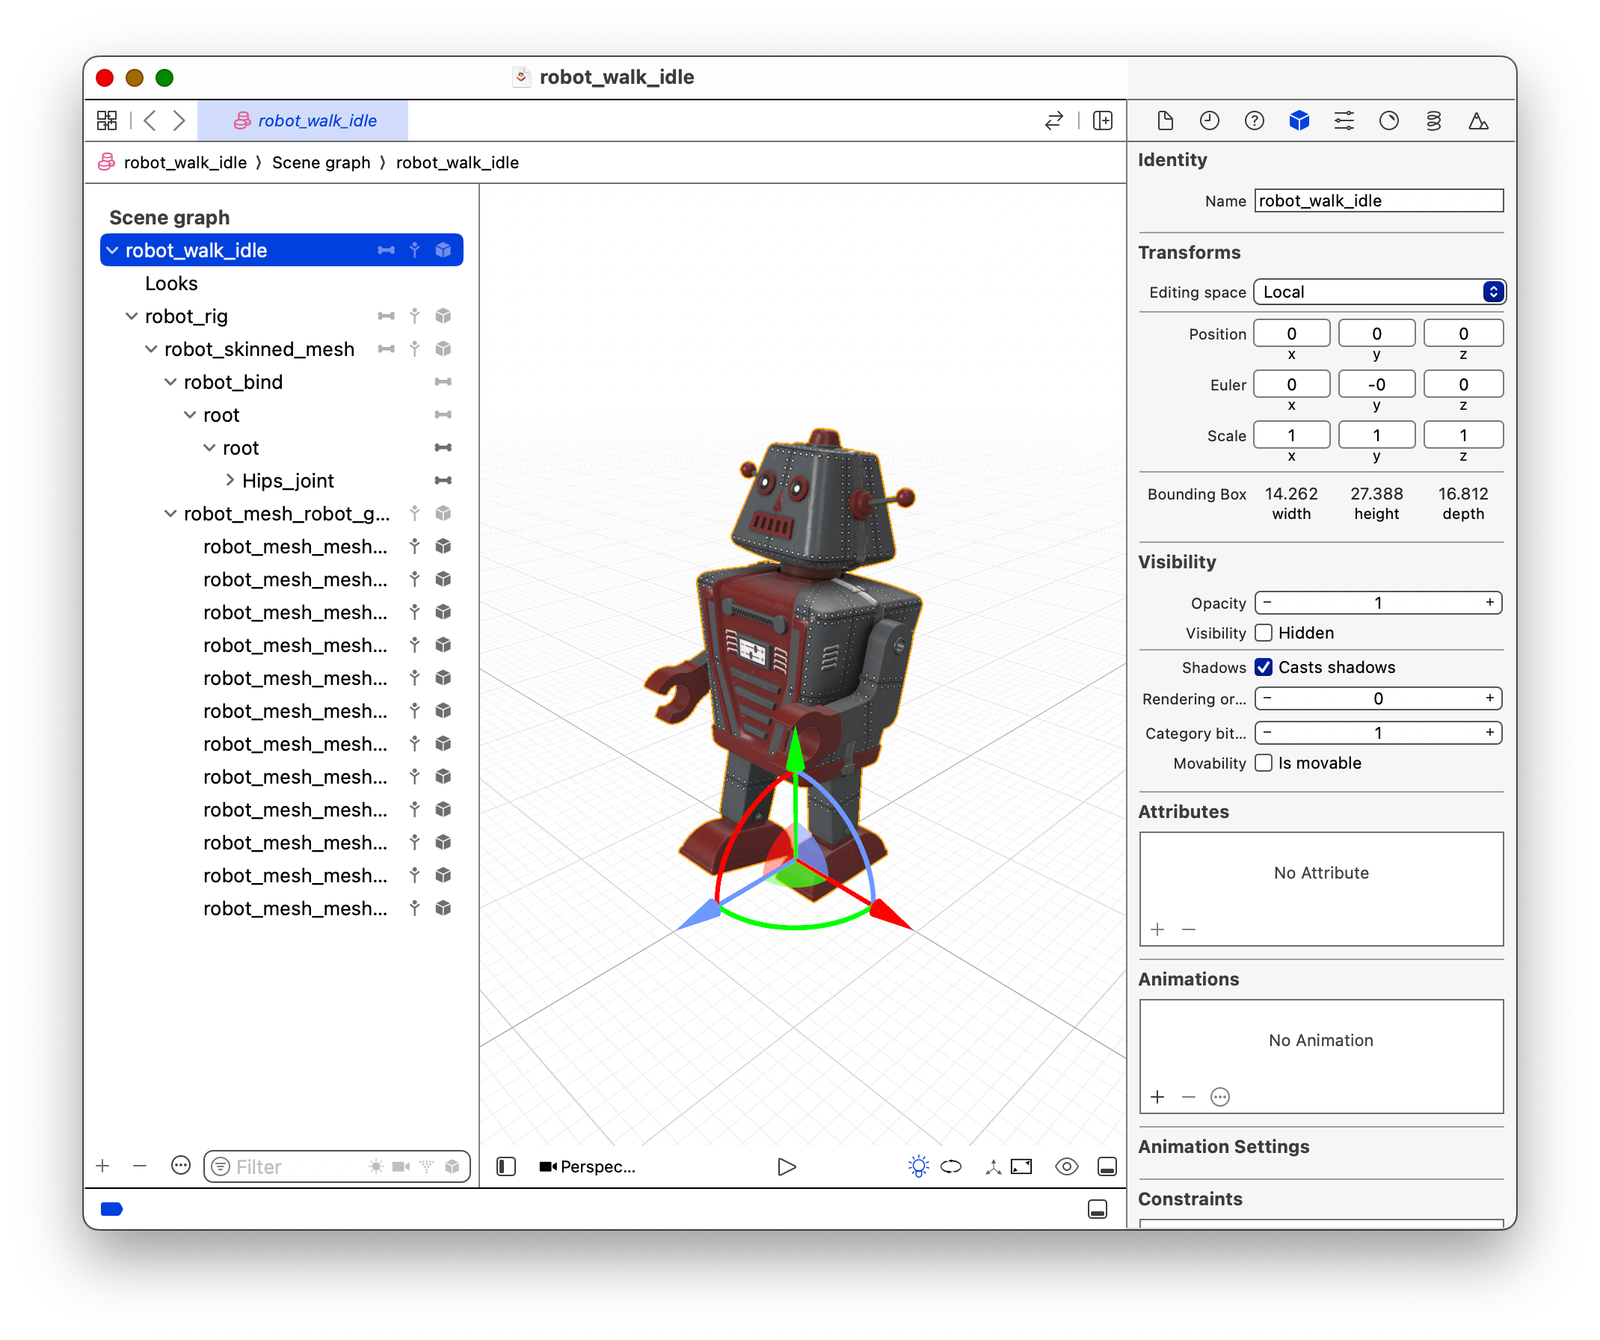
In the above case, robot_walk_idle is the name of the root (top level) entity.
This is useful if you have many assets within a single .usdz file and only want to load one of them.
💡
Think of .usdz as read-only format provided to the end-user; and .scn file as the editor format, used by developers and 3D designer to modify the content of the 3D file. Notice that .usdz can be converted to .scn at any time, and it not encrypted.
Creating an immersive space
To display contents in user’s room, you need to create an immersive space. Notice that this is different than displaying a 3D content within the application window itself. We will go through both of these in this article.
TODO: show table contrast of displaying content in user’s room and in a separate window.
Create a new file called ContentSpace.swift. In this file, we will use a RealityView, load the 3D asset, set it up, and add it to the view:
#if os(visionOS)

import SwiftUI
import RealityKit

struct ContentSpace: View {

    @State private var loaded3DAsset: Entity? = nil

    var body: some View {

        RealityView { content in

            loaded3DAsset = await loadFromRealityComposerProject(nodeName: "robot_walk_idle",
                                                                 sceneFileName: "robot_walk_idle.usdz")
            loaded3DAsset?.scale = .init(x: 0.1, y: 0.1, z: 0.1)
            loaded3DAsset?.position = .init(x: 0, y: 0, z: -3)

            // TODO: Collision
            // TODO: Allow user to tap on it
            // TODO: add lighting

            guard let loaded3DAsset else {
                return
            }

            content.add(loaded3DAsset)

        }

    }

}
💡
Remember to set a proper scale for the object. You can do so by checking the size of the object first (shown in meters) and then calculate it. If you cannot see the object, it is usually because it is too big or too tiny.
Now, go to the main app code, and we can declare the above view as an immersive space. We also provide an id to the space, so we can invoke it anywhere in our app. When we invoke it, it will show up in the user’s room.
import SwiftUI

@main
struct VisionOSDemoApp: App {

    var body: some Scene {

        WindowGroup {
            ContentView()
        }
        .windowStyle(.plain)

        ImmersiveSpace(id: "robotSpace") {
            ContentSpace()
        }

    }

}
To open any immersive space, or to dismiss the currently shown immersive space, we will use a SwiftUI environment variable:
@Environment(\.openImmersiveSpace) private var openImmersiveSpace

@Environment(\.dismissImmersiveSpace) private var dismissImmersiveSpace
Notice that you can only show one immersive space at a time. To show a new one, make sure you dismiss the current one (if there is any).
Now, we can add a button to show the above robotSpace in our 2D view:
If it is too big, you can adjust the .scale factor
Explanation about the coordinate space
You should have noticed that we have used loaded3DAsset?.position = .init(x: 0, y: 0, z: -3) to set the initial position of the 3D asset.
X axis means left and right.
Y axis means up and down (roof or floor)
Z axis means closer or further from the user. If it is negative, it is in front of the user; if it is positive, it means it is behind the user.
Adding animation
If your 3D model comes with an animation, you can play that animation:
        RealityView { content in

            // ...

            guard let loaded3DAsset else {
                return
            }

            // animation
            if let firstAnimation = loaded3DAsset.availableAnimations.first {
                loaded3DAsset.playAnimation(firstAnimation.repeat(),
                                           transitionDuration: 0,
                                           startsPaused: false)
            }

            // TODO: Collision
            // TODO: Allow user to tap on it
            // TODO: add lighting

            content.add(loaded3DAsset)

        }
Now you can see the robot will be walking.
Opening a new window for an interactive robot model
You can also show the robot in a new window (instead of user’s space) so that the user can pinch to scale the robot, or use hands to rotate and view different angles of the robot:
First, we need to define a data structure that tells the app which AR model to show:
struct ARModelOpenParameter: Identifiable, Hashable, Codable {
    var id: String {
        return "\(modelName)-\(modelNodeName)"
    }
    var modelName: String
    var modelNodeName: String
    var initialScale: Float
}
To allow the user to drag to rotate the model, we can put the following helper function within our code. Notice the below code has been taken from a sample project from Apple Developer documentation.
/*
See the LICENSE.txt file for this sample’s licensing information.

Abstract:
A modifier for turning drag gestures into rotation.
*/

import SwiftUI
import RealityKit

extension View {
    /// Enables people to drag an entity to rotate it, with optional limitations
    /// on the rotation in yaw and pitch.
    func dragRotation(
        yawLimit: Angle? = nil,
        pitchLimit: Angle? = nil,
        sensitivity: Double = 10,
        axRotateClockwise: Bool = false,
        axRotateCounterClockwise: Bool = false
    ) -> some View {
        self.modifier(
            DragRotationModifier(
                yawLimit: yawLimit,
                pitchLimit: pitchLimit,
                sensitivity: sensitivity,
                axRotateClockwise: axRotateClockwise,
                axRotateCounterClockwise: axRotateCounterClockwise
            )
        )
    }
}

/// A modifier converts drag gestures into entity rotation.
private struct DragRotationModifier: ViewModifier {
    var yawLimit: Angle?
    var pitchLimit: Angle?
    var sensitivity: Double
    var axRotateClockwise: Bool
    var axRotateCounterClockwise: Bool

    @State private var baseYaw: Double = 0
    @State private var yaw: Double = 0
    @State private var basePitch: Double = 0
    @State private var pitch: Double = 0

    func body(content: Content) -> some View {
        content
            .rotation3DEffect(.radians(yaw == 0 ? 0.01 : yaw), axis: .y)
            .rotation3DEffect(.radians(pitch == 0 ? 0.01 : pitch), axis: .x)
            .gesture(DragGesture(minimumDistance: 0.0)
                .targetedToAnyEntity()
                .onChanged { value in
                    // Find the current linear displacement.
                    let location3D = value.convert(value.location3D, from: .local, to: .scene)
                    let startLocation3D = value.convert(value.startLocation3D, from: .local, to: .scene)
                    let delta = location3D - startLocation3D

                    // Use an interactive spring animation that becomes
                    // a spring animation when the gesture ends below.
                    withAnimation(.interactiveSpring) {
                        yaw = spin(displacement: Double(delta.x), base: baseYaw, limit: yawLimit)
                        pitch = spin(displacement: Double(delta.y), base: basePitch, limit: pitchLimit)
                    }
                }
                .onEnded { value in
                    // Find the current and predicted final linear displacements.
                    let location3D = value.convert(value.location3D, from: .local, to: .scene)
                    let startLocation3D = value.convert(value.startLocation3D, from: .local, to: .scene)
                    let predictedEndLocation3D = value.convert(value.predictedEndLocation3D, from: .local, to: .scene)
                    let delta = location3D - startLocation3D
                    let predictedDelta = predictedEndLocation3D - location3D

                    // Set the final spin value using a spring animation.
                    withAnimation(.spring) {
                        yaw = finalSpin(
                            displacement: Double(delta.x),
                            predictedDisplacement: Double(predictedDelta.x),
                            base: baseYaw,
                            limit: yawLimit)
                        pitch = finalSpin(
                            displacement: Double(delta.y),
                            predictedDisplacement: Double(predictedDelta.y),
                            base: basePitch,
                            limit: pitchLimit)
                    }

                    // Store the last value for use by the next gesture.
                    baseYaw = yaw
                    basePitch = pitch
                }
            )
            .onChange(of: axRotateClockwise) {
                withAnimation(.spring) {
                    yaw -= (.pi / 6)
                    baseYaw = yaw
                }
            }
            .onChange(of: axRotateCounterClockwise) {
                withAnimation(.spring) {
                    yaw += (.pi / 6)
                    baseYaw = yaw
                }
            }
    }

    /// Finds the spin for the specified linear displacement, subject to an
    /// optional limit.
    private func spin(
        displacement: Double,
        base: Double,
        limit: Angle?
    ) -> Double {
        if let limit {
            return atan(displacement * sensitivity) * (limit.degrees / 90)
        } else {
            return base + displacement * sensitivity
        }
    }

    /// Finds the final spin given the current and predicted final linear
    /// displacements, or zero when the spin is restricted.
    private func finalSpin(
        displacement: Double,
        predictedDisplacement: Double,
        base: Double,
        limit: Angle?
    ) -> Double {
        // If there is a spin limit, always return to zero spin at the end.
        guard limit == nil else { return 0 }

        // Find the projected final linear displacement, capped at 1 more revolution.
        let cap = .pi * 2.0 / sensitivity
        let delta = displacement + max(-cap, min(cap, predictedDisplacement))

        // Find the final spin.
        return base + delta * sensitivity
    }
}
Then, update your main SwiftUI app code:
@main
struct VisionOSDemoApp: App {

    @Environment(\.dismissWindow) private var dismissWindow

    var body: some SwiftUI.Scene {

        WindowGroup {
            ContentView()
        }
        .windowStyle(.plain)

        ImmersiveSpace(id: "robotSpace") {
            ContentSpace()
        }

        WindowGroup(for: ARModelOpenParameter.self) { $object in
            // 3D view
            if let object {
                RealityView { content in
                    guard let arAsset = await loadFromRealityComposerProject(
                        nodeName: object.modelNodeName,
                        sceneFileName: object.modelName
                    ) else {
                        fatalError("Unable to load beam from Reality Composer Pro project.")
                    }
                    arAsset.generateCollisionShapes(recursive: true)
                    arAsset.position = .init(x: 0, y: 0, z: 0)
                    arAsset.scale = .init(x: object.initialScale,
                                          y: object.initialScale,
                                          z: object.initialScale)
                    arAsset.components[InputTargetComponent.self] = InputTargetComponent(allowedInputTypes: .all)
                    content.add(arAsset)
                }
                .dragRotation()
                .frame(width: 900, height: 900)
                .glassBackgroundEffect(displayMode: .always)
            }
        }
        .windowStyle(.volumetric)
        .defaultSize(width: 0.5, height: 0.5, depth: 0.5, in: .meters)

    }

}
There are several changes:
- Change the type of the view from
ScenetoSwiftUI.Scene, because the same name also appears in theRealityKitsystem framework. - Add a new
WindowGroup, which will be open based on the data provided by theARModelOpenParameter. Within the new window, it will show the AR object, allow rotation of that object.
To show that window, you can use the openWindow environmental variable and construct a ARModelOpenParameter
@Environment(\.openWindow) private var openWindow
Button("Inspect robot in a window") {
self.openWindow(value: ARModelOpenParameter(modelName: "robot_walk_idle.usdz", modelNodeName: "robot_walk_idle", initialScale: 0.01))
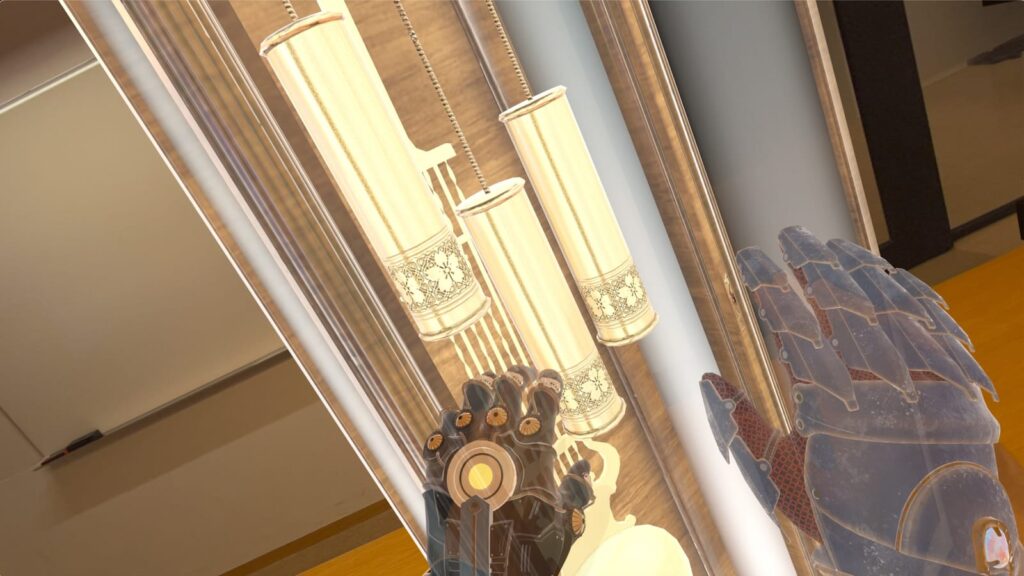
}Now, you can tap this button to show a separate window, which contains a rotatable 3D model for inspection:

Use system 3D viewer
The above method shows a way where you can design the model preview window yourself. You can also directly use the model preview provided by the VisionOS system:
 Model3D(named: "Robot-Drummer") { model in
     model
         .resizable()
         .aspectRatio(contentMode: .fit)
 } placeholder: {
     ProgressView()
 }
You can also use a model within the package you created:
Model3D(named: "robot_walk_idle.usdz", bundle: demoAssetsBundle)
                .padding(.bottom, 50)
Allow user to tap on the model
In VisionOS, the user can use the eye to look at something and pinch the fingers to select it. We can apply this to the 3D objects we added to the scene.
💡
Note: This is different from using hands to touch the 3D model, which is not covered in this article due to the complexity of hand tracking, and I will talk about this in another article.
You can simple add the following line for the 3D entity you loaded to allow user to tap on it:
arAsset.components[InputTargetComponent.self] = InputTargetComponent(allowedInputTypes: .all)To receive tap events, you should add the following gesture to your 3D space view (the one with RealityView). You can get the tappedNode as the node user tapped on, but do keep in mind this might be a child node of the node you added.
    .gesture(TapGesture()
        .targetedToAnyEntity()
        .onEnded({ tap in
            let tappedNode = tap.entity

        }))
So remember to check recursively for parent nodes to see if the user tapped on the node you are looking for. You can also use the name of the node as an identifier.
Whac-A-Robot! (Cause I could not find a free 3D model for a mole)
[Video or GIF demo here]
In the previous step, we have stored the loaded 3D model in the ContentSpace. In order to be more flexible and be able to access that asset everywhere in the app, we can put it into a model:
import SwiftUI
import RealityKit

let contentSpaceOrigin = Entity()

@Observable
class ContentModel {

    var loaded3DAsset: Entity? = nil

    @MainActor
    func loadAssets() async {
        loaded3DAsset = await loadFromRealityComposerProject(nodeName: "robot_walk_idle",
                                                             sceneFileName: "robot_walk_idle.usdz")
        loaded3DAsset?.name = "robot_root_node"
        loaded3DAsset?.scale = .init(x: 0.05, y: 0.05, z: 0.05)
        loaded3DAsset?.position = .init(x: 0, y: 0, z: -3)

        guard let loaded3DAsset else {
            return
        }

        // animation
        if let firstAnimation = loaded3DAsset.availableAnimations.first {
            loaded3DAsset.playAnimation(firstAnimation.repeat(),
                                        transitionDuration: 0,
                                        startsPaused: false)
        }

        // allow tap
        loaded3DAsset.generateCollisionShapes(recursive: true)
        loaded3DAsset.components[InputTargetComponent.self] = InputTargetComponent(allowedInputTypes: .all)

        contentSpaceOrigin.addChild(loaded3DAsset)
    }

    func addRobotAtRandomPosition() {
        guard let loaded3DAsset else { return }
        // clone the already loaded robot node
        let newRobot = loaded3DAsset.clone(recursive: true)
        newRobot.name = "robot_root_node"
        newRobot.position = .init(x: Float.random(in: -2...2),
                                  y: Float.random(in: 0...2),
                                  z: Float.random(in: (-3)...(-2)))
        newRobot.scale = .init(x: 0.03, y: 0.03, z: 0.03)
        if let firstAnimation = newRobot.availableAnimations.first {
            newRobot.playAnimation(firstAnimation.repeat(),
                                        transitionDuration: 0,
                                        startsPaused: false)
        }
        newRobot.generateCollisionShapes(recursive: true)
        newRobot.components[InputTargetComponent.self] = InputTargetComponent(allowedInputTypes: .all)
        contentSpaceOrigin.addChild(newRobot)
    }

}
Here, we have the function loadAssets that loads the asset into memory. This function will be called before the immersive space shows up. We also have the addRobotAtRandomPosition function, which is used in the game to add a robot at a random location.
As you can see in the above code, because we need to load the asset before the immersive view shows up. But before the immersive view shows up, there is no world root node (the node of the room environment) to add the asset to. Thus, we will create a global variable contentSpaceOrigin to add all of our loaded assets to, then, when the immersive space shows up, we can simply add the contentSpaceOrigin as a child of the world node.
import SwiftUI
import RealityKit

struct ContentSpace: View {

    @Environment(ContentModel.self) var gameModel

    var body: some View {

        RealityView { content in
            content.add(contentSpaceOrigin)
        }
        .gesture(TapGesture()
            .targetedToAnyEntity()
            .onEnded({ tap in
                let tappedNode = tap.entity
                // look up until it reaches the robot main node
                var foundRobotMainNode: Entity? = tappedNode
                while foundRobotMainNode != nil &&
                        foundRobotMainNode?.parent != nil {
                    if foundRobotMainNode?.name == "robot_root_node" {
                        break // we found it!
                    } else {
                        foundRobotMainNode = foundRobotMainNode?.parent
                    }
                }
                foundRobotMainNode?.removeFromParent()
                speak(text: "まだね")
            }))

    }

}
Notice in the above code, we set a detection for tap gesture. Whenever there is a tap gesture, the app will remove the robot that has been tapped.
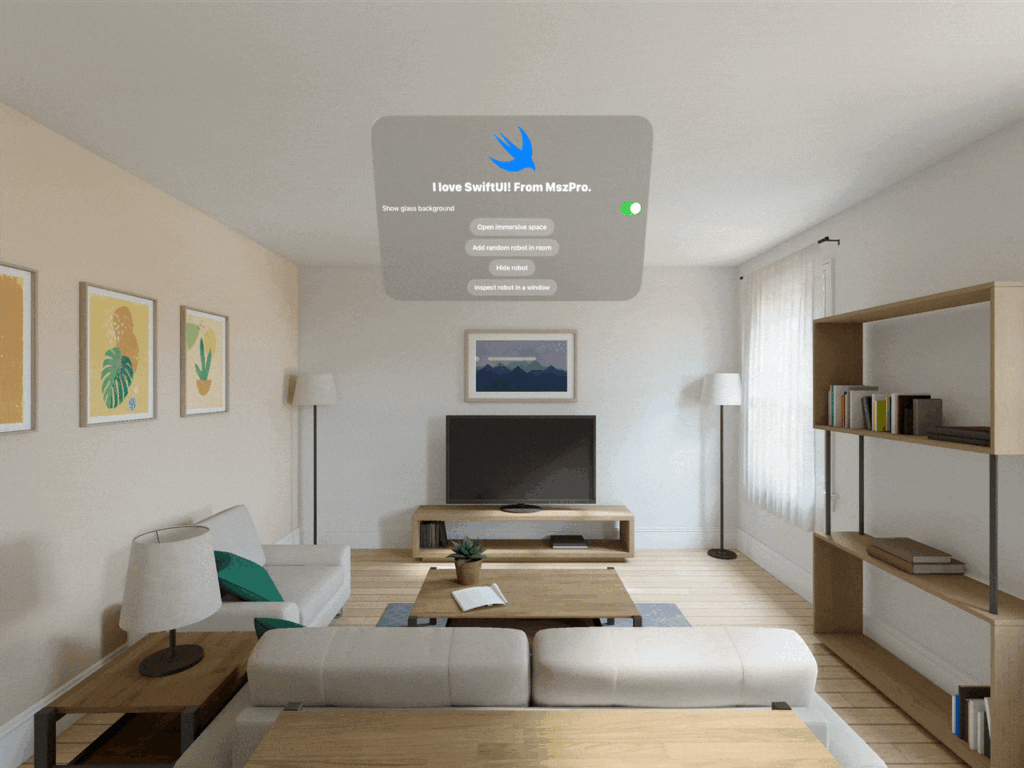
Now, in our 2D view, we will have a button to add a random robot.
import SwiftUI
import RealityKit

struct ContentView: View {

    @State private var showGlassBackground: Bool = true

    @Environment(ContentModel.self) var gameModel
    @Environment(\.openImmersiveSpace) private var openImmersiveSpace
    @Environment(\.dismissImmersiveSpace) private var dismissImmersiveSpace

    @Environment(\.openWindow) private var openWindow

    var body: some View {

        VStack {

            Image(systemName: "swift")
                .resizable()
                .scaledToFit()
                .frame(width: 120, height: 120)
                .foregroundStyle(.tint)

            Text("I love SwiftUI! From MszPro.")
                .font(.largeTitle)
                .bold()

            Toggle("Show glass background", isOn: $showGlassBackground)

            Button("Open immersive space") {
                Task { @MainActor in
                    await self.dismissImmersiveSpace()
                    await self.gameModel.loadAssets()
                    await self.openImmersiveSpace(id: "robotSpace")
                }
            }

            Button("Add random robot in room") {
                self.gameModel.addRobotAtRandomPosition()
                speak(text: "ハロー")
            }

            Button("Hide robot") {
                Task { @MainActor in
                    await self.dismissImmersiveSpace()
                }
            }

            Button("Inspect robot in a window") {
                self.openWindow(value: ARModelOpenParameter(modelName: "robot_walk_idle.usdz", modelNodeName: "robot_walk_idle", initialScale: 0.01))
            }

        }
        .padding()
        .frame(width: 700)
        .glassBackgroundEffect(displayMode: showGlassBackground ? .always : .never)

    }

}
And here is the helper function to speak something:
import SwiftUI
import AVFoundation

func speak(text: String) {
    let utterance = AVSpeechUtterance(string: text)
    utterance.voice = AVSpeechSynthesisVoice(language: "ja-JP")
    utterance.rate = 0.5
    utterance.pitchMultiplier = 1.5

    let synthesizer = AVSpeechSynthesizer()
    synthesizer.speak(utterance)
}
Now, you can run the app, tap button to add about 10 random robot, and then tap on the robot to RAC-A-BOT!
Thank you for reading!
I spent a lot of effort writing this up to help others learn about VisionOS programming and inspire others to make amazing apps.
If you could, please consider buying me a coffee: https://buymeacoffee.com/mszpro
Follow me on Twitter to get updates: https://twitter.com/mszpro
Apple code license
Copyright (C) 2024 Apple Inc. All Rights Reserved.

IMPORTANT:  This Apple software is supplied to you by Apple
Inc. ("Apple") in consideration of your agreement to the following
terms, and your use, installation, modification or redistribution of
this Apple software constitutes acceptance of these terms.  If you do
not agree with these terms, please do not use, install, modify or
redistribute this Apple software.

In consideration of your agreement to abide by the following terms, and
subject to these terms, Apple grants you a personal, non-exclusive
license, under Apple's copyrights in this original Apple software (the
"Apple Software"), to use, reproduce, modify and redistribute the Apple
Software, with or without modifications, in source and/or binary forms;
provided that if you redistribute the Apple Software in its entirety and
without modifications, you must retain this notice and the following
text and disclaimers in all such redistributions of the Apple Software.
Neither the name, trademarks, service marks or logos of Apple Inc. may
be used to endorse or promote products derived from the Apple Software
without specific prior written permission from Apple.  Except as
expressly stated in this notice, no other rights or licenses, express or
implied, are granted by Apple herein, including but not limited to any
patent rights that may be infringed by your derivative works or by other
works in which the Apple Software may be incorporated.

The Apple Software is provided by Apple on an "AS IS" basis.  APPLE
MAKES NO WARRANTIES, EXPRESS OR IMPLIED, INCLUDING WITHOUT LIMITATION
THE IMPLIED WARRANTIES OF NON-INFRINGEMENT, MERCHANTABILITY AND FITNESS
FOR A PARTICULAR PURPOSE, REGARDING THE APPLE SOFTWARE OR ITS USE AND
OPERATION ALONE OR IN COMBINATION WITH YOUR PRODUCTS.

IN NO EVENT SHALL APPLE BE LIABLE FOR ANY SPECIAL, INDIRECT, INCIDENTAL
OR CONSEQUENTIAL DAMAGES (INCLUDING, BUT NOT LIMITED TO, PROCUREMENT OF
SUBSTITUTE GOODS OR SERVICES; LOSS OF USE, DATA, OR PROFITS; OR BUSINESS
INTERRUPTION) ARISING IN ANY WAY OUT OF THE USE, REPRODUCTION,
MODIFICATION AND/OR DISTRIBUTION OF THE APPLE SOFTWARE, HOWEVER CAUSED
AND WHETHER UNDER THEORY OF CONTRACT, TORT (INCLUDING NEGLIGENCE),
STRICT LIABILITY OR OTHERWISE, EVEN IF APPLE HAS BEEN ADVISED OF THE
POSSIBILITY OF SUCH DAMAGE.