This article talks about adapting the new physical camera button within your iOS app.
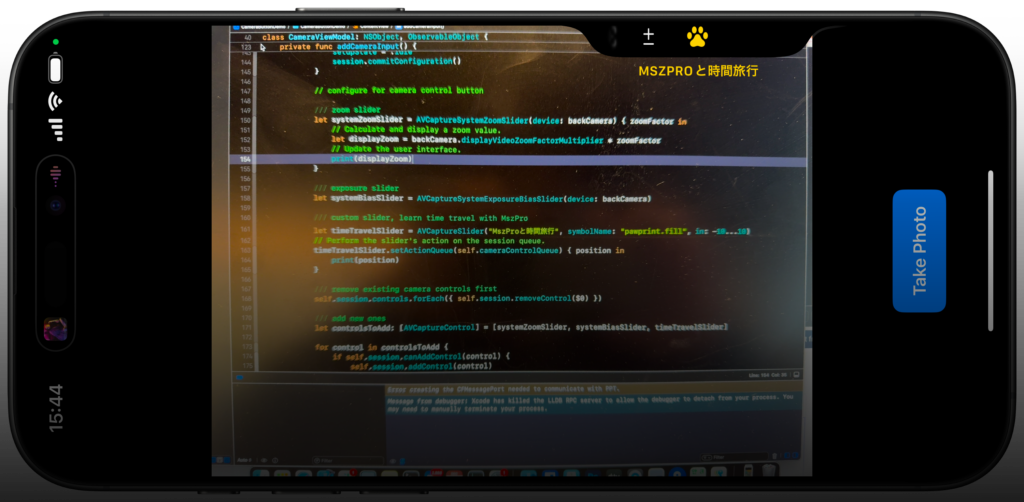
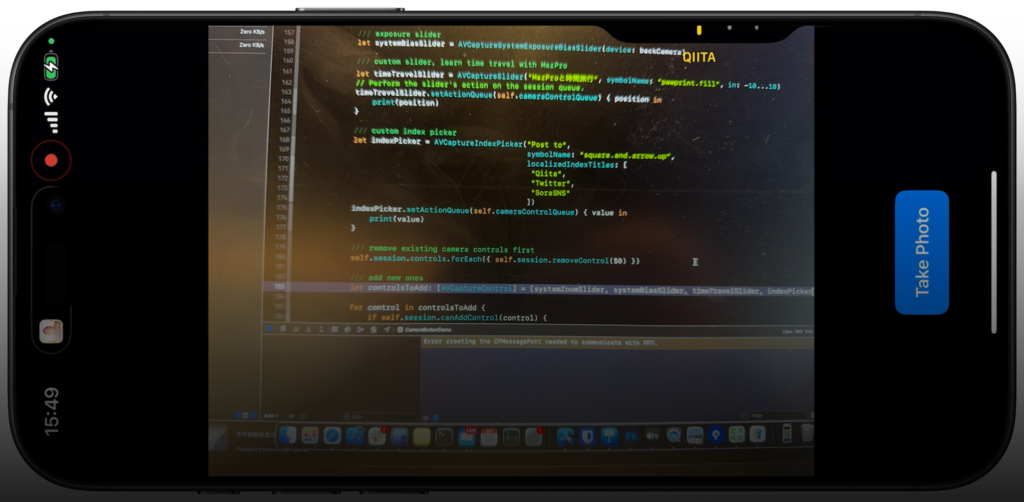
Why?
If you do nothing, and when the user presses the camera button within your app, it always goes to the system Camera app. However, with some minor adjustments, user can use the camera button to take pictures within your own app, and your app can provide custom controls to the camera, for example, allow the user to change the filter by swiping on the physical camera button.
Also, you can add cool new control options, like shown in the above 2 screenshots.
Let’s get started!
Starting point
We will start from a very simple SwiftUI view that shows a camera and a capture button:
This is the view model that manages the permission to access camera, and take actions when we need to take a picture, and receives the image and saves it to a variable.
// MARK: - Unified Camera ViewModel
class CameraViewModel: NSObject, ObservableObject {

    // Session states
    enum CameraSetupState {
        case idle
        case configured
        case permissionDenied
        case failed
    }

    @Published var setupState: CameraSetupState = .idle
    @Published var capturedPhoto: UIImage? = nil
    @Published var permissionGranted: Bool = false

    let session = AVCaptureSession()
    private let photoOutput = AVCapturePhotoOutput()
    private var videoInput: AVCaptureDeviceInput?

    // Dispatch queue for configuring the session
    private let configurationQueue = DispatchQueue(label: "com.example.camera.config")

    override init() {
        super.init()
    }

    deinit {
        stopSession()
    }

    // MARK: - Public API

    /// Checks camera permissions and configures session if authorized.
    func requestAccessIfNeeded() {
        let authStatus = AVCaptureDevice.authorizationStatus(for: .video)
        switch authStatus {
            case .authorized:
                permissionGranted = true
                configureSessionIfIdle()
            case .notDetermined:
                AVCaptureDevice.requestAccess(for: .video) { [weak self] granted in
                    guard let self = self else { return }
                    DispatchQueue.main.async {
                        if granted {
                            self.permissionGranted = true
                            self.configureSessionIfIdle()
                        } else {
                            self.setupState = .permissionDenied
                        }
                    }
                }
            default:
                // Denied or Restricted
                setupState = .permissionDenied
        }
    }

    /// Initiate photo capture.
    func capturePhoto() {
        guard setupState == .configured else { return }
        let settings = AVCapturePhotoSettings()
        photoOutput.capturePhoto(with: settings, delegate: self)
    }

    // MARK: - Session Configuration

    private func configureSessionIfIdle() {
        configurationQueue.async { [weak self] in
            guard let self = self, self.setupState == .idle else { return }

            self.session.beginConfiguration()
            self.session.sessionPreset = .photo

            self.addCameraInput()
            self.addPhotoOutput()

            self.session.commitConfiguration()
            self.startSessionIfReady()
        }
    }

    private func addCameraInput() {
        do {
            guard let backCamera = AVCaptureDevice.default(.builtInWideAngleCamera,
                                                           for: .video,
                                                           position: .back) else {
                print("CameraViewModel: Back camera is unavailable.")
                setupState = .idle
                session.commitConfiguration()
                return
            }

            let cameraInput = try AVCaptureDeviceInput(device: backCamera)
            if session.canAddInput(cameraInput) {
                session.addInput(cameraInput)
                videoInput = cameraInput
                DispatchQueue.main.async {
                    self.setupState = .configured
                }
            } else {
                print("CameraViewModel: Unable to add camera input to session.")
                setupState = .idle
                session.commitConfiguration()
            }
        } catch {
            print("CameraViewModel: Error creating camera input - \(error)")
            setupState = .failed
            session.commitConfiguration()
        }
    }

    private func addPhotoOutput() {
        guard session.canAddOutput(photoOutput) else {
            print("CameraViewModel: Cannot add photo output.")
            setupState = .failed
            session.commitConfiguration()
            return
        }
        session.addOutput(photoOutput)
        photoOutput.maxPhotoQualityPrioritization = .quality
        DispatchQueue.main.async {
            self.setupState = .configured
        }
    }

    private func startSessionIfReady() {
        guard setupState == .configured else { return }
        session.startRunning()
    }

    private func stopSession() {
        configurationQueue.async { [weak self] in
            guard let self = self else { return }
            if self.session.isRunning {
                self.session.stopRunning()
            }
        }
    }
}

// MARK: - AVCapturePhotoCaptureDelegate
extension CameraViewModel: AVCapturePhotoCaptureDelegate {
    func photoOutput(_ output: AVCapturePhotoOutput,
                     didFinishProcessingPhoto photo: AVCapturePhoto,
                     error: Error?) {

        guard error == nil else {
            print("CameraViewModel: Error capturing photo - \(error!)")
            return
        }
        guard let photoData = photo.fileDataRepresentation() else {
            print("CameraViewModel: No photo data found.")
            return
        }
        self.capturedPhoto = UIImage(data: photoData)
    }
}
This is our UIKit compatible view so we can show the camera preview layer within SwiftUI:
// MARK: - SwiftUI Representable for Camera Preview
struct CameraLayerView: UIViewRepresentable {

    let cameraSession: AVCaptureSession

    func makeUIView(context: Context) -> CameraContainerView {
        let container = CameraContainerView()
        container.backgroundColor = .black
        container.previewLayer.session = cameraSession
        container.previewLayer.videoGravity = .resizeAspect
        return container
    }

    func updateUIView(_ uiView: CameraContainerView, context: Context) {
        // No dynamic updates needed
    }

    // A UIView subclass that hosts an AVCaptureVideoPreviewLayer
    class CameraContainerView: UIView {

        override class var layerClass: AnyClass {
            AVCaptureVideoPreviewLayer.self
        }

        var previewLayer: AVCaptureVideoPreviewLayer {
            guard let layer = self.layer as? AVCaptureVideoPreviewLayer else {
                fatalError("CameraContainerView: Failed casting layer to AVCaptureVideoPreviewLayer.")
            }
            return layer
        }
    }
}
And this is our main SwiftUI view:
// MARK: - SwiftUI Main View
struct ContentView: View {

    @ObservedObject var viewModel = CameraViewModel()

    var body: some View {
        GeometryReader { _ in
            ZStack(alignment: .bottom) {
                CameraLayerView(cameraSession: viewModel.session)
                    .onAppear {
                        viewModel.requestAccessIfNeeded()
                    }
                    .edgesIgnoringSafeArea(.all)

                // Capture button
                VStack {
                    Spacer()

                    Button {
                        viewModel.capturePhoto()
                    } label: {
                        Text("Take Photo")
                            .font(.headline)
                            .foregroundColor(.white)
                            .padding()
                            .background(Color.blue)
                            .cornerRadius(10)
                    }
                    .padding(.bottom, 20)
                }

                // Thumbnail of the captured photo
                if let image = viewModel.capturedPhoto {
                    Image(uiImage: image)
                        .resizable()
                        .aspectRatio(contentMode: .fit)
                        .frame(width: 120, height: 90)
                        .padding(.bottom, 80)
                }
            }
        }
    }
}

// MARK: - SwiftUI Preview
#Preview {
    ContentView()
}
Capture picture when pressing camera button
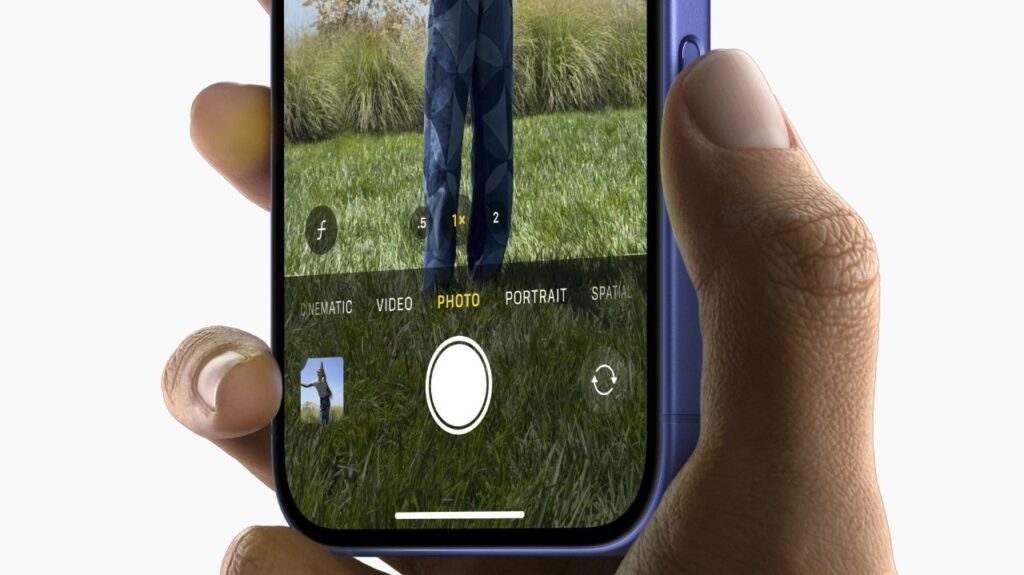
As we talked about, if your app does not adapt this, when the user presses on the camera button, it will jump to the camera app.
To allow your app to handle the take picture action, simply import the AVKit framework and add a view modifier onCameraCaptureEvent() view modifier to your camera preview layer CameraLayerView:
CameraLayerView(cameraSession: viewModel.session)
    .onAppear {
        viewModel.requestAccessIfNeeded()
    }
    .edgesIgnoringSafeArea(.all)
    .onCameraCaptureEvent() { event in
        if event.phase == .began {
            self.viewModel.capturePhoto()
        }
    }
Now, whenever the user presses the camera button on the side, it will call the code block you provided, which you can call the capture photo function within your view model.
Checking support
You can check if the user’s device has support for camera button by checking the supportsControls parameter within your camera session AVCaptureSession:
In our provided starting point code, you can call it like this
struct ContentView: View {

    @ObservedObject var viewModel = CameraViewModel()

    var body: some View {
        GeometryReader { _ in
            // ... //
        }
        .task {
            let supportsCameraButton = self.viewModel.session.supportsControls

        }
    }
}
Add zoom control
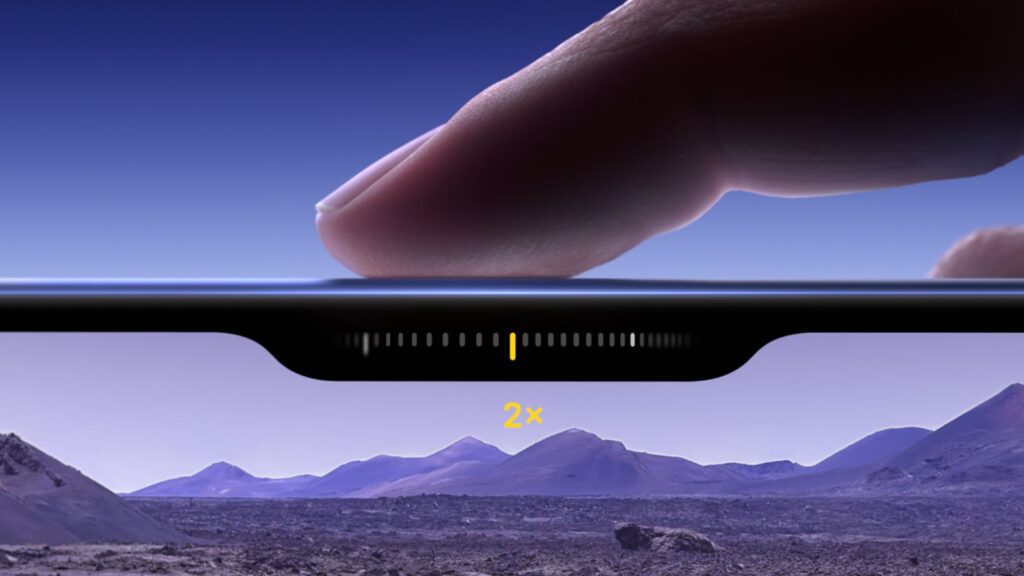
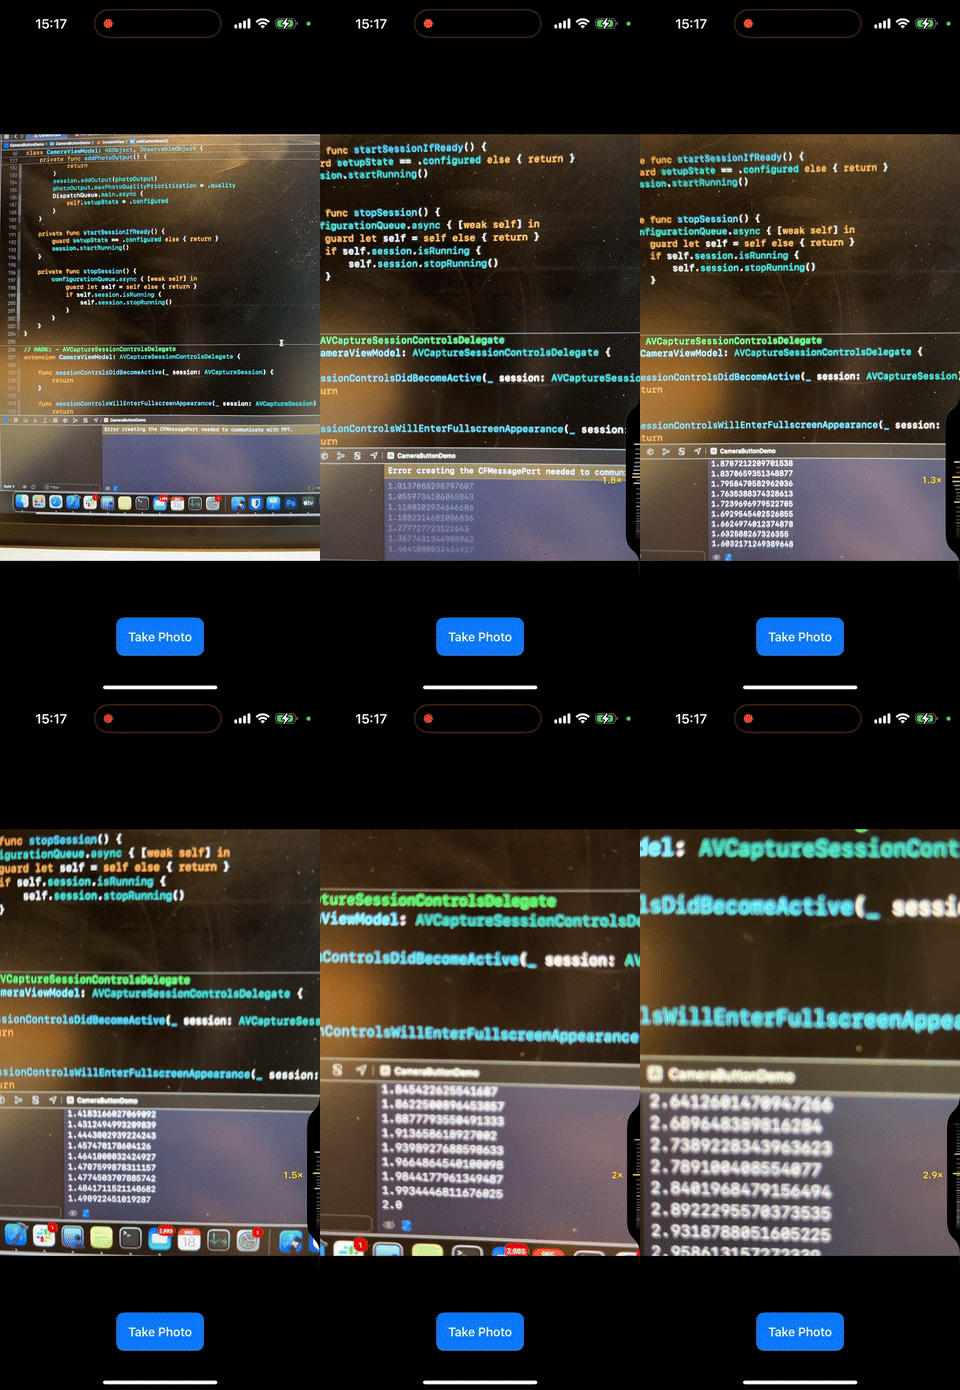
We can easily add a control for the zoom level. What’s great is that iOS system handles the zoom automatically, and your app get notified the zoom level to be shown in your own UI:
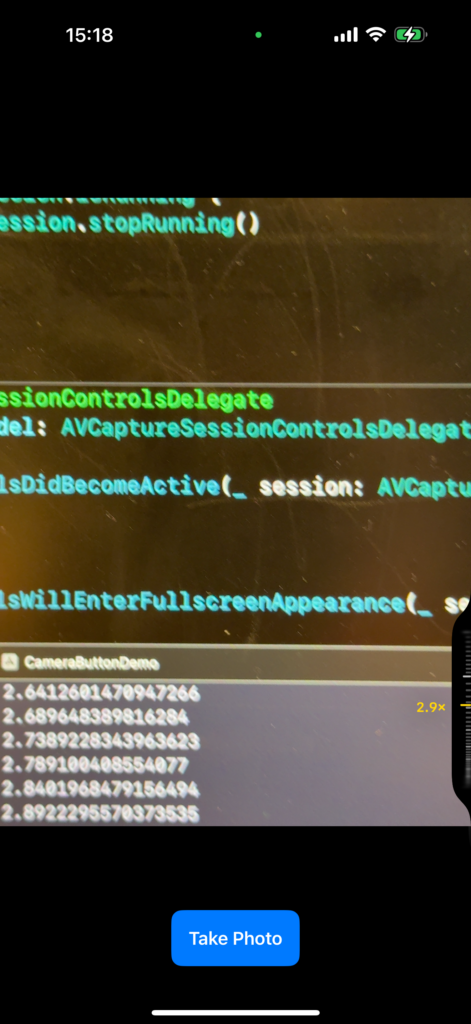
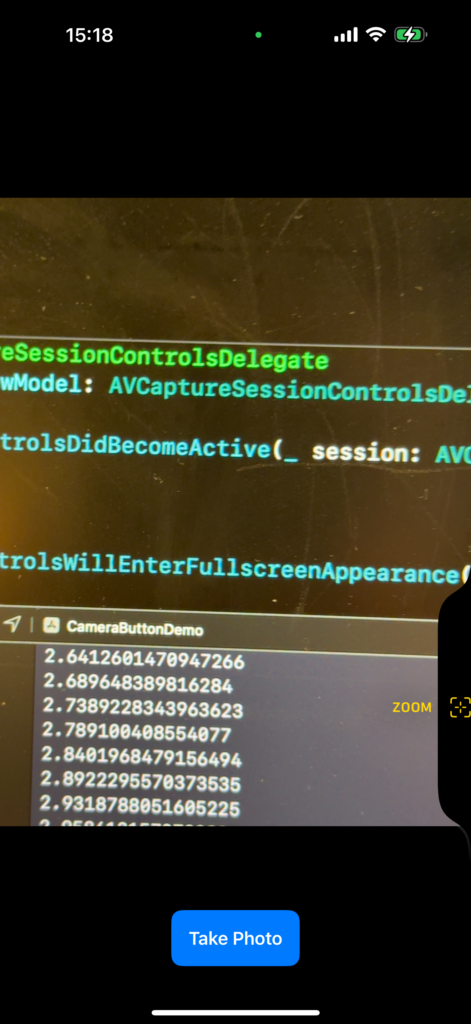
To get started, first, set a camera control delegate to your camera session:
self.session.setControlsDelegate(self, queue: self.cameraControlQueue)Now, conform your class to AVCaptureSessionControlsDelegate and add the required functions.
// MARK: - AVCaptureSessionControlsDelegate
extension CameraViewModel: AVCaptureSessionControlsDelegate {

    func sessionControlsDidBecomeActive(_ session: AVCaptureSession) {
        return
    }

    func sessionControlsWillEnterFullscreenAppearance(_ session: AVCaptureSession) {
        return
    }

    func sessionControlsWillExitFullscreenAppearance(_ session: AVCaptureSession) {
        return
    }

    func sessionControlsDidBecomeInactive(_ session: AVCaptureSession) {
        return
    }

}
Even if you do nothing in the above functions, you have to implement the delegate in order to use the camera control features.
Now, we will initialize the system zoom control:
let systemZoomSlider = AVCaptureSystemZoomSlider(device: backCamera) { zoomFactor in
    // Calculate and display a zoom value.
    let displayZoom = backCamera.displayVideoZoomFactorMultiplier * zoomFactor
    // Update the user interface.
    print(displayZoom)
}
Here, we provide the camera device as the input. Within the code block, the system will run our code whenever the zoom level changes.
We will then remove all existing controls of the camera, and add the system zoom slider:
/// remove existing camera controls first
self.session.controls.forEach({ self.session.removeControl($0) })

/// add new ones
let controlsToAdd: [AVCaptureControl] = [systemZoomSlider]

for control in controlsToAdd {
    if self.session.canAddControl(control) {
        self.session.addControl(control)
    }
}
Here is my updated CameraViewModel
// MARK: - Unified Camera ViewModel
class CameraViewModel: NSObject, ObservableObject {

    // Session states
    enum CameraSetupState {
        case idle
        case configured
        case permissionDenied
        case failed
    }

    @Published var setupState: CameraSetupState = .idle
    @Published var capturedPhoto: UIImage? = nil
    @Published var permissionGranted: Bool = false

    let session = AVCaptureSession()
    private let photoOutput = AVCapturePhotoOutput()
    private var videoInput: AVCaptureDeviceInput?

    // Dispatch queue for configuring the session
    private let configurationQueue = DispatchQueue(label: "com.example.camera.config")
    private let cameraControlQueue = DispatchQueue(label: "com.example.camera.control")

    override init() {
        super.init()
    }

    deinit {
        stopSession()
    }

    // MARK: - Public API

    /// Checks camera permissions and configures session if authorized.
    func requestAccessIfNeeded() { ... }

    /// Initiate photo capture.
    func capturePhoto() { ... }

    // MARK: - Session Configuration

    private func configureSessionIfIdle() { ... }

    private func addCameraInput() {
        do {
            guard let backCamera = AVCaptureDevice.default(.builtInWideAngleCamera,
                                                           for: .video,
                                                           position: .back) else {
                print("CameraViewModel: Back camera is unavailable.")
                setupState = .idle
                session.commitConfiguration()
                return
            }

            let cameraInput = try AVCaptureDeviceInput(device: backCamera)
            if session.canAddInput(cameraInput) {
                session.addInput(cameraInput)
                videoInput = cameraInput
                DispatchQueue.main.async {
                    self.setupState = .configured
                }
            } else {
                print("CameraViewModel: Unable to add camera input to session.")
                setupState = .idle
                session.commitConfiguration()
            }

            // configure for camera control button
            let systemZoomSlider = AVCaptureSystemZoomSlider(device: backCamera) { zoomFactor in
                // Calculate and display a zoom value.
                let displayZoom = backCamera.displayVideoZoomFactorMultiplier * zoomFactor
                // Update the user interface.
                print(displayZoom)
            }

            /// remove existing camera controls first
            self.session.controls.forEach({ self.session.removeControl($0) })

            /// add new ones
            let controlsToAdd: [AVCaptureControl] = [systemZoomSlider]

            for control in controlsToAdd {
                if self.session.canAddControl(control) {
                    self.session.addControl(control)
                }
            }

            /// set delegate
            self.session.setControlsDelegate(self, queue: self.cameraControlQueue)
            //
        } catch {
            print("CameraViewModel: Error creating camera input - \(error)")
            setupState = .failed
            session.commitConfiguration()
        }
    }

    private func addPhotoOutput() { ... }

    private func startSessionIfReady() { ... }

    private func stopSession() { ... }
}

// MARK: - AVCaptureSessionControlsDelegate
extension CameraViewModel: AVCaptureSessionControlsDelegate {

    func sessionControlsDidBecomeActive(_ session: AVCaptureSession) {
        return
    }

    func sessionControlsWillEnterFullscreenAppearance(_ session: AVCaptureSession) {
        return
    }

    func sessionControlsWillExitFullscreenAppearance(_ session: AVCaptureSession) {
        return
    }

    func sessionControlsDidBecomeInactive(_ session: AVCaptureSession) {
        return
    }

}
Notice that I have added a cameraControlQueue, set the delegate, and set the system zoom slider within my addCameraInput function.
Now, if you run your program on your iPhone, you will notice that you can use the zoom slider within your own app:
Add exposure control
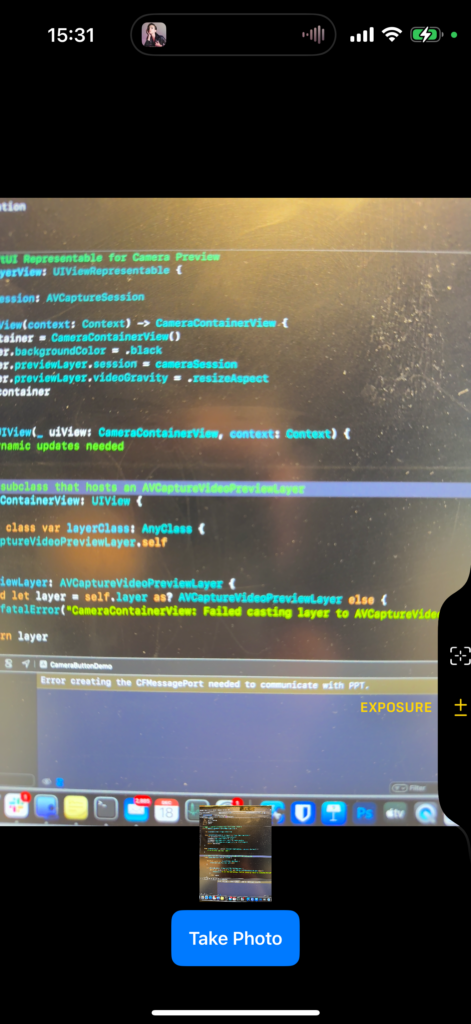
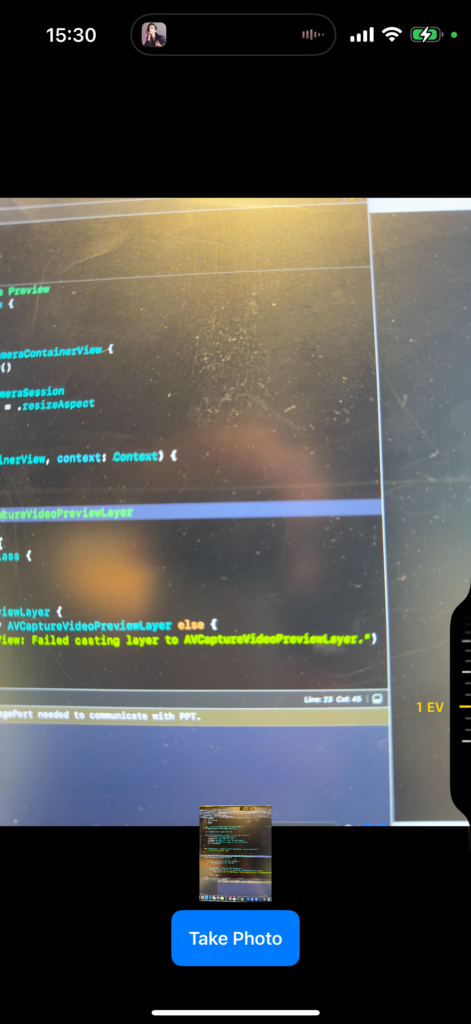
You can easily add control for exposure by adding one more camera control to the array:
// configure for camera control button
let systemZoomSlider = AVCaptureSystemZoomSlider(device: backCamera) { zoomFactor in
    // Calculate and display a zoom value.
    let displayZoom = backCamera.displayVideoZoomFactorMultiplier * zoomFactor
    // Update the user interface.
    print(displayZoom)
}

let systemBiasSlider = AVCaptureSystemExposureBiasSlider(device: backCamera)

/// remove existing camera controls first
self.session.controls.forEach({ self.session.removeControl($0) })

/// add new ones
let controlsToAdd: [AVCaptureControl] = [systemZoomSlider, systemBiasSlider]

for control in controlsToAdd {
    if self.session.canAddControl(control) {
        self.session.addControl(control)
    }
}
Now, when you launch the app and quickly double tap (not press) on the camera button, you will see 2 options, and you can switch to the exposure control (which is a slider provided by the system)
Add custom slider

You can initialize a custom slider, and use setActionQueue to get notified when the value changes.
Here is a little joke where you control the time (4th dimension( with my camera app (fancy right?)
let timeTravelSlider = AVCaptureSlider("MszProと時間旅行", symbolName: "pawprint.fill", in: -10...10)
// Perform the slider's action on the session queue.
timeTravelSlider.setActionQueue(self.cameraControlQueue) { position in
    print(position)
}
Add custom picker
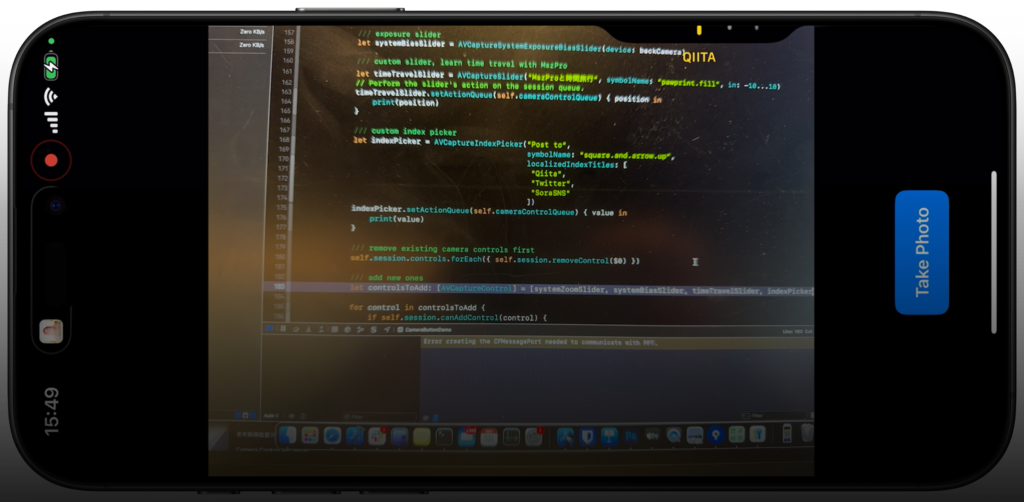
You can also allow the user to pick one of the many given options (for example, a list of filters)
let indexPicker = AVCaptureIndexPicker("Post to",
                                       symbolName: "square.and.arrow.up",
                                       localizedIndexTitles: [
                                        "Qiita",
                                        "Twitter",
                                        "SoraSNS"
                                       ])
indexPicker.setActionQueue(self.cameraControlQueue) { value in
    print(value)
}
Notice, the value you get within the function is an index number.
That is how you do it!
Did you learn how to add custom camera control options within your own app? Here is the complete code:
import SwiftUI
import AVFoundation
import Combine
import AVKit

// MARK: - SwiftUI Representable for Camera Preview
struct CameraLayerView: UIViewRepresentable {

    let cameraSession: AVCaptureSession

    func makeUIView(context: Context) -> CameraContainerView {
        let container = CameraContainerView()
        container.backgroundColor = .black
        container.previewLayer.session = cameraSession
        container.previewLayer.videoGravity = .resizeAspect
        return container
    }

    func updateUIView(_ uiView: CameraContainerView, context: Context) {
        // No dynamic updates needed
    }

    // A UIView subclass that hosts an AVCaptureVideoPreviewLayer
    class CameraContainerView: UIView {

        override class var layerClass: AnyClass {
            AVCaptureVideoPreviewLayer.self
        }

        var previewLayer: AVCaptureVideoPreviewLayer {
            guard let layer = self.layer as? AVCaptureVideoPreviewLayer else {
                fatalError("CameraContainerView: Failed casting layer to AVCaptureVideoPreviewLayer.")
            }
            return layer
        }
    }
}

// MARK: - Unified Camera ViewModel
class CameraViewModel: NSObject, ObservableObject {

    // Session states
    enum CameraSetupState {
        case idle
        case configured
        case permissionDenied
        case failed
    }

    @Published var setupState: CameraSetupState = .idle
    @Published var capturedPhoto: UIImage? = nil
    @Published var permissionGranted: Bool = false

    let session = AVCaptureSession()
    private let photoOutput = AVCapturePhotoOutput()
    private var videoInput: AVCaptureDeviceInput?

    // Dispatch queue for configuring the session
    private let configurationQueue = DispatchQueue(label: "com.example.camera.config")
    private let cameraControlQueue = DispatchQueue(label: "com.example.camera.control")

    override init() {
        super.init()
    }

    deinit {
        stopSession()
    }

    // MARK: - Public API

    /// Checks camera permissions and configures session if authorized.
    func requestAccessIfNeeded() {
        let authStatus = AVCaptureDevice.authorizationStatus(for: .video)
        switch authStatus {
            case .authorized:
                permissionGranted = true
                configureSessionIfIdle()
            case .notDetermined:
                AVCaptureDevice.requestAccess(for: .video) { [weak self] granted in
                    guard let self = self else { return }
                    DispatchQueue.main.async {
                        if granted {
                            self.permissionGranted = true
                            self.configureSessionIfIdle()
                        } else {
                            self.setupState = .permissionDenied
                        }
                    }
                }
            default:
                // Denied or Restricted
                setupState = .permissionDenied
        }
    }

    /// Initiate photo capture.
    func capturePhoto() {
        guard setupState == .configured else { return }
        let settings = AVCapturePhotoSettings()
        photoOutput.capturePhoto(with: settings, delegate: self)
    }

    // MARK: - Session Configuration

    private func configureSessionIfIdle() {
        configurationQueue.async { [weak self] in
            guard let self = self, self.setupState == .idle else { return }

            self.session.beginConfiguration()

            self.session.sessionPreset = .photo

            self.addCameraInput()
            self.addPhotoOutput()

            // save configuration and start camera session
            self.session.commitConfiguration()
            self.startSessionIfReady()
        }
    }

    private func addCameraInput() {
        do {
            guard let backCamera = AVCaptureDevice.default(.builtInWideAngleCamera,
                                                           for: .video,
                                                           position: .back) else {
                print("CameraViewModel: Back camera is unavailable.")
                setupState = .idle
                session.commitConfiguration()
                return
            }

            let cameraInput = try AVCaptureDeviceInput(device: backCamera)
            if session.canAddInput(cameraInput) {
                session.addInput(cameraInput)
                videoInput = cameraInput
                DispatchQueue.main.async {
                    self.setupState = .configured
                }
            } else {
                print("CameraViewModel: Unable to add camera input to session.")
                setupState = .idle
                session.commitConfiguration()
            }

            // configure for camera control button

            /// zoom slider
            let systemZoomSlider = AVCaptureSystemZoomSlider(device: backCamera) { zoomFactor in
                // Calculate and display a zoom value.
                let displayZoom = backCamera.displayVideoZoomFactorMultiplier * zoomFactor
                // Update the user interface.
                print(displayZoom)
            }

            /// exposure slider
            let systemBiasSlider = AVCaptureSystemExposureBiasSlider(device: backCamera)

            /// custom slider, learn time travel with MszPro
            let timeTravelSlider = AVCaptureSlider("MszProと時間旅行", symbolName: "pawprint.fill", in: -10...10)
            // Perform the slider's action on the session queue.
            timeTravelSlider.setActionQueue(self.cameraControlQueue) { position in
                print(position)
            }

            /// custom index picker
            let indexPicker = AVCaptureIndexPicker("Post to",
                                                   symbolName: "square.and.arrow.up",
                                                   localizedIndexTitles: [
                                                    "Qiita",
                                                    "Twitter",
                                                    "SoraSNS"
                                                   ])
            indexPicker.setActionQueue(self.cameraControlQueue) { value in
                print(value)
            }

            /// remove existing camera controls first
            self.session.controls.forEach({ self.session.removeControl($0) })

            /// add new ones
            let controlsToAdd: [AVCaptureControl] = [systemZoomSlider, systemBiasSlider, timeTravelSlider, indexPicker]

            for control in controlsToAdd {
                if self.session.canAddControl(control) {
                    self.session.addControl(control)
                }
            }

            /// set delegate
            self.session.setControlsDelegate(self, queue: self.cameraControlQueue)
            //
        } catch {
            print("CameraViewModel: Error creating camera input - \(error)")
            setupState = .failed
            session.commitConfiguration()
        }
    }

    private func addPhotoOutput() {
        guard session.canAddOutput(photoOutput) else {
            print("CameraViewModel: Cannot add photo output.")
            setupState = .failed
            session.commitConfiguration()
            return
        }
        session.addOutput(photoOutput)
        photoOutput.maxPhotoQualityPrioritization = .quality
        DispatchQueue.main.async {
            self.setupState = .configured
        }
    }

    private func startSessionIfReady() {
        guard setupState == .configured else { return }
        session.startRunning()
    }

    private func stopSession() {
        configurationQueue.async { [weak self] in
            guard let self = self else { return }
            if self.session.isRunning {
                self.session.stopRunning()
            }
        }
    }
}

// MARK: - AVCaptureSessionControlsDelegate
extension CameraViewModel: AVCaptureSessionControlsDelegate {

    func sessionControlsDidBecomeActive(_ session: AVCaptureSession) {
        return
    }

    func sessionControlsWillEnterFullscreenAppearance(_ session: AVCaptureSession) {
        return
    }

    func sessionControlsWillExitFullscreenAppearance(_ session: AVCaptureSession) {
        return
    }

    func sessionControlsDidBecomeInactive(_ session: AVCaptureSession) {
        return
    }

}

// MARK: - AVCapturePhotoCaptureDelegate
extension CameraViewModel: AVCapturePhotoCaptureDelegate {
    func photoOutput(_ output: AVCapturePhotoOutput,
                     didFinishProcessingPhoto photo: AVCapturePhoto,
                     error: Error?) {

        guard error == nil else {
            print("CameraViewModel: Error capturing photo - \(error!)")
            return
        }
        guard let photoData = photo.fileDataRepresentation() else {
            print("CameraViewModel: No photo data found.")
            return
        }
        self.capturedPhoto = UIImage(data: photoData)
    }
}

// MARK: - SwiftUI Main View
struct ContentView: View {

    @ObservedObject var viewModel = CameraViewModel()

    var body: some View {
        GeometryReader { _ in
            ZStack(alignment: .bottom) {
                CameraLayerView(cameraSession: viewModel.session)
                    .onAppear {
                        viewModel.requestAccessIfNeeded()
                    }
                    .edgesIgnoringSafeArea(.all)
                    .onCameraCaptureEvent() { event in
                        if event.phase == .began {
                            self.viewModel.capturePhoto()
                        }
                    }

                // Capture button
                VStack {
                    Spacer()

                    Button {
                        viewModel.capturePhoto()
                    } label: {
                        Text("Take Photo")
                            .font(.headline)
                            .foregroundColor(.white)
                            .padding()
                            .background(Color.blue)
                            .cornerRadius(10)
                    }
                    .padding(.bottom, 20)
                }

                // Thumbnail of the captured photo
                if let image = viewModel.capturedPhoto {
                    Image(uiImage: image)
                        .resizable()
                        .aspectRatio(contentMode: .fit)
                        .frame(width: 120, height: 90)
                        .padding(.bottom, 80)
                }
            }
        }
        .task {
            let supportsCameraButton = self.viewModel.session.supportsControls

        }
    }
}

// MARK: - SwiftUI Preview
#Preview {
    ContentView()
}
Enjoy!
